Table of Contents
Advertisement
Available languages
Available languages
MEDIDOR DE HUMEDAD PARA MADERA
Y MATERIALES DE CONSTRUCCIÓN /
MISURATORE DI UMIDITÀ NEL LEGNO
E NELLE COSTRUZIONI
MEDIDOR DE HUMEDAD PARA MADERA
Y MATERIALES DE CONSTRUCCIÓN
Instrucciones de utilización y de seguridad
MISURATORE DI UMIDITÀ NEL LEGNO
E NELLE COSTRUZIONI
Indicazioni per l'uso e per la sicurezza
APARELHO DE MEDIÇÃO DA HUMIDADE
DE PEDRA E MADEIRA
Instruções de utilização e de segurança
MOISTURE METER
Operation and Safety Notes
BAU- UND HOLZFEUCHTEMESSGERÄT
Bedienungs- und Sicherheitshinweise
IAN 271367
Advertisement
Chapters
Table of Contents

Related Manuals for Powerfix Profi HG00384C


Summary of Contents for Powerfix Profi HG00384C
- Page 1 MEDIDOR DE HUMEDAD PARA MADERA Y MATERIALES DE CONSTRUCCIÓN / MISURATORE DI UMIDITÀ NEL LEGNO E NELLE COSTRUZIONI MEDIDOR DE HUMEDAD PARA MADERA Y MATERIALES DE CONSTRUCCIÓN Instrucciones de utilización y de seguridad MISURATORE DI UMIDITÀ NEL LEGNO E NELLE COSTRUZIONI Indicazioni per l’uso e per la sicurezza APARELHO DE MEDIÇÃO DA HUMIDADE DE PEDRA E MADEIRA...
- Page 2 Instrucciones de utilización y de seguridad Página 5 IT / MT Indicazioni per l’uso e per la sicurezza Pagina 18 Instruções de utilização e de segurança Página 31 GB / MT Operation and Safety Notes Page 43 DE / AT / CH Bedienungs- und Sicherheitshinweise Seite...
-
Page 5: Table Of Contents
Uso adecuado ......Página Descripción de las piezas ..........Página Características técnicas ..Página Contenido ........Página Indicaciones generales de seguridad ......Página Indicaciones de seguridad acerca de las pilas ......Página Insertar / Cambiar la pila ......Página Puesta en funcionamiento Antes de realizar la medición .. -
Page 6: Uso Adecuado
Medidor de humedad para madera y materiales de construcción Uso adecuado Este aparato está indicado para medir la hume- dad de la madera y de materiales de construc- ción, por ejemplo, en la leña, papel, cartón, madera maciza para construcción, argamasa, hormigón o yesos. -
Page 7: Indicaciones Generales De Seguridad
Características técnicas Tensión de funcionamiento: , 15 mA Tipo de pila: 6F22 / 6LR61 (pila en bloque 9 V) Grado de exactitud: ver apartado „Realizar medición“ Temperatura de funcionamiento: 0 °C - 40 °C Clase de protección: IP 20 Desglose: 0,1 % Humedad atmosférica: hasta un máximo del 80 % (relativa) -
Page 8: Indicaciones De Seguridad Acerca De Las Pilas
Compruebe que el producto se encuentra en perfectas condiciones antes de ponerlo en funcionamiento! ¡Si el aparato está averiado, no lo utilice en ningún caso! ¡No exponga el aparato a la humedad! O podría resultar dañado. Este producto puede ser utilizado por niños mayores de 8 años, así... -
Page 9: Cambiar La Pila
¡No recargar nunca pilas no recargables, no poner en cortocircuito ni abrirlas! ¡No arrojarlas nunca al fuego o al agua! ¡No someter las pilas a esfuerzos mecánicos! Peligro de derrame de las pilas ¡En caso de que las pilas se sulfaten, retírelas inmediatamente del aparato para evitar daños! ¡Evite el contacto con la piel, ojos y mucosas! ¡En caso de que el ácido de las pilas entre en... -
Page 10: Puesta En Funcionamiento
mente gastada y se debe cambiar. Las pilas gastadas pueden ocasionar resultados de medición erróneos. Para colocar la pila, proceda como sigue: A bra la tapa del compartimento de las pilas de la parte trasera del aparato. Con ayuda de la tira de tela, que se encuentra en el interior del compartimento de las pilas, po- drá... -
Page 11: Realizar Medición
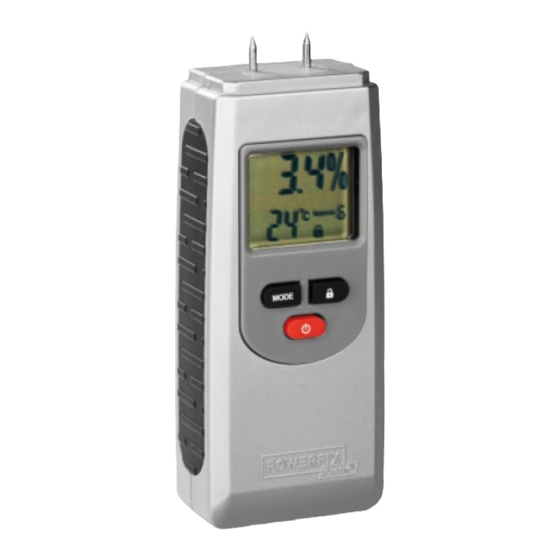
Nota: Los sensores son puntiagudos y po- drían ejercer presión o dañar las superficies. Retire los restos húmedos de la superficie antes de proceder con la medición. Mida en distintas zonas y calcule un valor medio. Tenga en cuenta que la salinidad aumenta la conductividad del agua. - Page 12 Dígito Material Rango de medición Haya, pícea, alerce, 6–44 % abedul, cerezo, nogal, roble, pino, arce, fresno, douglasia Capa de cemento, 1,4–7,4 % hormigón, yeso Bloque de anhidrita 0,0–4,1 % Mortero de cemento 0,8–5,1 % Mortero de cal 0,4–3,7 % Ladrillo 0,0–8,5 % Nota: La pantalla muestra „0,0 %“...
-
Page 13: Indicación De Estado De La Pila
Nota: El medidor de humedad se apaga automáticamente cuando el aparato no se utiliza durante 60 segundos. Indicación de estado de la pila Si la carga de la pila es baja, en la pantalla aparece el símbolo de la pila . -
Page 14: Limpieza Y Cuidados
Problema Posible causa y solución En la pantalla Se ha superado o no se ha aparece alcanzado el rango de la indicación medición. "Lo" o "Hi". El indicador ¿Aparece el símbolo del de la pantalla candado en la pantalla? no reacciona. Pulse el botón A penas se La batería está... -
Page 15: Almacenamiento
Almacenamiento Si no va a utilizar el aparato, coloque la tapa protectora Retire las pilas siempre que no vaya a necesitar el aparato durante un periodo prolongado de tiempo. Conserve el aparato en un lugar seco. Desecho del producto El embalaje está compuesto por mate- riales no contaminantes que pueden ser desechados en el centro de reciclaje local. -
Page 16: Garantía
¡Daños medioambientales debidos a un reciclaje incorrecto de las pilas! Las pilas no deben eliminarse junto con los resi- duos domésticos. Estas pueden contener metales pesados tóxicos que deben tratarse conforme a la normativa aplicable a los residuos especiales. Los símbolos químicos de los metales pesados son: Cd = cadmio, Hg = mercurio, Pb = plomo. - Page 17 quedará anulada si el producto resulta dañado o es utilizado o mantenido de forma inadecuada. La garantía cubre defectos de materiales o de fabricación. Esta garantía no cubre aquellos com- ponentes del producto sometidos a un desgaste normal y que, por ello, puedan considerarse piezas de desgaste (por ej.
- Page 18 Utilizzo secondo la destinazione d’uso ..Pagina 19 Descrizione dei componenti ........Pagina 19 Dati tecnici ........Pagina 20 Contenuto della confezione ........Pagina 20 Avvertenze generali di sicurezza ........Pagina 20 Avvertenze di sicurezza per le batterie ........Pagina 21 Inserimento / sostituzione delle batterie...
-
Page 19: Utilizzo Secondo La Destinazione D'uso
Misuratore di umidità nel legno e nelle costruzioni Utilizzo secondo la destinazione d’uso L‘apparecchio è adatto alla misurazione dell‘umi- dità del legno e dei materiali da costruzione, ad esempio legna da ardere, carta, cartone, legna da costruzione, malta, calcestruzzo o intonaco. L’apparecchio è... -
Page 20: Dati Tecnici
Dati tecnici Tensione di funzionamento: 9 V , 15 mA Tipo di batteria: 6F22 / 6LR61 (batte- ria rettangolare da 9 V) Precisione della misurazione: vedere il capitolo „Esecuzione della misurazione“ Temperatura di esercizio: 0 °C a 40 °C Classe di protezione: IP 20 Risoluzione: 0,1 %... -
Page 21: Avvertenze Di Sicurezza Per Le Batterie
Controllare l’apparecchio prima della messa in funzione per rilevare eventuali danni. Non mettere in funzione l‘apparecchio se danneg- giato. Non esporre l‘apparecchio all‘umidità. In caso contrario l‘ apparecchio potrebbe danneggiarsi. Questo dispositivo può essere utilizzato da bambini di età superiore agli 8 anni, da per- sone con capacità... - Page 22 Non ricaricare mai batterie non ricaricabili, non cortocircuitarle e / o aprirle. Non gettare mai le batterie nel fuoco o in acqua. Non esercitare alcuna pressione meccanica sulle batterie. Pericolo di perdite delle batterie Nel caso di perdite delle batterie, rimuoverle subito dall‘apparecchio per evitare danni.
-
Page 23: Inserimento/Sostituzione Delle Batterie
Inserimento/sostituzione delle batterie Se nel display è apparso il simbolo della batteria , la batteria inserita è pressoché esaurita e deve essere sostituita. Le batterie scariche possono alterare il risultato di misura. Per l‘inserimento della batteria, procedere come segue: A prire il coperchio del vano portabatterie posto sul retro dell‘apparecchio. -
Page 24: Esecuzione Della Misurazione
In caso di superfici ruvide, aumentare even- tualmente la pressione dei sensori di misura- zione. In presenza di superfici sensibili, eseguire la misurazione in un punto al di fuori del campo visivo. Avvertenza: i sensori di misurazione sono appuntiti e potrebbero lasciare dei segni sulle superfici oppure danneggiarle. - Page 25 Procedere come descritto di seguito: aprire il vano batterie , estrarre le batterie e premere con un oggetto appuntito il tasto RESET che si trova al centro in basso sul fondo. Premere nuovamente il tasto MODE impostare il misuratore di umidità a seconda del materiale da misurare.
-
Page 26: Visualizzazione Della Batteria
circa 1–2 secondi potrà essere letto il valore percentuale. Nel caso la misurazione venga effettuata in un campo in cui il display non può essere letto, premere il tasto per bloccare l‘indica- zione sul display. Il display mostrerà in ag- giunta il simbolo a forma di lucchetto. -
Page 27: Risoluzione Dei Problemi
Risoluzione dei problemi Errore Possibile causa e soluzione Accertarsi che l'apparecchio Il risultato della misura- sia impostato per il materiale zione è pale- giusto. Accertarsi che i sensori semente di misurazione siano pre- troppo alto o muti correttamente sul materiale. troppo basso. -
Page 28: Pulizia E Cura
Pulizia e cura Assicurarsi che nell‘apparecchio non preni- trino liquidi. In caso contrario sussiste il pericolo di danno materiale. Pulire l‘apparecchio esclusivamente con un panno leggermente umido. Pulire le punte di misurazione con un panno leggermente umido ed infine asciugarle. Controllare prima di ogni utilizzo che l‘appa- recchio non presenti danni esterni visibili. -
Page 29: Garanzia
Non gettare il prodotto usurato tra i rifiuti domestici ma, per motivi di tutela dell‘ambiente, provvedere al suo corretto smaltimento. È possibile infor- marsi sui luoghi di raccolta e i loro orari di apertura presso l‘amministra- zione competente. Le batterie difettose o usate devono essere riciclate ai sensi della Direttiva 2006 / 66 / CE e relative modifiche. - Page 30 Se entro 3 anni dalla data di acquisto di questo prodotto si rileva un difetto di materiale o di fab- bricazione, il prodotto verrà riparato o sostituito gratuitamente, a nostra discrezione. Il termine di garanzia ha inizio a partire dalla data di acqui- sto.
- Page 31 Utilização adequada ... Página 32 Descrição das peças ..... Página 32 Dados técnicos ......Página 32 Material fornecido ....Página 33 Indicações gerais de segurança ......Página 33 Indicações de segurança relativas às pilhas ......Página 34 Inserir / substituir a pilha ......
-
Page 32: Utilização Adequada
Aparelho de medição da humidade de pedra e madeira Utilização adequada O aparelho destina-se a mediar a humidade da madeira e da construção, por exemplo em lenha, papel, cartão, madeira para construção, arga- massa, betão ou reboco. O aparelho destina-se apenas ao uso privado e não ao uso industrial. -
Page 33: Material Fornecido
Precisão de medição: veja capítulo „Fazer medição“ Temperatura de funcionamento: 0 °C a 40 °C Classe de proteção: IP 20 Resolução: 0,1 % Humidade do ar: até no máximo 80 % (relativa) Material fornecido Verifique o material fornecido ao desembalar, para averiguar se este se encontra completo e se o ar- tigo e todas as peças se encontram em bom estado. -
Page 34: Indicações De Segurança Relativas Às Pilhas
com capacidades físicas, sensoriais ou men- tais reduzidas ou deficiências na experiência e.ou conhecimento se for vigiadas ou instruí- das em relação ao uso seguro do aparelho e se compreenderem os perigos que daí pos- sam resultar. As crianças não devem brincar com o aparelho. -
Page 35: Inserir /Substituir A Pilha
Evite o contacto com a pele, os olhos e mu- cosas! Em caso de contacto com o ácido das pilhas, lave imediatamente as zonas afetadas com água limpa e consulte um médico logo que possível! Utilize apenas pilhas do mesmo tipo! Não misture pilhas antigas com pilhas novas! Evite condições e temperaturas extremas que possam ter efeito sobre as pilhas, por ex. -
Page 36: Colocação Em Funcionamento
do compartimento da pilha, conseguirá retirar a pilha usada facilmente. Puxe somente pela tira de tecido. R etire a pilha usada. I nsira os contactos da pilha de bloco de 9 V nos contactos do conector de perfil. Tenha em atenção a polaridade correta. Esta é indicada através da forma do perfil dos con- tactos. -
Page 37: Fazer A Medição
No caso de madeira para chaminés, retire a casca caso necessário. Pressione os pinos de medição transversalmente em relação as fibras. Fazer a medição Prima o botão para ligar o medidor de humidade. No visualizador aparece „0,0 %“, a temperatura do ambiente em °C e o material anteriormente selecionado (1–6). - Page 38 Dígito Material Amplitude de medição Betonilhas, con- 1,4–7,4 % creto, gesso cimento de anidita 0,0–4,1 % argamassa de ci- 0,8–5,1 % mento manta de cal 0,4–3,7 % tijolo 0,0–8,5 % Aviso: Medições abaixo do espectro de medição mostram „0,0 %“ ou „Lo“ no visualizador.
-
Page 39: Indicação Das Pilhas
Indicação das pilhas Com um estado de pilha fraco, surge no visor o símbolo da pilha . Se este símbolo apare- cer, substitua a pilha o mais rapidamente possí- vel. Pilhas vazias podem corromper o resultado da medição. A substituição das pilhas é descrita no capítulo „Inserir / substituir a pilha“. -
Page 40: Limpeza E Conservação
Erro Possíveis causas e soluções A visuali- A bateria está gasta. zação no Para isto veja o capítulo ecrã não „Inserir / trocar bateria“. pode ser reconhecida. Cargas eletrostáticas podem causar interferências no funcionamento. No caso de interferências deste tipo no funcionamento, retire as pilhas durante um curto espaço de tempo e volte a colocá-las. -
Page 41: Eliminação
Eliminação A embalagem é feita de materiais não poluentes que podem ser eliminados nos contentores de reciclagem locais. As possibilidades de reciclagem dos artigos utilizados poderão ser averiguadas no seu Município ou Câmara Municipal. Não deposite o produto utilizado no lixo doméstico, a favor da proteção do ambiente. -
Page 42: Garantia
Garantia O aparelho foi cuidadosamente fabricado segundo rigorosas directivas de qualidade e meti- culosamente testado antes da sua distribuição. Em caso de falhas deste aparelho, possui direitos legais relativamente ao vendedor do aparelho. Os seus direitos legais não estão limitados pela garantia representada de seguida. - Page 43 Intended use ........Page 44 Parts description ......Page 44 Technical Data .......Page 44 Scope of delivery ......Page 45 General safety instructions ........Page 45 Battery safety information .....Page 46 Inserting / changing the battery ....Page 47 Start-up Before you take a measurement ..Page 48 Taking a measurement ......Page 48 Battery display........Page 50 Temperature display ......Page 50...
-
Page 44: Intended Use
Moisture Meter Intended use This device is suitable for measuring wood and building moisture, for example in firewood, paper, cardboard, mortar, concrete or plaster. The device is only intended for use in private households, and not intended for commercial use. Parts description Protective cap Measuring pins... -
Page 45: Scope Of Delivery
Protection class: IP 20 Resolution: 0.1% Air humidity: up to a maximum of 80% (relative) Scope of delivery Immediately after unpacking please check the package contents for completeness and if all parts and the product are in good condition. 1 Moisture Meter 1 9 V-blockbattery 1 Instructions for use General safety instructions... -
Page 46: Battery Safety Information
user maintenance should not be performed by children without supervision. The measuring pins are very sharp. Always be careful when using this de- vice. Always attach the protective cap to the device when not in use. Otherwise there is a risk of injury! Battery safety information... -
Page 47: Changing The Battery
Avoid extreme environmental conditions and temperatures, which could affect batteries, e.g. above radiators / in direct sunlight. Remove the batteries from the device if they have not been used for a long period. Risk of property damage Only use the specified battery type! When inserting the battery ensure the correct polarity! This is shown in the battery compart- ment. -
Page 48: Start-Up
Insert the battery in the battery compartment and close the cover again, so that it audibly latches into place. Start-up Before you take a measurement Ensure that both measuring pins touch the surface of the material at the same time. Increase the pressure on the measuring pins for rough surfaces if necessary. - Page 49 and the previously selected material (1–6) appears. Press the button and hold it down for approximately 5 seconds to switch the tem- perature display between °C and °F. If the display does not show ‚0.0 %‘ after switching it on, you can calibrate the device. Do this as follows: Open the battery compartment , remove...
-
Page 50: Battery Display
Remove the protective cap Press both measuring pins against the sur- face at the same time. After 1-2 seconds you can read the percentage value. If you are taking a measurement in an area in which you cannot read the display, press the button to freeze the result on the display. -
Page 51: Troubleshooting
Troubleshooting Error Possible causes and solutions Check whether the device is The measure- ment is obvi- set to the correct material. ously too high Check if the measuring pins or low. are correctly pressed against the material. Repeat the measurement process. The measurement range has The display been exceeded or you have... -
Page 52: Storage
Check the device for visible external damage before every use. Check the measuring pins for damage before every use. Storage Always attach the protective cap to the device when not in use. Always remove the batteries if the device will not be used for extended periods. -
Page 53: Warranty
amendments. Please return the batteries and / or the device to the available collection points. Improper disposal of batteries can harm the environment! Never dispose of batteries in your household waste. They may contain toxic heavy metals and are sub- ject to hazardous waste regulations. - Page 54 The warranty applies to faults in material or man- ufacture. This warranty does not cover product parts subject to normal wear, thus possibly considered consumables (e.g. batteries) or for damage to frag- ile parts, e.g. switches, rechargeable batteries or glass parts. 54 GB/MT...
- Page 55 Bestimmungsgemäße Verwendung ........Seite 56 Teilebeschreibung ......Seite 56 Technische Daten ......Seite 56 Lieferumfang ........Seite 57 Allgemeine Sicherheitshinweise ....Seite 57 Sicherheitshinweise für Batterien ..Seite 58 Batterie einlegen / wechseln ..........Seite 59 Inbetriebnahme Bevor Sie eine Messung durchführen ..Seite 60 Messung durchführen ......Seite 61 Batterieanzeige ........Seite 63 Temperaturanzeige .......Seite 63 Fehlerbehebung...
-
Page 56: Bestimmungsgemäße Verwendung
Bau- und Holzfeuchtemessgerät Bestimmungsgemäße Verwendung Das Gerät ist zum Messen von Holz- und Bau- feuchte geeignet, zum Beispiel in Brennhölzern, Papier, Pappe, Konstruktionshölzern, Mörtel, Be- ton oder Putz. Das Gerät ist nur für den Einsatz in privaten Haushalten und nicht für den gewerbli- chen Gebrauch vorgesehen. -
Page 57: Lieferumfang
Messgenauigkeit: siehe Kapitel „Messung durchführen“ Betriebstemperatur: 0 °C bis 40 °C Schutzklasse: IP 20 Auflösung: 0,1 % Luftfeuchtigkeit: bis maximal 80 % (relativ) Lieferumfang Kontrollieren Sie unmittelbar nach dem Auspacken den Lieferumfang auf Vollständigkeit sowie den ein- wandfreien Zustand des Produktes und aller Teile. 1 Bau- und Holzfeuchtemessgerät 1 9 V-Blockbatterie 1 Bedienungsanleitung... -
Page 58: Sicherheitshinweise Für Batterien
Wissen benutzt werden, wenn sie beaufsich- tigt oder bezüglich des sicheren Gebrauchs des Gerätes unterwiesen wurden und die dar- aus resultierenden Gefahren verstehen. Kinder dürfen nicht mit dem Gerät spielen. Reinigung und Benutzerwartung dürfen nicht von Kindern ohne Beaufsichtigung durchgeführt werden. Die Messstifte sind sehr spitz. -
Page 59: Batterie Einlegen / Wechseln
Batteriesäure die betroffenen Stellen sofort mit reichlich klarem Wasser und suchen Sie um- gehend einen Arzt auf. Verwenden Sie nur den angegebenen Batterie- typ. Verwenden Sie keine alten und neuen Batterien zusammen. Vermeiden Sie extreme Bedingungen und Tem- peraturen, die auf Batterien einwirken können, z. -
Page 60: Inbetriebnahme
befindet, können Sie die alte Batterie leichter herausnehmen. Ziehen Sie hierzu lediglich am Stoffstreifen. Entnehmen Sie ggf. die alte Batterie. Stecken Sie die Kontakte der 9 V-Blockbatterie auf die Kontakte des Profilsteckers. Achten Sie hierbei auf die richtige Polarität. Diese ist durch die Profilform der Kontakte vorgegeben. -
Page 61: Messung Durchführen
Entfernen Sie bei Kaminholz, falls notwendig, die Rinde. Drücken Sie die Messstifte quer zur Faserrichtung an verschiedenen Stellen in das Holz ein. Messung durchführen Drücken Sie die -Taste , um den Feuch- tigkeitsmesser einzuschalten. Im Display erscheint „0,0 %“, die Umgebungstempera- tur in °C und das zuvor gewählte Material (1–6). - Page 62 Ziffer Material Messbereich Zementestrich, 1,4–7,4 % Beton, Gips Anhydritestrich 0,0–4,1 % Zementmörtel 0,8–5,1 % Kalkmörtel 0,4–3,7 % Ziegelstein 0,0–8,5 % Hinweis: Bei Messungen, die unterhalb des Messbereichs liegen, zeigt das Display „0,0 %“ oder „Lo“ an. Bei Messungen, die oberhalb des Messbereichs liegen, zeigt das Display „Hi“...
-
Page 63: Batterieanzeige
Batterieanzeige Bei niedrigem Batterieladezustand erscheint im Display das Batteriesymbol . Tauschen Sie bei Erscheinen dieses Symbols schnellstmöglich die Batterie aus. Leere Batterien können das Messer- gebnis verfälschen. Der Batteriewechsel wird im Kapitel „Batterie einlegen / wechseln“ beschrieben. Temperaturanzeige Sie können in der Temperaturanzeige zwischen °C und °F wechseln, indem Sie die -Taste ca. -
Page 64: Reinigung Und Pflege
Fehler Mögliche Ursache und Lösung Die Anzeige Die Batterie ist erschöpft. im Display ist Sehen Sie hierzu das Kapitel kaum zu er- „Batterie einlegen / wechseln“. kennen. Elektrostatische Entladungen können zu Funktions- störungen führen. Entfernen Sie bei solchen Funk- tionsstörungen kurzzeitig die Batterien und setzen Sie sie erneut ein. -
Page 65: Entsorgung
Bewahren Sie das Gerät in einer trockenen Umgebung auf. Entsorgung Die Verpackung besteht aus umwelt- freundlichen Materialien, die Sie über die örtlichen Recyclingstellen entsor- gen können. Möglichkeiten zur Entsorgung des ausgedienten Produkts erfahren Sie bei Ihrer Gemeinde oder Stadtverwaltung. Werfen Sie Ihr Produkt, wenn es aus- gedient hat, im Interesse des Umwelt- schutzes nicht in den Hausmüll, sondern führen Sie es einer fachgerechten Ent-... -
Page 66: Garantie
wie folgt: Cd = Cadmium, Hg = Quecksilber, Pb = Blei. Geben Sie deshalb verbrauchte Batte- rien bei einer kommunalen Sammelstelle ab. Garantie Das Produkt wurde nach strengen Qualitätsrichtli- nien sorgfältig produziert und vor Anlieferung ge- wissenhaft geprüft. Im Falle von Mwängeln dieses Produkts stehen Ihnen gegen den Verkäufer des Produkts gesetzliche Rechte zu. - Page 67 OWIM GmbH & Co. KG Stiftsbergstraße 1 D-74167 Neckarsulm Model-No.: HG00384C Version: 09 / 2015 Estado de las informaciones Versione delle informazioni Estado das informações Last Information Update · Stand der Informationen: 11 / 2015 Ident.-No.: HG00384C112015-5 IAN 271367...
Need help?
Do you have a question about the HG00384C and is the answer not in the manual?
Questions and answers