
Related Manuals for Kramer VP-311DVI


Summary of Contents for Kramer VP-311DVI
-
Page 1: User Manual
Kramer Electronics, Ltd. USER MANUAL Model: VP-311DVI Automatic DVI / Audio Switcher... -
Page 2: Table Of Contents
Technical Specifications Figures Figure 1: VP-311DVI Automatic DVI / Audio Switcher Figure 2: Connecting the VP-311DVI Automatic DVI / Audio Switcher Figure 3: VP-311DVI Dipswitches Figure 4: Connecting the Contact Closure Remote Control PINS Figure 5: Connecting a PC without using a Null-modem Adapter... - Page 3 Contents Tables Table 1: Terminology Used in this User Manual Table 2: VP-311DVI Automatic DVI / Audio Switcher Features Table 3: Dipswitch Settings Table 4: Dipswitch Priority Setup Table 5: Crossover Cable RJ-45 PINOUT Table 6: Straight-through Cable RJ-45 PINOUT...
- Page 4 This addendum outlines three changes to the VP-311DVI user manual: The VP-311DVI comes with a customized DVI male to male cable with a smaller connector so that you can attach it to IN 2, while still being able to use the other DVI connectors.
- Page 5 ADDENDUM: Ethernet Cross Cable Wiring Connection This addendum describes the correct wiring for crossover cable connections and replaces the opening paragraph in the "Connecting the ETHERNET Port directly to a PC (Crossover Cable)" section in the User Manual as follows: Connecting the ETHERNET Port directly to a PC (Crossover Cable) You can connect the Ethernet port of the machine to the Ethernet port on your PC, via a crossover cable with RJ-45 connectors.
-
Page 6: Introduction
2 Downloadable from our Web site at http://www.kramerelectronics.com 3 Previously known as the IR-1 / IR-1-01 4 Download up-to-date Kramer user manuals from our Web site at http://www.kramerelectronics.com 5 The complete list of Kramer cables is on our Web site at http://www.kramerelectronics.com... -
Page 7: Overview
5-pin terminal block connector The VP-311DVI can operate either in the manual mode or in the auto mode: In the manual mode, the VP-311DVI acts as a regular switcher, switching the input video and audio signals to the output via the three front panel INPUT SELECT buttons. -
Page 8: Terminology Used In This User Manual
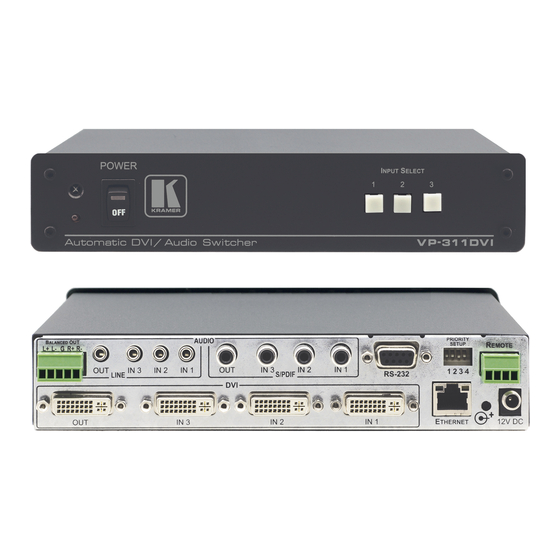
Protocol/Internet protocol in an intranet or an extranet. Protocol (TCP/IP) VP-311DVI Automatic DVI / Audio Switcher Figure 1 illustrates the front and rear panels of the VP-311DVI. Table 2 defines the front and rear panels of the VP-311DVI. -
Page 9: Figure 1: Vp-311Dvi Automatic Dvi / Audio Switcher
VP-311DVI Automatic DVI / Audio Switcher Figure 1: VP-311DVI Automatic DVI / Audio Switcher Table 2: VP-311DVI Automatic DVI / Audio Switcher Features Feature Function IR Receiver The red LED lights when receiving signals from the Infra-red remote control transmitter... -
Page 10: Connecting The Vp-311Dvi Automatic Dvi / Audio Switcher
1 You do not need to connect all the inputs 2 Switch OFF the power on each device before connecting it to your VP-311DVI. After connecting your VP-311DVI, switch on its power and then switch on the power on each device... -
Page 11: Figure 2: Connecting The Vp-311Dvi Automatic Dvi / Audio Switcher
Connecting the VP-311DVI Automatic DVI / Audio Switcher DVI/HDMI Plasma Display DVI Computer DVI-HDCP AV Receiver Graphics Source Compatible DVD Player Figure 2: Connecting the VP-311DVI Automatic DVI / Audio Switcher KRAMER: SIMPLE CREATIVE TECHNOLOGY... -
Page 12: Setting The Dipswitches
ON: automatic mode, inputs switch automatically to the output according to the priority setup Inputs 1, 2 and 3 can be set in priority according to your needs. The VP-311DVI will switch to the secondary input upon loss of the primary input signal, and back to the primary input when a signal is detected. -
Page 13: Priority Switching Applications
2 When in the manual mode (dipswitch 4 set to OFF), you can switch an input to the output using the front panel INPUT SELECT buttons 3 Input 1, 2 or 3 4 Note that unless the connection is permanent, the VP-311DVI will revert to an automatic switcher when the connection is removed KRAMER: SIMPLE CREATIVE TECHNOLOGY... -
Page 14: Controlling Via Rs-232 (For Example, Using A Pc)
Null-modem adapter and connect the Null-modem adapter with a 9-wire flat cable to the RS-232 DB9 port on your PC To connect a PC to the VP-311DVI unit, without using a Null-modem adapter: Connect the RS-232 DB9 port on your PC to the RS-232 DB9 rear panel... -
Page 15: Controlling Via The Ethernet
5.4.1 Connecting the ETHERNET Port directly to a PC (Crossover Cable) You can connect the Ethernet port of the VP-311DVI to the Ethernet port on your PC, via a crossover cable with RJ-45 connectors, as Table 5 and Figure 6 define. -
Page 16: Figure 7: Local Area Connection Properties Window
Connecting the VP-311DVI Automatic DVI / Audio Switcher 5. Select the Internet Protocol (TCP/IP) and click the Properties Button (see Figure 7). Figure 7: Local Area Connection Properties Window 6. Select Use the following IP Address, and fill in the details as shown in Figure 8. -
Page 17: Connecting The Ethernet Port Via A Network Hub (Straight-Through Cable)
Connecting the ETHERNET Port via a Network Hub (Straight-Through Cable) You can connect the Ethernet port of the VP-311DVI to the Ethernet port on a network hub or network router, via a straight-through cable with RJ-45 connectors, as Table 6 defines:... -
Page 18: Figure 9: The Ethernet Configuration Manager Window
The Exit command closes the Configuration Manager application Action The Search Board command seeks the VP-311DVI device that connects to the PC via the ETHERNET port, and displays it and its corresponding settings; The Config command adjusts the VP-311DVI according to the displayed data... -
Page 19: Setting A Virtual Port
IP address and local port of your VP-311DVI (see Figure 11). Figure 11: The Virtual Serial Port Properties Window 3. You can set a virtual port for each local port on your VP-311DVI (see Figure 12). KRAMER: SIMPLE CREATIVE TECHNOLOGY... -
Page 20: Setting An Ethernet Connection
Connecting the VP-311DVI Automatic DVI / Audio Switcher Figure 12: The Virtual Serial Port Properties Window (COM 3 and COM 4) 4. In the control application, choose the COM-port connection according to your virtual serial port connections (see Figure 13). -
Page 21: Technical Specifications
Technical Specifications Technical Specifications Table 8 includes the technical specifications: Table 8: Technical Specifications of the VP-311DVI INPUTS: 3 DVI , 1.2Vpp on DVI Molex 24pin female connectors; DDC signal 5Vpp (TTL) 3 S/PDIF digital audio on RCA connectors 3 unbalanced stereo audio +4dBm on 3.5mm mini jacks... - Page 22 EXCLUSION OF DAMAGES The liability of Kramer for any effective products is limited to the repair or replacement of the product at our option. Kramer shall not be liable for: Damage to other property caused by defects in this product, damages based upon inconvenience, loss of use of the product, loss of time, commercial loss;...
- Page 23 For the latest information on our products and a list of Kramer distributors, visit our Web site: www.kramerelectronics.com, where updates to this user manual may be found. We welcome your questions, comments and feedback. Safety Warning: Disconnect the unit from the power supply before opening/servicing.
Need help?
Do you have a question about the VP-311DVI and is the answer not in the manual?
Questions and answers