
Related Manuals for Poly Voyager 4245 Office


Summary of Contents for Poly Voyager 4245 Office
- Page 1 PLANTRONICS + POLYCOM. NOW TOGETHER AS Voyager 4245 Office for computer and desk phone User Guide...
-
Page 2: Table Of Contents
Contents Overview Headset overview Base overview Accessories Hook up system Desk phone setup details Position Your Base Pair Pair again to base Pair to mobile device Pair mode Fit and charge Customize Your Headset Charge your headset and spare battery Talk time Headset battery status Load software... -
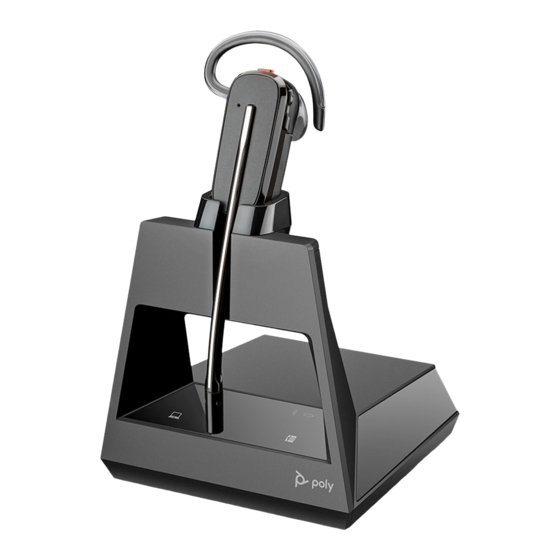
Page 3: Overview
Overview Headset overview Alexa* Siri/Google Now Volume LEDs Call Power ® Siri , Google Smartphone feature: Default voice assistant only active when your headset is out of base range and paired to mobile ® Bluetooth pairing Alexa Smartphone feature: Voice assistant (requires app) Mute/unmute Be safe Please read the safety guide for important safety, charging, battery and regulatory information... -
Page 4: Base Overview
Base overview 2 3 4 Computer button Handset lifter jack Bluetooth LED Telephone interface cable jack Desk phone button Headset Bluetooth pairing button Charging LED Desk phone listening volume USB port Desk phone speaking volume Power jack Desk phone configuration switch Accessories Electronic hookswitch cable (EHS cable) Electronically and automatically answers/ends a desk phone call. -
Page 5: Hook Up System
Hook up system Using the diagram, connect your headset system. HEADSET PORT plantronics.com /software Plantronics Hub for Windows/Mac NO HEADSET PORT NOTE Base configuration settings Desk phone Setting (on bottom of base) Most phones Cisco phones Cisco phones with EHS cable Desk phone setup details Choose a desk phone setup A, B, C or D... - Page 6 NOTE Use this setup if you are not using the HL10 lifter or EHS cable. In this configuration, press both the headset button on your desk phone and the call control button on the headset to answer or end calls. Desk phone (standard) •...
-
Page 7: Position Your Base
IMPORTANT Cisco phones use configuration on the bottom of the base. Most other phones use default configuration A. Position Your Base The minimum recommended separation between your desk phone and the base is 6 inches. The minimum recommended separation between the base and computer is 12 inches. Incorrect position can cause noise and interference problems. -
Page 8: Pair
Settings > Bluetooth: On > Scan for devices* NOTE *Menus may vary by device. Select “Poly V4240 Series.” If necessary, enter four zeros (0000) for the passcode or accept the connection. Once successfully paired, you hear “pairing successful” and the headset LEDs stop flashing. -
Page 9: Fit And Charge
Fit and charge Customize Your Headset After you install the headset battery, choose one of the three headset wearing styles, over-the-ear, over-the-head or behind-the-head. Use the fit kit to assemble it and optimize the position of the microphone. Install the Headset Battery Position the battery as shown on the headset and slide into position until the battery snaps into place. - Page 10 To correctly position your headset, see Position Your Headset. Left Over-the-Ear Assembly Choose the size of earloop that fits most comfortably. Align the earloop as shown and insert it onto the headset. Rotate the earloop up 90°. 90º NOTE Ensure the earloop is flat against the headset before rotating. Choose the size and style of eartip that fits most comfortably.
- Page 11 Rotate the headset up. The headband can be worn on the right or left side. To optimize the position of the headset, push the headset in so the microphone is close to your mouth. Behind-the-Head Assembly Align the headband as shown. Ensure the headband sits flat against the headset, then rotate it up 90°.
- Page 12 NOTE Ensure the large end of the eartip points to the microphone. To position your headset correctly, first slide the stem of the headband so the headset fits comfortably. With a finger on the headset indicator light, push in until the microphone rests as close to your cheek as possible without touching.
-
Page 13: Charge Your Headset And Spare Battery
Charge your headset and Charge your headset spare battery Place the headset in the charge cradle. The headset charging LED flashes when charging the headset and turns off when the headset is fully charged. Charge for at least 20 minutes prior to the first use. -
Page 14: Load Software
Load software Plantronics Hub is an invaluable headset tool. NOTE Some softphones require the installation of Plantronics Hub for Windows and Mac to enable headset control (answer/end and mute) functionality. • Download Plantronics Hub for Windows/Mac by visiting plantronics.com/software. • Download Plantronics Hub for iOS/Android by visiting plantronics.com/software, the App Store or Google Play. -
Page 15: The Basics
The Basics Alexa* Siri/Google Now Power on or off Press the Call button until you hear “power on" or "power off." Adjust volume • Headset volume Fine-tune your headset volume by adjusting the headset's volume up (+) and down (-) controls. •... - Page 16 Hold a call To hold an active call or resume a held call: • Press the headset Call button for 2 seconds. • Computer or desk phone: Press the corresponding base Audio button for 2 seconds. The button flashes red when a call is on hold. NOTE 2 desk phone calls can be put on hold only from your desk phone.
-
Page 17: More Features
More Features Voice assistant Siri, Google Now ™ , Cortana Press and hold the Call button for 2 seconds to activate your (smartphone feature) smartphone's default voice assistant. Wait for the phone prompt to activate voice dialing, search, and other smartphone voice controls. ATTENTION Voice assistant is only active when your headset is out of base range and paired to a smartphone. -
Page 18: Troubleshooting
Troubleshooting Headset I can’t hear a dial tone in the • Make sure your headset is charged. headset. • Make sure your headset is paired to base. See Pair again to base. • Adjust the configuration switch (A--F) on the bottom of the base until a dial tone is heard. -
Page 19: Desk Phone
People I talk to can hear a buzz in • Move the base further away from your phone. See Position Your the background. Base. • If the base power supply is plugged into a power strip, plug it into the wall directly. I can't activate Siri or Google Now Your smartphone's default voice assistant is a mobile-only feature on my headset. - Page 20 • Go to Start > Control Panel > Sounds and Audio Devices > Audio > Sound Playback and change the default setting from your headset to your PC speakers. Click “OK” to confirm your change. For Windows Vista and Windows 7 systems •...
-
Page 21: Support
Netherlands © 2020 Plantronics, Inc. All rights reserved. Poly, the propeller design, and the Poly logo are trademarks of Plantronics, Inc. Bluetooth is a registered trademark of Bluetooth SIG, Inc. and any use by Plantronics, Inc. is under license. All other trademarks are the property of their respective owners.
Need help?
Do you have a question about the Voyager 4245 Office and is the answer not in the manual?
Questions and answers
How do you turn off speaker ring or change the ring tone.
To change the base ringtone volume on the Poly Voyager 4245 Office, adjust the setting in Plantronics Hub. This ringtone alerts you when a call comes in and you are not wearing the headset. The document does not provide information on how to turn off the speaker ring or change the ringtone itself.
This answer is automatically generated
DESK PHONE CONFIGURATI BUTTON SETTINGS
The configuration button settings for the Poly Voyager 4245 Office desk phone are not explicitly detailed in the provided context. However, the manual mentions "Desk phone setup details," "Make, answer, end calls," and "Adjust volume," which suggests that the headset includes buttons for call control, volume adjustment, and possibly mute functions. For precise configuration settings, refer to the "Desk phone setup details" section in the user guide.
This answer is automatically generated