
Related Manuals for Advantech HPC-8316 Series


Summary of Contents for Advantech HPC-8316 Series
- Page 1 User Manual HPC-8316 3U Storage Chassis for ATX/EATX Serverboard with 16 Hot-plug Drive Bays 3U 儲存伺服器試用 EATX/ATX/MicroATX 伺服器主機板,支援 16 個熱抽拔硬碟 3U 储存服务器试用 EATX/ATX/MicroATX 服务器主板,支持 16 个热抽拔硬盘...
- Page 2 No part of this manual may be reproduced, copied, translated or transmitted in any form or by any means without the prior written permission of Advantech Co., Ltd. Information provided in this manual is intended to be accurate and reliable. How- ever, Advantech Co., Ltd.
- Page 3 On-line Technical Support/ 在线技术支持 / 線上技術支 援 For technical support and service, please visit our support website at: http://support.advantech.com 如需技术支持和服务,请访问研华公司的网站: http://support.advantech.com.cn 若需技術支援及其它服務,請連結研華公司的支援網站: http://support.advantech.com.tw Instructions/ 安全指示 Read these safety instructions carefully. Keep this User Manual for later reference. Disconnect this equipment from any AC outlet before cleaning. Use a damp cloth.
- Page 4 CAUTION: The computer is provided with a battery-powered real-time clock cir- cuit. There is a danger of explosion if battery is incorrectly replaced. Replace only with same or equivalent type recommended by the manufacture. Discard used batteries according to the manufacturer’s instructions. THE COMPUTER IS PROVIDED WITH CD DRIVES COMPLY WITH APPRO- PRIATE SAFETY STANDARDS INCLUDING IEC 60825.
- Page 5 设备内部有液体流入; 设备曾暴露在过于潮湿的环境中使用; 设备无法正常工作,或您无法通过用户手册来使其正常工作; 设备跌落或者损坏; 设备有明显的外观破损。 注意:计算机配置了由电池供电的实时时钟电路,如果更换错误的电池,将有爆 炸的危险。因此,只可以使用制造商推荐的同一种或者同等型号的电池进行替 换。请按照制造商的指示处理旧电池。 计算机提供的 CD 光盘驱动,已符合各种安全标准,包括 IEC 60825。 CLASS I LASER PRODUCT KLASS I LASER PRODUKT 本设备符合 FCC 规则第 15 款的规定。操作受如下两个条件限制: (1) 本设备不得产生有害的干扰,而且 (2) 本设备必须能经受干扰,包括可能引起意外操作的干扰。 注意:无论何时进行操作,请务必完全断开机箱电源。不可在电源接通时进行设 备连接,以避免瞬间电涌损坏敏感电子元件。只有专业技术人员才可以打开机 箱。 注意:接触产品的母板、无源底板或附加卡前,请先确保您接地来移除身上附带 的静电。由于现在的电子设备对静电十分敏感,为了安全起见,请使用接地腕 环。请将所有电子元件放在无静电的表面或静电屏蔽袋中。 注意:未经专业认可的元件会损坏设备。请使用附件盒中提供的元件 (如螺丝) 以确保正确的安装。 本产品不带电源线销售,用户需购买符合 CCC 要求的电源线。 請仔細閱讀此安全操作說明。...
- Page 6 Advantech has come to be known. Your satisfaction is our primary concern. Here is a guide to Advantech’s cus- tomer services.
- Page 7 Because of Advantech’s high quality-control standards and rigorous testing, most of our customers never need to use our repair service. If an Advantech product is defec- tive, it will be repaired or replaced at no charge during the warranty period. For out- of-warranty repairs, you will be billed according to the cost of replacement materials, service time and freight.
- Page 8 Collect all the information about the problem encountered. (For example, CPU speed, Advantech products used, other hardware and software used, etc.) Note anything abnormal and list any onscreen messages you get when the problem occurs. Call your dealer and describe the problem. Please have your manual, product, and any helpful information readily available.
- Page 9 Initial Inspection/ 初始检查 / 初始檢查 When you open the carton, please make sure that the following materials have been shipped: Chassis User Manual Driver CD (TE and TA Version) Warranty Card Accessory box with a package of screws (for fastening the motherboard, optical disk drive, other disk drives, ears and handles, etc.), a stub copper and a pair of ears and handles.
- Page 10 HPC-8316 User Manual/ 用户手册...
-
Page 11: Table Of Contents
Contents/ 目录 / 目錄 Chapter General Information 概述 產品資訊1 Introduction/ 产品简介 / 產品簡介 ........2 Specifications/ 产品规格 / 產品規格 ........2 Power Supply Options/ 电源选项 / 電源選項 ......3 Table 1.1: Power supply options/ 电源选项 / 電源選項 ..3 Environmental Specifications/ 环境规格 / 環境規格 ....4 Table 1.2: Environment specifications/ 环境规格... - Page 12 Figure 3.1 Front panel / 前视图 / 前視圖 ....22 3.1.1 Switch, Buttons and I/O Interfaces/ 开关和按钮 / 開關和按鈕 . 22 3.1.2 LED indicators for System Status/ 系统指示灯 / 系統指示燈 .. 23 Table 3.1: LED Indicator functions/ 系统指示灯 / 系統指示燈 . 23 3.1.3 LED Indicators for SAS/SATA HDD Power &...
- Page 13 Chapter SATA HBA Driver Installation SATA HBA 安装驱动 SATA HBA 安裝驅動35 Before You Begin / 开始之前 / 開始之前 ......36 Introduction / 简介 / 簡介........36 HBA Driver Installation /HBA 驱动安装 / HBA 驅動安裝....37 Appendix A Exploded Diagram& Parts List 分解图 & 部件列表 分解圖...
- Page 14 HPC-8316 User Manual/ 用户手册...
-
Page 15: Chapter 1 General Information
Chapter General Information 概述 產品資訊... -
Page 16: Introduction/ 产品简介 / 產品簡介
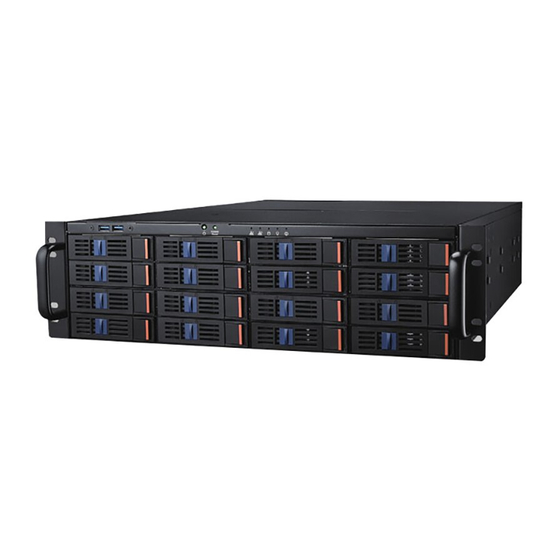
Introduction/ 产品简介 / 產品簡介 The HPC-8316 series is a 3U storage chassis with 16 3.5” hot-plug HDD bays designed for NVR and CMS servers for digital surveillance or cloud storage applica- tions which are storage orientated. Featuring the latest in industrial design, the HPC- 8316 represents a breakthrough from the traditional, rigid concept of industrial PCs, and provides users with both a high-performance and a state-off-the- art platform. -
Page 17: Power Supply Options/ 电源选项 / 電源選項
构造:不锈钢及镀锌钢板 磁盘容量 : 前面版 16 个热插入 3.5”/2.5” 硬盘拖盘, TE/TA 版本配置 2 个内部 2.5” 硬盘 ),SE/SA 版本配置后面 2 个热插入 2.5” 硬盘拖盘 LED 指示灯:单色 LED(蓝色)用于电源、硬盘传输和 LAN 状态。针对系统 BMC 报 错则有一颗单色 LED( 红灯 ) 显示 前面板上的开关和按钮:电源开关、系统重启按钮 前部 I/O 接头:双 USB3.0 接头 ... -
Page 18: Environmental Specifications/环境规格/環境規格
Safety UL/TUV/CCC/KCC UL/TUV/CB/CCC 安规认证 安規認證 Watt 500 W max. (80+ Bronze) 700 W max. (80+ Gold, PFC) (1+1 Redundant 2U) (1+1 Redundant 2U) 功率 Input rating 100 ~ 240 Vac (Full range) 100 ~ 240 Vac (Full range) 输入电压 輸入電壓 Output voltage +5 V @ 25 A, +3.3 V @ 20 A, +5 V @ 25 A, +3.3 V @ 25 A,... -
Page 19: Dimension Diagram/ 产品尺寸 / 產品尺寸
Table 1.2: Environment specifications/ 环境规格 / 環境規格 Shock 10 G with 11 ms duration, half sine 冲击 wave 衝擊 Safety CE compliant 安规认证 安規認證 Dimension Diagram/ 产品尺寸 / 產品尺寸 Unit: mm [inch] FOR SAS SKU FOR SATA SKU 435 [17.13] 66 [2.60] 435 [17.13] 66 [2.60]... - Page 20 HPC-8316 User Manual/ 用户手册...
-
Page 21: Chapter 2 System Setup
Chapter System Setup 系统安装 系統安裝... -
Page 22: Removing The Top Cover/ 移除顶盖 / 移除上蓋
The following procedures instruct users to install a motherboard, a riser card, add-on cards, and disk drives into the chassis. Please also refer to the Appendix A, Exploded Diagram and Parts List, for detailed parts of the chassis. 下述步骤指导用户如何在 HPC-8316 产品内安装母板、附加卡和磁盘驱动器。有关产品 组件的信息,请参考附录... -
Page 23: Installing The Motherboard/ 安装母板 / 安裝主機板
Figure 2.1 Removing the top cover/ 移除顶盖 / 移除上蓋 Installing the Motherboard/ 安装母板 / 安裝主機板 HPC-8316 TE and SE SKU supports EATX/ATX/MicroATX motherboards. To install a motherboard, please proceed as follows: A yellow label is located inside of the chassis bottom. (see Figure 2.2) It shows the stub copper location for attaching the specific EATX/ ATX/MicroATX motherboard. -
Page 24: 指示铜柱位置的黄色标签 / 指示銅柱位置的黃色標籤10
121 mm Y Y1 Z F F1 G R H H1 J J1 K K1 L L1 M M1 X ASMB-822 ASMB-784 ASMB-782 ASMB-781 ASMB-813 ASMB-820 ASMB-823 ASMB-920 ASMB-922 ASMB-923 ASMB-913 Figure 2.2 Yellow label indicating plastic post locations/ 指示铜柱位置的黄色标签 / 指示銅柱位置的黃色標籤 Figure 2.3 Fastening the stub copper/ 固定铜柱... -
Page 25: Installing Disk Drives/ 安装磁盘驱动器 / 安裝磁碟機
将机箱的 USB 3.0 电缆、HDD LED 电缆、LAN LED 电缆、报错 LED 电缆 ( 若主板 有支持 ), 电源开关电缆以及系统复位开关电缆连接到主板。 將主機板的 I/O 遮罩襯墊放在後面板上,然後把主機板固定在主機殼上 (如圖 2.4 所示) 。 將電源的 20 針 (或 24 針)ATX 電源介面和 8 針 /4 針 +12 V 電源介面連接到主 機板。 將主機殼的 9 針 USB 電纜、HDD LED 電纜、LAN LED 電纜、電源開關電纜以及系 統重定開關電纜連線到主機板。... -
Page 26: Installing Sa
2.3.1 Installing SA S/SATA HDD in Front Hot-plug Drive Bays/安装SAS/SATA硬盘于前面版16个可抽取 式硬盘槽 / 安裝 SAS/SATA 硬碟於前面版 16 個可抽取式硬碟槽 HPC-8316 SE/SA SKU accepts both SAS and SATA HDD, and TE/TA SKU only accepts SATA HDD. Users do not need to remove the chassis cover when installing a SAS / SATA HDD for front HDD bays. -
Page 27: 2.5" Hdd
2.5” HDD 3.5” HDD Figure 2.6 Installing a 2.5” or 3.5” SAS/SATA HDD/ 安装 2.5” 或 3.5” SAS 或 SATA HDD/ 安裝 2.5” 或 3.5” SAS 或 SATA HDD Installing the 2.5” HDD in rear/ 安装后置 2.5” HDD / 安裝後置 2.3.2 2.5”... - Page 28 针对 SE/SA 版本,我们提供 2 个热抽拔 2.5” SATA 硬盘拖盘,请参考以下步骤安装热 插入硬盘。 将硬盘拖盘从硬盘槽中取出。 将 SATA 硬盘固定于硬盘托架上并锁付四个螺丝固定。 放回 HDD 托架,然后握住把手将其推回原处。向右拨动 HDD 托架的门闩,将托架 锁住。 如需安装多个 SATA HDD,请重复操作步骤 1 ~ 3。 HPC-8316 配置 2 個 2.5” SATA HDD。針對 TE/TA 版本,我們提供 2 個 2.5” 內置 SATA 硬盤架,請參考以下步驟安裝內置硬碟。 安裝...
-
Page 29: Attaching The Ears And Handles/ 安装耳柄
Attaching the Ears and Handles / 安装耳柄 There is a pair of ears and handles in the accessory box. If you need to install them, please refer to Figure 2.8 to simply fasten them to the front-right and front-left mount- ing ears with the screws provided. -
Page 30: Slide Rail Or Pallet/ 滑轨或层板 / 滑軌或層板
Slide Rail or Pallet / 滑轨或层板 / 滑軌或層板 Figure 2.9 Install chassis with inner slide rail/ 安装滑轨内轨 / 安裝滑軌內軌 Figure 2.10 Install chassis with slide rail in cabinet/ 安装滑轨外轨 / 安裝滑軌外軌 HPC-8316 User Manual/ 用户手册... -
Page 31: Slide Rail Installation
2.5.1 Slide Rail Installation 2.5.1.1 Remove the chassis (inner) member Pull the slide open. Then press the rigger down as show on the drawing, and pull the chassis (inner) member out. HPC-8316 User Manual/ 用户手册... - Page 32 2.5.1.2 Mount the chassis (inner) member to the chassis Align the rectangular cut-outs on chassis (inner) member to the pre-formed bayonets on the side of the chassis. Secure the chassis (inner) member with H-207 screw from standard screw kit after all the bayonets have gone through the cut-outs and properly engaged.
- Page 33 2.5.1.4 Mount the chassis into the cabinet Insert the chassis (inner) member into the cabinet member as shown on the drawing. It's important to check if the ball retainer is in the fully open position before installing the chassis or it might cause catastrophic damage to the chassis if the ball retainer is not in the fully open position while mounting the chassis.
- Page 34 HPC-8316 User Manual/ 用户手册...
-
Page 35: Chapter 3 Operation
Chapter Operation 操作... -
Page 36: The Front Panel/ 前面板
The Front Panel/ 前面板 The front panel features five LED indicators, dual USB3.0 ports besides16 hot-plug HDD bays. In addition, there is a momentary power switch, a system reset button in front panel, and specific functions are described as below. 前面版配置... -
Page 37: Led Indicators For System Status/ 系统指示灯 / 系統指示燈
3.1.2 LED indicators for System Status/ 系统指示灯 / 系統指示燈 Five LEDs are placed on the top of the front panel to indicate system power and LAN activity. Refer to Table 3.1 for the LED definition summary. 机箱前面板上方配有 5 个 LED 指示灯,能够显示系统是否正常运行及运行状态。LED 指 示灯的功能描述请参考表... -
Page 38: Led Indicators For Sas/Sata Hdd Power & Status/ 显示 Sas/Sata 硬盘电源和 & 状态的 Led 指示灯 / 顯示 Sas/Sata 硬碟電源和 & 狀 態的 Led 指示燈
Note! 1. The HDD LED only works for SATA HDD from the motherboard, for example : front SATA1 to SATA 4 of TE and TA version, and internal/ rear two 2.5" SATA drives. 2. Please connect the black wire of the HDD LED cable to pin definition #5, and the blue wire to pin definition #2. -
Page 39: Sion)/Sas或Sata硬盘Led指示灯功能(Se/Sa机种)/Sas 或 Sata 硬碟 Led 指示燈功能 (Se/Sa 機種 )
Table 3.2: SATA HDD LED indicator functions (TE/TA version)/SATA 硬盘 LED 指示灯功能 (TE/TA 机种 )/SATA 硬碟 LED 指示燈功能 (TE/TA 機種 ) Drive Present, No Activity 硬盘正确安装但无数据存取 亮灯 不亮灯 硬碟正確安裝但無資料存取 亮燈 不亮燈 16 port SATA Drive Present, Activity 硬盘正确安装且有数据存取 以 4Hz 频率闪烁 不亮灯... -
Page 40: The Rear Panel/ 后面板 / 後面板
The Rear Panel/ 后面板 / 後面板 The rear plate includes 7-slot I/O brackets, and a motherboard I/O opening, and two 2.5” hot-plug HDD bay for SE/SA SKU. (see Figure 3.3). 后面板带有 7 槽 I/O 支架、1 个主板 I/O 开口,及 SE/SA 版本 2 个热插吧硬盘槽 (如 图... - Page 41 HPC-8316 的完善设计可让使用者无需螺丝起子便能更换前方系统冷却风扇。 系统关机。 打开机壳頂盖。 按压系统风扇架的塑料卡榫,并移除系统风扇架及风扇。 将更能正常的系统风扇及风扇架插回。 盖回上盖并锁紧。 HPC-8316 的完善設計可讓使用者無需螺絲起子便能更換前方系統冷卻風扇。 系統關機。 打開機殼頂蓋。 按壓系統風扇架的塑膠卡榫,並移除系統風扇架及風扇。 將更能正常的系統風扇及風扇架插回。 蓋回上蓋並鎖緊。 Figure 3.3: Take out the fan bracket)/ 取出系统风扇支架 / 取出系統風扇支架 HPC-8316 User Manual/ 用户手册...
- Page 42 Figure 3.4 Replacing the system cooling fan/ 更换系统冷却风扇 / 更換系統 HPC-8316 User Manual/ 用户手册...
-
Page 43: Replacing The Power Supply/ 更换电源 / 更換電源
Replacing the Power Supply/ 更换电源 / 更換電源 HPC-8316 supports 1U and 2U-high power supplies, follow the steps below to replace the power supply, Unplug the power cord from the power supply. Remove the top cover. Unplug the 20-pin (or 24-pin) ATX power connector and 4-pin/8-pin +12 V power connector from the motherboard, as well as the power connectors from the disk drives and peripherals. - Page 44 Figure 3.5: Replacing the power supply/ 更换电源 / 更換電源 HPC-8316 User Manual/ 用户手册...
-
Page 45: Sas/Sata Backplane
Chapter SAS/SATA Backplane 双槽 SAS/SATA 底板 雙槽 SAS/SATA 背板... -
Page 46: Sata Backplane Layout Of Te And Ta Sku/Te 及 Ta 機種的 Sata 底板布局 / Te 及 Ta 機種的 Sata 背板佈局
SATA Backplane Layout of TE and TA SKU/TE 及 TA 機種的 SATA 底板布局 /TE 及 TA 機種的 SATA 背板 佈局 SATA0 SATA1 SATA2 SATA3 Figure 4.1 4 port SATA BP Front Side Layout (connect to HDD) / 4 port SATA 背 板前方配置... -
Page 47: Sas Backplane Layout Of Se And Sa Sku /Se 及 Sa 機種的 Sas 底板布局 /Se 及 Sa 機種的 Sas 背板佈局
SAS Backplane Layout of SE and SA SKU /SE 及 SA 機種的 SAS 底板布局 /SE 及 SA 機種的 SAS 背板佈 局 SAS0 SAS1 SAS2 SAS3 SAS4 SAS5 SAS6 SAS7 SAS8 SAS9 SAS10 SAS11 SAS12 SAS13 SAS14 SAS15 Figure 4.5 16 port SAS BP Front Side Layout (connect to HDD) / 16 port SAS 背 板前方配置... -
Page 48: Board) / 2 Port Sata 背板后方配置(连接至主板)/ 2 Port Sata 背板後方配置 (連接至主板
CN_SATA0 CN_SATA1 PSOC_UR1 SGPI01 Figure 4.8 2 port SATA BP Rear Side Layout (connect to motherboard) / 2 port SATA 背板后方配置 (连接至主板)/ 2 port SATA 背板後方配置 (連接至主板) If you want to get HDD status information shown on the HDD led of activity and status (definition on page 25), please connect a SGPIO cable between SGPIO1 from 2 port SATA BP and the motherboard. -
Page 49: Chapter 5 Sata Hba Driver Installation
Chapter SATA HBA Driver Installation SATA HBA 安装驱动 SATA HBA 安裝驅動... -
Page 50: Before You Begin / 开始之前 / 開始之前
HPC-8316 TE and TA version is default bundled a SATA HBA which is designed by Advantech and paired with 12 port SATA of TE and TA version. If driver isn't installed properly, some of SATA would be not-functional, so please follow the instructions below for driver installation: HPC-8316 TE 及... -
Page 51: Hba Driver Installation /Hba 驱动安装 / Hba 驅動安裝
HBA Driver Installation /HBA 驱动安装 / HBA 驅動 安裝 Power-on HPC-8316 TE/TA version system, and then go into device manager page as below. HPC-8316 TE/TA 机种开进入 Windows 操作系统,并进到设备管理器页面如下。 HPC-8316 TE/TA 機種開進入 Windows 作業系統,並進到裝置管理員頁面如下。 HPC-8316 User Manual/ 用户手册... - Page 52 Moving cursor to "Standard SATA AHCI Controller", and then click right key of mouse to go to properties setting page. 移动鼠标指针至 “Standard SATA AHCI Controller” 项目,按鼠标右键进到 “properties setting” 页面。 移動滑鼠指標至 “Standard SATA AHCI Controller” 項目,按滑鼠右鍵進到 “properties setting” 頁面。 HPC-8316 User Manual/ 用户手册...
- Page 53 Moving into "Hardware Ids" item. 进入 “Hardware Ids” 项目。 進入 “Hardware Ids” 項目。 HPC-8316 User Manual/ 用户手册...
- Page 54 Please make sure vendor ID of SATA AHCI controller is "VEN_1B4B_9235". If the vendor ID is not" VEN_1B4B_9235", please repeat the above steps 1 to 3 for the other SATA AHCI controller when your system has had one more SATA AHCI controller installed.
- Page 55 Moving to Driver item, and click "Update Driver" item. 移至 Driver 项目,执行 “Update Driver” 项目。 移至 Driver 項目,執行 “Update Driver” 項目。 HPC-8316 User Manual/ 用户手册...
- Page 56 Insert the driver CD into your system's CD-ROM drive, and then click "Browse my computer for driver software" item to the install driver manually. 插入驱动光盘至系统光驱中,点选 “Browse my computer for driver software” 项目,手动安装驱动。 插入驅動光碟至系統光碟機中,點選 “Browse my computer for driver software” 項目,手動安裝驅動。 HPC-8316 User Manual/ 用户手册...
- Page 57 Browsing and moving to folder naming "Windows 7&8.1&10&Server 2012 R2", then click next. 浏览并点选光盘目录 “Windows 7&8.1&10&Server 2012 R2” 后点选下一步。 瀏覽並點選光碟目錄 “Windows 7&8.1&10&Server 2012 R2” 後點選下一步。 HPC-8316 User Manual/ 用户手册...
- Page 58 The below dialog is shown on screen after successful installation. 当驱动成功安装后,会出现以下安装成功画面。 當驅動成功安裝後,會出現以下安裝成功畫面。 HPC-8316 User Manual/ 用户手册...
- Page 59 Marvell 92xx SATA 6G controller screen will show on device manager as below. 驱动成功安装后,Marvell 92xx SATA 6G 控制去会出现在设备管理器中。 驅動成功安裝後,Marvell 92xx SATA 6G 控制去會出現在裝置管理員中。 HPC-8316 User Manual/ 用户手册...
- Page 60 HPC-8316 User Manual/ 用户手册...
-
Page 61: Exploded Diagram& Parts List
Appendix Exploded Diagram& Parts List 分解图 & 部件列表 分解圖 & 零件表... -
Page 62: Exploded Diagram& Parts List/分解图&部件列表/ 分解圖 & 零件表
Exploded Diagram& Parts List/分解图&部件列表/ 分解圖 & 零件表 Figure A.1 Exploded Diagram & Parts List/ 分解图 & 部件列表 / 分解圖 & 零件表 HPC-8316 User Manual/ 用户手册... - Page 63 Table A.1: Parts list/ 部件列表 / 零件表 Item Part Name Item Part Name 编号 部件名称 编号 部件名称 編號 部件名稱 編號 部件名稱 HDD TRAY MODULE HANDLE 硬盘盒模块 把手 硬碟盒模組 RACKMOUNT BRAKCET BOTTOM CHASSIS 上架式支架 底部机箱 上架式支架 底部主機殼 BACKPLANE BP BACK BRACKET 背板...
- Page 64 No part of this publication may be reproduced in any form or by any means, electronic, photocopying, recording or otherwise, without prior written permis- sion of the publisher. All brand and product names are trademarks or registered trademarks of their respective companies. © Advantech Co., Ltd. 2016 www.advantech.com.cn 使用前请检查核实产品的规格。本手册仅作为参考。 产品规格如有变更,恕不另行通知。 未经研华公司书面许可,本手册中的所有内容不得通过任何途径以任何形式复制、翻...
Need help?
Do you have a question about the HPC-8316 Series and is the answer not in the manual?
Questions and answers