Table of Contents
Advertisement
Quick Links
Advertisement
Table of Contents

Subscribe to Our Youtube Channel
Related Manuals for WePresent WiPG-1600W


Summary of Contents for WePresent WiPG-1600W
- Page 1 WiPG-1600W User’s Manual WiPG-1600W User's Manual Version: 08...
-
Page 2: Table Of Contents
WiPG-1600W User’s Manual Table of Contents Overview ..........................4 Package Contents ......................... 7 Physical Details ........................7 What You (Might) Need ...................... 10 Hardware Installation ......................11 Standby Screen of the Projector/Display ............... 13 Quick Guide ........................13 Whiteboard ........................13 “USB Player”... - Page 3 A Complete User’s Guide on MirrorOp (Sender) ............55 Use the SidePad Function with MirrorOp Receiver ............56 Launch WebSlides ....................... 62 Wall-Mount Kit ........................65 Frequently Asked Questions ..................... 66 Disposal Information ......................70 Open-Source and Third-Party Software Used in WiPG-1600W ........ 71...
-
Page 4: Overview
“WiFi-enabled” and “WiFi-disabled” options through easy setup. [Please see the section on “7.4.4 WiFi Setup”.] The WiPG-1600W also comes with two detachable antennas, which can be used for better wireless signal coverage and reception. - Page 5 Quad-Screen Mode Project four PC/Mac/smartphone/tablet screens (4-to-1 Split Screen) to one projector/display simultaneously. 1-to-Many Project your device screen to up to 4 wePresent Distribution units and their connected displays at the same time. (Please refer to MirrorOp Sender User’s Manual.)
- Page 6 Customizable standby screen: replace the entire standby screen image with any image of your choice) Support SNMPv3: Manage/configure multiple WiPG-1600W devices through SNMPv3. Firmware update via FTP A security enhancement for SNMP Provide session security login, wireless WEP/WPA PSK/WPA2 ...
-
Page 7: Package Contents
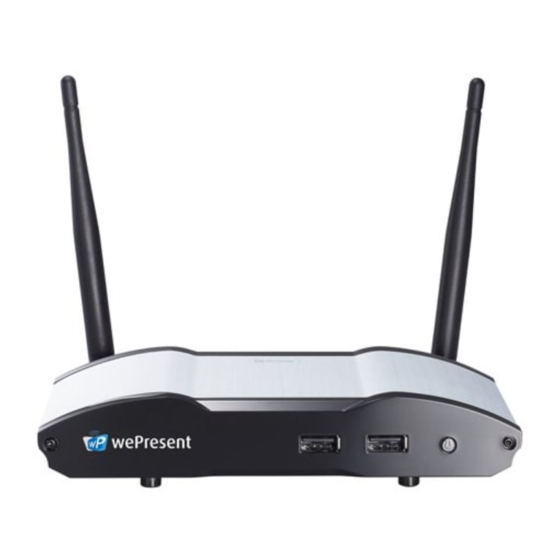
WiPG-1600W User’s Manual Package Contents wePresent WiPG-1600W Base Unit Power Adapter (DC +5V, 2.6A) Two Detachable Antennas Wall-Mount Kit Quick Start Guide Warranty Card CE DoC & Warning Statement Physical Details Front Panel ... - Page 8 WiPG-1600W User’s Manual Rear Panel Description Detachable Antennas Two antennas installed for better WiFi performance USB Port (Rear) For USB thumb drive/mouse/keyboard/touch device Ethernet Port 10/100/1000M RJ-45 port For PoE (Power over Ethernet) VGA Port For VGA projector/display HDMI Port For HDMI projector/display Audio Jack (3.5mm)
- Page 9 Description Reset Button For hard reset. *** To perform a hard reset to restore your WiPG-1600W device to the factory default settings, please follow the below procedures: Long press the reset button and hold. Turn on the WiPG-1600W and wait for over 10 seconds until the LED indicator turns blue.
-
Page 10: What You (Might) Need
WiPG-1600W User’s Manual What You (Might) Need Projector/display with VGA/HDMI interface (Required) Ethernet cable (Required if you want to disable the WiFi of the WiPG-1600W) Windows or Mac computer Apple iPhone, iPad, iPod touch Android phone or tablet ... -
Page 11: Hardware Installation
1) Connect the WiPG-1600W to the projector/display through the VGA/HDMI port and turn on the projector/display power. 2) Connect the power adapter to the WiPG-1600W and press the power button to turn on the device. The system is ready when the LED indicator turns blue. - Page 12 WiPG-1600W User’s Manual 3) If you disable the WiFi of the WiPG-1600W, you need to connect the device to an existing IT network through an Ethernet cable. 4) Connect the speaker to the WiPG-1600W audio jack for audio output. (A speaker is required for audio output when using VGA.)
-
Page 13: Standby Screen Of The Projector/Display
(a) software download instructions; (b) WiFi network name or SSID [Default SSID is wePresent-xxx (xxx are the last three numbers of the MAC ID shown on the bottom side of the WiPG-1600W device)]; (c) IP address [default IP address is 192.168.100.10]; (d) login code. - Page 14 2) Toolbar of the Whiteboard Button Description Show/hide the toolbar Return to the WiPG-1600W standby screen Open a file from an attached USB drive Save the drawings/writings (current screen image) as a JPG file to an attached USB drive Clear all the drawings/writings...
-
Page 15: Usb Player" Function
“USB Player” function. You can playback photo/video/music/office files on the USB drive attached to the WiPG-1600W device. (For details, please refer to the “9. USB Player” section) 6.4 “Conference Control” Mode (enable/disable the “Conference Control” mode): When the “Conference Control”... -
Page 16: User-List
WiPG-1600W User’s Manual 6.5 User-List Click on the “User-List” button to show all the login users. The moderator can pick which user to project his/her screen to the projector/display. 6.6 Quad-Screen Mode (4-to-1 Split Screen) Click on the “Quad-Screen” button on the standby screen to enter the “Quad-Screen”... -
Page 17: Setup
(no software installation is required).] 6.8 Remote Control/Remote Touch Control (UMT) WiPG-1600W supports remote control, including remote touch control (UMT). Users can remotely control the projecting computer from the display via a mouse, keyboard or touch screen. -
Page 18: Toolbar In The Projection Mode
[Please be aware that Windows 7 can only provide limited multi-touch capability for specific applications.] Each USB port on the WiPG-1600W device can supply up to 5V/0.5A power. Additional power supply is required if the attached HID device needs more power. - Page 19 WiPG-1600W User’s Manual Save the annotations/drawings/writings (current screen image) as a JPG file to an attached USB drive Clear all the annotations/drawings/writings Erase part of or the whole of the annotations/drawings/writings Pen color (red, green, blue, black) Pen width (fine, medium, bold)
-
Page 20: Web Management
7.1 Home Page 1) Make sure your sender device (PC/Mac) is WiFi-enabled, and connect your sender device to the WiPG-1600W through WiFi. You can find the WiFi network name (SSID) of your WiPG-1600W device on the standby screen. [Default SSID is wePresent-xxx (xxx are the last three numbers... - Page 21 IP address/hostname in the address bar of the browser. You can find the receiver IP address and hostname on the standby screen of the projector/display. [Default IP address is 192.168.100.10; default hostname is wePresent-xxx (xxx are the last three characters of the MAC ID shown on the bottom of the WiPG-1600W).] Note: If you want to enter the hostname in the URL bar, please put “https://”...
-
Page 22: Conference Control
“Device Profile” to download an MOP file. The MOP file provides a quick way to connect to a predefined receiver. A user can double click on the MOP file, and it will connect to the predefined WiPG-1600W device automatically. - Page 23 3) After login, you can see a user-list on the screen which indicates all the users connected to the WiPG-1600W. 4) There are three columns: “Name”, “Play Control” and “IP Address”. 5) Play Control: There are seven buttons – (a) (full screen);...
-
Page 24: Webslides
4) Please refer to the “12 Launch WebSlides” section for more information. 7.4 HTTPS Self-Signed Certificate 1) When you enter the IP address or hostname of the WiPG-1600W in the URL bar of the browser, you will get a security warning message as shown below. - Page 25 WiPG-1600W User’s Manual a) Download the self-signed certificate file from the wePresent Home page. b) The file name is : wePresent_HTTPS_Certificate.der. c) Double click the *.der file in your computer. d) Follow the on-screen instructions to proceed.
- Page 26 WiPG-1600W User’s Manual e) Please note that you should check the option “Place all certificates in the following store” (and click “Browse”), instead of the option "Automatically select the certificate store based on the type of certificate". f) Make sure that you select “Trusted Root Certification Authorities” as...
- Page 27 WiPG-1600W User’s Manual g) After the installation is complete, please close and restart your browser. The HTTPS security warnings will not appear (for WiPG-1600W v2.5 and later versions). h) Please note that you only need to install the certificate once for all...
-
Page 28: Admin
< Device Information > Host Name: Device Network Hostname Resolution: Device output resolution < Network Status > IP address: IP address of the WiPG-1600W device Subnet Mask: subnet mask Default Gateway: default gateway Wireless MAC address: wireless MAC address ... -
Page 29: Device Setup
WiPG-1600W User’s Manual Projecting Status: “Waiting for projecting”/”Projecting” Total Users: the number of users logged into the WiPG-1600W device Code: login code < Date and Time > Date: Current date Time: Current time Time Zone: Current time zone ... - Page 30 “Enable” or “Disable” the AirPlay feature. Note: If a login code is set on the WiPG-1600W device, you will be asked for a password when you use AirPlay on Mac or iOS devices. Please enter the same login code in the AirPlay password dialog box.
-
Page 31: Network Setup
WiPG-1600W User’s Manual WiPG-1600W before moderation is enabled. However, once stopped, AirPlay projection cannot be restarted in the moderation mode. < Video Streaming > Real-time video streaming can be supported by the WiPG-1600W. [The default setting is “Enable”.] < Apply >... - Page 32 WiPG-1600W is connected to a LAN that already has a DHCP server present, the WiPG-1600W takes an IP address assigned to it by the server. When the WiPG-1600W is connected to a LAN that does not have a DHCP server, the WiPG-1600W can become the DHCP server in the network.
- Page 33 WiPG-1600W User’s Manual All Pass: Users connected to WiPG-1600W can freely access all office/school networks and internet via the Ethernet cable or AP-Client (AP & Station) mode. All Block: Users connected to WiPG-1600W can only use the office/school network for presentation without internet or intranet access.
-
Page 34: Wifi Setup
< Wireless LAN>: You can choose to enable or disable the wireless LAN (WiFi function). The default value is “Enable”. [If you disable the WiFi of the WiPG-1600W, you need to connect the device to an existing IT network through an Ethernet cable.] <... -
Page 35: Snmp Setup
WiPG-1600W User’s Manual will pop up. Note: The Encryption and Key information must be consistent to the existing AP configuration. < AP & Station Mode > Please see the above information on < AP Mode > and < Station Mode >. -
Page 36: Osd (On-Screen Display) Setup
WiPG-1600W User’s Manual Enable/Disable the SNMPv3 service. User Name: configure the user name to manage this device via SNMP. Auth Password: configure the Auth password. Priv Password: configure the Priv password. Trap Destination: configure the IP address of the trap receiver. - Page 37 WiPG-1600W User’s Manual Browse: Browse and choose an image file you wish to display on the standby screen. Image File Upload: Upload the image file you have selected. Note: The image file needs to be in PNG format and the maximum file size is 5MB.
-
Page 38: Webslides Setup
WiPG-1600W User’s Manual 7.5.7 WebSlides Setup Click [WebSlides Setup] to set up the WebSlides function. < Auto Refresh Interval >: Choose “Manual Refresh”, “10”, “20”, “30”, “45”, “60” or “90” seconds refresh interval < Access Password Control >: Choose “Disable”, “Use the same password as Code”... -
Page 39: Change Passwords
If there are more than 10 concurrent WebSlides users, it is recommended to connect the WiPG-1600W to your company network via Ethernet, or set up a wireless router to connect to the WiPG-1600W. Then, users should connect their devices to the WiPG-1600W via their company network or a wireless router in order to secure the projection performance. -
Page 40: Reset To Default
<Confirm New Password>: Confirm the new password by entering it once again. <Apply>: Confirm and save the new password. 7.5.9 Reset to Default Click [Reset to Default] to restore your WiPG-1600W device to the factory default settings. <Apply>: Confirm to perform the reset. -
Page 41: Firmware Update
WiPG-1600W User’s Manual *** To perform a hard reset to restore your WiPG-1600W device to the factory default settings, please follow the below procedures: 1. Long press the reset button (on the bottom side of the WiPG-1600W) and hold. 2. Turn on the WiPG-1600W and wait for over 10 seconds until the LED indicator turns blue. - Page 42 WiPG-1600W User’s Manual There are three ways to update your firmware: (a) <Check for update>: Click “Check for update”. If a new firmware is available, you can perform the firmware update right away. (b) <Manual Firmware Update>: Firstly, you have to get the latest firmware file from your vendor.
- Page 43 WiPG-1600W User’s Manual Warning: Do not power off the WiPG-1600W device while the firmware update is in progress; otherwise your WiPG-1600W device may crash and you have to return the device to your vendor for repair.
-
Page 44: Troubleshoot
WiPG-1600W User’s Manual 7.5.11 Troubleshoot The “Troubleshoot” tab allows users to download system logs in order to monitor system activity and troubleshoot issues. Just click the “Download” button and you can download system log files. 7.5.12 Reboot System Click [Reboot System], and you can restart the system. -
Page 45: Logout
WiPG-1600W User’s Manual 7.5.13 Logout Click [Logout] (on the upper-right corner of the screen), and you can log out of the admin page (and return to the web management front page). -
Page 46: Usb Player
USB Player Click the “USB Player” button on the standby screen, and you can playback photo/video/music /office files (stored on the USB drive attached to the WiPG-1600W device). Button Description Return to the standby screen Enter the Photo Viewer function. -
Page 47: Photo Viewer
WiPG-1600W User’s Manual 8.1 Photo Viewer Click the “Photo” button, and find the photo you want to show on the display. Button Description Exit this file Go to the previous file Start/Pause the slideshow Go to the next file Rotate the photo counter-clockwise... -
Page 48: Video Player
WiPG-1600W User’s Manual 8.2 Video Player Click the “Video” button, and find the video you want to play on the display. Button Description Exit this file Fast-rewind (2x/4x/8x) Play/Pause Fast-forward (2x/4x/8x) Increase/Decrease the volume... -
Page 49: Music Player
WiPG-1600W User’s Manual 8.3 Music Player Click the “Music” button, and select the music you want to play. Button Description Exit this file Fast-rewind (2x/4x/8x) Go to the previous file Play/Pause Go to the next file Fast-forward (2x/4x/8x) Increase/Decrease the volume... -
Page 50: Office Viewer
WiPG-1600W User’s Manual 8.4 Office Viewer Click the “Office Viewer” button, and find the Office file you want to show on the display. Button Description Exit this file Go to the previous page Go to the next page View all pages of this file in thumbnail form... -
Page 51: Setup
WiPG-1600W User’s Manual 8.5 Setup Item Description Slideshow Duration 5/10/20/30 seconds. Slideshow Repeat Play once/Repeat Video Play Mode Play once/Repeat Music Play Mode Play once/Repeat once/Repeat folder/Shuffle Note: Item Value Supported File Format MPEG-1 / MPEG-2 / MPEG-2 TS / MPEG-4... -
Page 52: Using Mirrorop (Sender) To Start Projection
The MirrorOp app will automatically locate the WiPG-1600W. (If not, you can click or input the hostname/IP in the text box to connect to the device.) Select the WiPG-1600W device you want to use and click “Connect”. Enter the passcode shown on the standby screen of the projector/display. - Page 53 WiPG-1600W User’s Manual Click and start sharing your screen.
-
Page 54: Main User Interface Of Mirrorop (Sender)
WiPG-1600W User’s Manual 9.2 Main User Interface of MirrorOp (Sender) Collapse/Expand the Info Panel Minimize the User Interface Preferences Settings Exit/Close the Application Expand/Collapse Video Streaming Device List Mute/Unmute (audio output) Full/Split Screen Start/Stop Projection... -
Page 55: A Complete User's Guide On Mirrorop (Sender)
WiPG-1600W User’s Manual 9.3 A Complete User’s Guide on MirrorOp (Sender) 1) For a complete user’s manual on MirrorOp (Sender), click the “Settings” icon on the upper-left corner of the info panel. Then, click “About” in the menu bar. 2) Click “Get Help” on the lower-right corner of the screen, and then you can view the “MirrorOp User’s Manual”. -
Page 56: Use The Sidepad Function With Mirrorop Receiver
WiPG-1600W User’s Manual Use the SidePad Function with MirrorOp Receiver 1) Introduction: SidePad is a feature that allows controlling the presenting PC/Mac from an iOS/Android device running the MirrorOp Receiver app. Display Tablet/Smartphone HDMI/VGA Cable PC/Mac (Remote Control) (Projection) WiPG-1600W... - Page 57 WiPG-1600W User’s Manual • Check “Allow controlling from tablets/smartphones”. • Set the passcode (default passcode: 1111). B. Tablet/Smartphone running the “MirrorOp Receiver” app Android • Install the “MirrorOp Receiver” app from the Google Play store. • Open the “MirrorOp Receiver” app. Long-press the Menu button...
- Page 58 WiPG-1600W User’s Manual • Check “Search for senders on start”. • Close MirrorOp Receiver and re-open it. • You will see the name of the PC/Mac with the MirrorOp (Sender) app installed.
- Page 59 WiPG-1600W User’s Manual • Select which PC/Mac you want to control and enter the passcode you set earlier. • Now you are able to remotely control the Mac/PC from your tablet/smartphone. • Install the “MirrorOp Receiver” app from the Apple App store.
- Page 60 WiPG-1600W User’s Manual • Open the “MirrorOp Receiver” app. • You will see the name of the PC/Mac with the MirrorOp (Sender) app installed.
- Page 61 WiPG-1600W User’s Manual • Select which PC/Mac you want to control and enter the passcode you set earlier. • Now you are able to remotely control the Mac/PC from your tablet/smartphone.
-
Page 62: Launch Webslides
- Connect your mobile device to the WiPG-1600W via WiFi. - Open your web browser, and enter the IP address of the WiPG-1600W. - View the presenting slides on your device…save the slides as JPG files for note-taking, annotation or others. - Page 63 2) Audience: • The audience also need to connect to the WiPG-1600W via WiFi. • Open the browser of the audience’s devices, and enter the IP address of the WiPG-1600W in the address bar of the browser.
- Page 64 WiPG-1600W User’s Manual • The audience will see the below image on their devices, and they can start to receive the projecting screen/slides. They can save the projecting screen (for note-taking later) by clicking in the menu bar at the top of the screen.
-
Page 65: Wall-Mount Kit
Wall-Mount Kit Replace two of the rubber feet (on the bottom side of the WiPG-1600W device) with the two short screws ( Install the mounting bracket on the wall with the four long screws Secure the WiPG-1600W device to the mounting bracket. -
Page 66: Frequently Asked Questions
WiPG-1600W User’s Manual Frequently Asked Questions Q: Why can’t I access the WiPG-1600W web UI (user interface) through a web browser? A: This may be because your sender device (PC/Mac/mobile device) and the receiver device (WiPG-1600W) are not on the same intranet. In order to troubleshoot this, you can try any of the following: •... - Page 67 A: This sometimes happens in the network configurations of schools or offices where you just cannot change the settings of the networks you can connect to. If the receiver device (WiPG-1600W) is not on the same subnet as the sender device (PC/Mac/mobile device), you can manually enter the IP address of the receiver device in the “Input hostname or IP”...
- Page 68 • If your sender device connects to the WiPG-1600W’s WiFi (the WiPG-1600W acts as an AP), make sure that your sender device is not too far away from the WiPG-1600W and avoid the physical interference (such as wall and other solid objects) in the wireless coverage.
- Page 69 WiPG-1600W User’s Manual Q: Why does the WiPG-1600W still lag when my sender device and the WiPG-1600W are connected via LAN? A: This may be caused by insufficient bandwidth. A common scenario is that when you project a high-resolution photo/video from your computer to the display, a “yellow turtle”...
-
Page 70: Disposal Information
WiPG-1600W User’s Manual Disposal Information Disposal of the product (Waste Electrical and Electronic Equipment) This symbol on the product indicates that, under the European Directive 2012/19/EU governing waste from electrical and electronic equipment, this product must not be disposed of with other municipal waste. -
Page 71: Open-Source And Third-Party Software Used In Wipg-1600W
WiPG-1600W User’s Manual Open-Source and Third-Party Software Used in WiPG-1600W WiPG-1600W utilizes open-source and third-party software components, which are licensed by their respective owners as indicated below. Open-Source Software Name Version From Licensing Terms Modified / Used busybox 1.1.2 http://www.busybox.net/ GPL 2.0...
Need help?
Do you have a question about the WiPG-1600W and is the answer not in the manual?
Questions and answers