
Related Manuals for SMART WSE-400


Summary of Contents for SMART WSE-400
- Page 1 SMART electric height-adjustable wall stand USER GUIDE WSE-410 (S410-2) Was this document helpful? smarttech.com/docfeedback/171627...
- Page 2 © 2020 SMART Technologies ULC. All rights reserved. No part of this publication may be reproduced, transmitted, transcribed, stored in a retrieval system or translated into any language in any form by any means without the prior written consent of SMART Technologies ULC. Information in this manual is subject to change without notice and does not represent a commitment on the part of SMART.
-
Page 3: Important Information
Use the stand only for its intended use as described in Use only SMART-supplied mounting hardware or these instructions. Do not use attachments not hardware that is designed to properly support the weight recommended by SMART Technologies. - Page 4 Replace a damaged power cord only with a new cord or furniture. Those who operate the stand must ensure and power bar provided by SMART Technologies or a that they and others stay clear of entrapment locations qualified service technician.
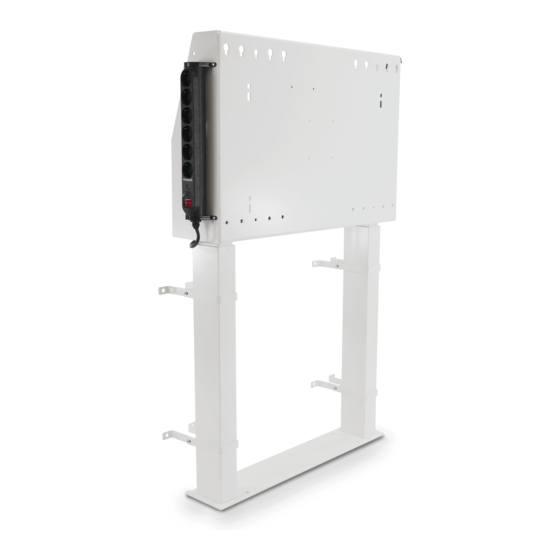
- Page 5 Important information Wall mount bracket WM-SBID-200 (Model W200-1) Subassemblies Laptop shelf FSE-400-LS 6 outlet power bar Model TPL615B smarttech.com/kb/171627...
-
Page 6: Table Of Contents
Contents Important information Chapter 1: About the stand Features Components Accessories More information Chapter 2: Assembling the stand Environmental requirements Considerations when assembling the stand Chapter 3: Using the stand Raising and lowering the stand Chapter 4: Troubleshooting the stand Resolving general issues Using the status light Factory resetting the stand... -
Page 7: Chapter 1: About The Stand
Features Components Control switch Accessories More information Features Your SMART electric height-adjustable wall stand has the following features: Feature Description Powered height With its 39 3/8" (99 cm) of electric-powered height adjustment, you can easily adjustment adjust the height of a mounted display with the press of a button. -
Page 8: Components
Chapter 1 About the stand Components The stand consists of the following components: Description Power bar Mounting holes Control switch Control switch You can raise and lower the stand with the control switch located on the right side of the stand. The control switch has three buttons and an indicator light. -
Page 9: Accessories
Use only the included six outlet power bar (model TPL615B) with the stand. More information See the following resources for more information: WSE-410 specifications: smarttech.com/kb/171628 WSE-410 illustrated installation instructions: smarttech.com/kb/171619 These documents are available in the Support section of the SMART website: smarttech.com/support. smarttech.com/kb/171627... -
Page 10: Chapter 2: Assembling The Stand
Assembling the stand Environmental requirements Considerations when assembling the stand The stand requires assembly. Consult the SMART electric height-adjustable wall stand illustrated installation instructions (smarttech.com/kb/171619) included with the stand for assembly instructions. WARNING Failure to follow the installation instructions included with the stand could result in personal injury or product damage. - Page 11 Do not set up or use the stand in an area with excessive levels of dust, dirt, humidity, or smoke. Review the following recommendations when using the WM-SBID-200 wall mount that is supplied with some SMART display models: Model(s) Recommendation SBID-MX265-V1/2 The wall mount supplied with these models is not compatible with the stand.
- Page 12 Chapter 2 Assembling the stand NOTE Please contact SMART Support (smarttech.com/contactsupport) if you need a WM-SBID-200 wall mount. smarttech.com/kb/171627...
-
Page 13: Chapter 3: Using The Stand
Chapter 3 Using the stand Raising and lowering the stand Resetting the stand Unlocking the height-adjustment safety lock Raising and lowering the stand Setting height limits Setting and using favorite positions Raising and lowering the stand WARNINGS Ensure the locking bolts are securely tightened before operating the stand. Do not allow children or people who are not able to safely operate the stand to use it. -
Page 14: Resetting The Stand
Chapter 3 Using the stand Resetting the stand The stand needs to be reset before you start to use it. To reset the stand 1. Connect the stand to a power outlet. 2. Press the , , and buttons in sequence, and then press down on the control switch for 5 seconds. -
Page 15: Setting Height Limits
Chapter 3 Using the stand To lower the stand 1. Press down and hold the control switch. The stand lowers. 2. Release the control switch to stop lowering the stand. Setting height limits You can set an upper and lower limit for the stand’s height adjustment. If there’s an object that’s blocking the stand’s adjustment path, the height limits prevent the stand from hitting the object. -
Page 16: Setting And Using Favorite Positions
Chapter 3 Using the stand Setting and using favorite positions You can save up to two positions in the stand’s memory. You can then raise or lower the stand to these favorite positions. To set a favorite position 1. Raise or lower the stand to the height you want to set as the favorite position. 2. - Page 17 Chapter 3 Using the stand To raise or lower the stand to a favorite position automatically Double-tap the control switch from the bottom to raise the stand or from the top to lower it. The stand rises or lowers until it reaches a favorite position. To stop the stand from rising or lowering, tap the control switch once.
-
Page 18: Chapter 4: Troubleshooting The Stand
Unplug the power cable for the stand. Wait 15 minutes and then reset the stand. The display doesn’t fit Ensure you’re using the mounting plate supplied with the SMART display. on the stand. If you’re using the stand with a third-party display, ensure the stand supports the display’s dimensions and mounting patterns (see... -
Page 19: Using The Status Light
The stand is locked after you first turn it There is a problem. Green Contact SMART Support (smarttech.com/contactsupport). Factory resetting the stand If the stand lowers but does not move when you try raising it or if you replace the controller, perform a factory reset by following the steps below. - Page 20 SMART TECHNOLOGIES smarttech.com/support smarttech.com/contactsupport smarttech.com/kb/171627...
Need help?
Do you have a question about the WSE-400 and is the answer not in the manual?
Questions and answers