Table of Contents
Advertisement
Available languages
Available languages
Advertisement
Chapters
Table of Contents

Related Manuals for SRAM Ematic


Summary of Contents for SRAM Ematic
- Page 1 95-3015-000-000 Rev C © 2013 SRAM LLC...
- Page 2 SRAM or its third party supplies be liable for direct, indirect, This warranty shall not cover damages caused by the use of special, incidental, or consequential damages.
-
Page 3: Table Of Contents
Table of ConTenTs SAfEty INStRuCtIoNS ............... 4 EMAtIC ANAtoMy ................. 5 hoW It WoRkS ..................6 FiRST RiDE ........................6 USinG THE RACK ......................6 INStALLAtIoN ..................7 WHEEl inSTAllATiOn ....................7 CHAin inSTAllATiOn ....................7 RACK inSTAllATiOn ..................... 8 BATTERy inSTAllATiOn ....................11... -
Page 4: Safety Instructions
Used batteries should be recycled or disposed of in accordance to local and federal regulations. For consumers in the United States and Canada, SRAM has partnered with the Rechargeable Battery Recycling Corporation. Please call 1-800-8-BATTERy or visit www.rbrc.org for additional information. -
Page 5: Ematic Anatomy
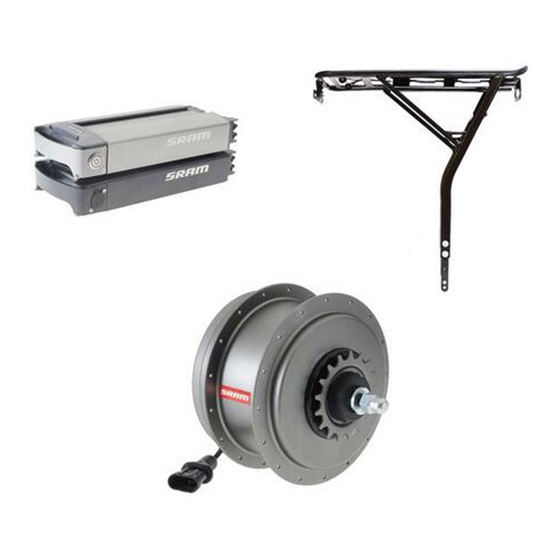
E M A t I C A N A t o M y DECK REFlECTOR/ DOCK liGHT MOUnT RACK COnnECTinG RODS CROSS BRACE SOCKET COnnECTOR PlUG BATTERy Ematic anatomy... -
Page 6: How It Works
h o W I t W o R k S f I R S t R I d E Make sure your path is clear and use caution when pedaling into corners. Turn on the electric assist hub by pressing the power button located on the battery. Once you begin to pedal, the hub will automatically engage and provide assistance. -
Page 7: Installation
• Make sure your chain has the proper tension and is not excessively tight in any single spot through the drivetrain. • EMATiC is designed for a singlespeed drivetrain only and is not to be used with front or rear derailleurs. -
Page 8: Rack Installation
R A C k I N S t A L L A t I o N 1. if the connecting rods are not pre-assembled, use the mounting hardware to assemble the connecting rods and bolt them into the cross brace of the rack. Use a 4 mm hex wrench to tighten the bolts to 6-8 n m (53-70 in-lb). - Page 9 R A C k I N S t A L L A t I o N 1. Position the rack extensions vertically against the lower rack mounts on the frame. install the bolt and washer, included with your frame, through each rack extension and into the frame. Tighten to the frame manufacturer’s specification.
- Page 10 R A C k I N S t A L L A t I o N 5. Use a 4 mm hex wrench to install two bolts with washers through the rack legs and into the extensions. Tighten the bolts to 6-8 n m (53-70 in-lb).
-
Page 11: Battery Installation
b A t t E R y I N S t A L L A t I o N 1. Lift the reflector/light mount. 2. Align the grooves in the top of the battery with the rails under the rack deck. Use the handle to push the battery into the rack until the electrical contacts on the battery and rack securely connect. -
Page 12: Charger
C h A R g E R N ot i c e the battery can become permanently damaged if left completely discharged. C h A R g I N g t h E b A t t E R y 1. -
Page 13: Battery & Hub
b A t t E R y & h u b • no memory effect; the battery does not require full charge or full discharge between charging cycles. • Capacity will slowly decrease with use at the rate of ~20% per 500 full discharge-charge cycles. Charge Time lithium-ion Battery Voltage... -
Page 14: Maintenance And Care
M A I N t E N A N C E A N d C A R E • EMATiC is only serviceable by your dealer. non-authorized service will void the SRAM warranty. Consult your dealer if you are unsure about the condition of your EMATiC. -
Page 15: Troubleshooting
t R o u b L E S h o o t I N g battery will not charge • Check the charge level to verify that the battery needs to be charged. • Check that the connector is installed correctly. •... - Page 16 95-3015-000-000 Rev C © 2013 SRAM LLC...
- Page 17 Haftung für direkte, indirekte, spezielle, Schäden infolge der Verwendung von Teilen, die nicht zufällige oder Folgeschäden aus. kompatibel oder geeignet sind bzw. nicht von SRAM für die garantieausschluss Verwendung mit SRAM-Komponenten autorisiert wurden, sind Die Garantie gilt nicht für Produkte, die nicht fachgerecht bzw.
- Page 18 InHalT SIChERhEItShINWEISE ..............19 AufbAu dES EMAtIC-ANtRIEbS ............. 20 fuNktIoNSWEISE ................21 ERSTE FAHRT ....................... 21 VERWEnDUnG DES GEPÄCKTRÄGERS ..............21 EINbAu ....................22 EinBAU DES lAUFRADS ....................22 KETTEnMOnTAGE ......................22 MOnTAGE DES GEPÄCKTRÄGERS ................23 EinBAU DER BATTERiE ....................26 AnBRinGEn DER STECKVERBinDER ...............
-
Page 19: Sicherheitshinweise
Verbrauchte Batterien müssen der Wiederverwertung zugeführt oder vorschriftsgemäß entsorgt werden. Für Kunden in den USA und Kanada ist SRAM eine Partnerschaft mit der Rechargeable Battery Recycling Corporation eingegangen. Rufen Sie 1-800-8-BATTERy an oder besuchen Sie www.rbrc.org, um weitere informationen zu erhalten. -
Page 20: Aufbau Des Ematic-Antriebs
A u f b A u d E S E M A t I C - A N t R I E b S PlATTE REFlEKTOR/liCHT- DOCK- BEFESTiGUnG VORRiCHTUnG GEPÄCKTRÄGER VERBinDUnGSSTAnGEn QUERSTREBE SOCKEl STECKVERBinDER nABE STECKER BATTERiE AufbAu Des emAtic-Antriebs... -
Page 21: Funktionsweise
f u N k t I o N S W E I S E E R S t E f A h R t Stellen Sie sicher, dass die Strecke frei ist und seien Sie vorsichtig, wenn Sie um eine Ecke biegen. Schalten Sie die elektrische Unterstützungsnabe ein, indem Sie den Ein/Aus-Schalter an der Batterie drücken. -
Page 22: Einbau
• Stellen Sie sicher, dass die Kette ordnungsgemäß gespannt ist und nicht an einzelnen Punkten des Antriebsstrangs übermäßig fest sitzt. • EMATiC ist für eine 1-fach-Kette ausgelegt und darf nicht mit Umwerfern oder Schaltwerken verwendet werden. • Bei senkrechten Ausfallenden ist ein Kettenspanner erforderlich. -
Page 23: Montage Des Gepäckträgers
M o N t A g E d E S g E P Ä C k t R Ä g E R S 1. Wenn die Verbindungsstangen nicht vormontiert sind, setzen Sie sie mit den Befestigungsteilen zusammen und schrauben Sie sie in die Querstrebe des Gepäckträgers. Ziehen Sie die Schrauben mit einem 4-mm-inbusschlüssels mit 6 bis 8 n•m fest. - Page 24 M o N t A g E d E S g E P Ä C k t R Ä g E R S 1. Platzieren Sie die Gepäckträger-Verlängerungen senkrecht an den unteren Gepäckträgeraufnahmen am Rahmen. Stecken Sie jeweils eine der mit ihrem Rahmen geliefertem Schrauben samt Unterlegscheibe durch die Gepäckträger-Verlängerung in den Rahmen.
- Page 25 M o N t A g E d E S g E P Ä C k t R Ä g E R S 5. Schrauben Sie mit einem 4-mm-inbusschlüssel zwei Schrauben mit Unterlegscheiben durch die unteren Gepäckträgerstreben in die Verlängerungen. Ziehen Sie die Schrauben mit 6 bis 8 n•m fest. Stellen Sie sicher, dass sich die unteren Gepäckträgerstreben auf beiden Seiten auf derselben Höhe befinden.
-
Page 26: Einbau Der Batterie
E I N b A u d E R b A t t E R I E 1. Heben Sie die Reflektor/Licht-Befestigung an. 2. Richten Sie die Kerben auf der Oberseite der Batterie auf die Schienen unter der Gepäckträgerplatte aus. Schieben Sie die Batterie mit dem Griff in den Gepäckträger, bis die elektrischen Kontakte der Batterie und des Gepäckträgers sicher verbunden sind. -
Page 27: Ladegerät
L A d E g E R Ä t H i N W e i S die batterie kann dauerhaft beschädigt werden, wenn sie längere Zeit vollständig entladen ist. L A d E N d E R b A t t E R I E 1. -
Page 28: Batterie Und Nabe
b A t t E R I E u N d N A b E • Die Batterie hat keinen Memory-Effekt; sie muss zwischen ladezyklen nicht vollständig geladen oder entladen werden. • Die Kapazität nimmt langsam ab, um ca. 20 % pro 500 vollständige Entlade-lade-Zyklen. ladedauer lithium-ionen- Akku Spannung... -
Page 29: Wartung Und Pflege
W A R t u N g u N d P f L E g E • Der EMATiC-Antrieb darf nur von ihrem Händler gewartet werden. Bei unbefugten Eingriffen erlischt die Garantie von SRAM. Wenden Sie sich an ihren Händler, wenn Sie sich bezüglich des Zustands des EMATiC-Antriebs nicht sicher sind. -
Page 30: Störungsbeseitigung
S t Ö R u N g S b E S E I t I g u N g batterie wird nicht geladen • Prüfen Sie den ladezustand, um sich zu vergewissern, dass die Batterie geladen werden muss. • Vergewissern Sie sich, dass der Steckverbinder richtig angebracht ist. •... - Page 31 95-3015-000-000 Rev C © 2013 SRAM LLC...
- Page 32 SRAM. Se requerirá prueba de compra original. Esta garantía no se aplicará cuando el número de serie o el código Aparte de lo indicado expresamente en este documento, de producción se hayan modificado, desfigurado o eliminado...
- Page 33 ÍnDICe TeMÁTICo INStRuCCIoNES dE SEguRIdAd ............. 34 ANAtoMÍA dEL SIStEMA EMAtIC ............ 35 CÓMo fuNCIoNA ................36 lA PRiMERA VEZ QUE MOnTE ................... 36 UTiliZACiÓn DEl PORTAOBJETOS ................36 INStALACIÓN ..................37 inSTAlACiÓn DE lA RUEDA ..................37 inSTAlACiÓn DE lA CADEnA ..................37 inSTAlACiÓn DEl PORTAOBJETOS ................
-
Page 34: Instrucciones De Seguridad
At E N C I Ó N Riesgo de incendio, explosión o descarga eléctrica. Utilice sólo cargadores suministrados por SRAM. El empleo de cualquier otro tipo de cargador puede provocar que la batería se recaliente, se incendie, o incluso llegue a explotar. -
Page 35: Anatomía Del Sistema Ematic
A N A t o M Í A d E L S I S t E M A E M A t I C PlATAFORMA SOPORTE AnClAJE PARA lUZ O REFlECTAnTE VARillAS DE PORTAOBJETOS COnEXiÓn TRAVESAÑO RECEPTÁCUlO COnECTOR BUJE MOTORiZADO EnCHUFE BATERÍA AnAtomíA Del SiStemA emAtic... -
Page 36: Cómo Funciona
C Ó M o f u N C I o N A L A P R I M E R A V E Z Q u E M o N t E Asegúrese de que el camino esté despejado y tenga cuidado al doblar esquinas mientras pedalea. Para activar el buje motorizado de asistencia eléctrica, pulse el botón de encendido situado sobre la batería. -
Page 37: Instalación
• Asegúrese de que la cadena tenga la tensión adecuada y no esté demasiado tensa en ningún punto del recorrido de la transmisión. • El sistema EMATiC está diseñado para transmisiones monovelocidad, por lo que no puede utilizarse con desviadores delanteros o traseros. -
Page 38: Instalación Del Portaobjetos
I N S t A L A C I Ó N d E L P o R t A o b J E t o S 1. Si las varillas de conexión no vienen ya ensambladas, utilice las herramientas de montaje para ensamblarlas y atornillarlas al travesaño del portaobjetos. - Page 39 I N S t A L A C I Ó N d E L P o R t A o b J E t o S 1. Coloque las extensiones del portaobjetos en posición vertical, contra los soportes inferiores para portaobjetos del cuadro.
- Page 40 I N S t A L A C I Ó N d E L P o R t A o b J E t o S 5. Con una llave Allen de 4 mm, instale dos tornillos, con sus respectivas arandelas, haciéndolos pasar a través de los brazos del portaobjetos y de las extensiones.
-
Page 41: Instalación De La Batería
I N S t A L A C I Ó N d E L A b A t E R Í A 1. Levante el soporte para la luz o reflectante. 2. Alinee los surcos que hay en la parte superior de la batería con los carriles situados debajo de la plataforma del portaobjetos. -
Page 42: Cargador
C A R g A d o R AV i S o La batería puede sufrir daños irreversibles si se deja completamente descargada. R E C A R g A d E L A b A t E R Í A 1. -
Page 43: Batería Y Buje Motorizado
b A t E R Í A y b u J E M o t o R I Z A d o • Sin efecto memoria; la batería no necesita cargarse o descargarse completamente entre un ciclo de carga y otro. •... -
Page 44: Mantenimiento Y Conservación
M A N t E N I M I E N t o y C o N S E R V A C I Ó N • El mantenimiento o reparación del sistema EMATiC sólo pueden ser realizados por su distribuidor autorizado. -
Page 45: Resolución De Problemas
R E S o L u C I Ó N d E P R o b L E M A S La batería no se carga • Compruebe el nivel de carga para verificar si la batería necesita recargarse. • Compruebe que el conector esté bien instalado. •... - Page 46 95-3015-000-000 Rev C © 2013 SRAM LLC...
- Page 47 être adressées au revendeur auprès duquel de composants électroniques connexes, comme le moteur, le le vélo ou la pièce SRAM a été acheté(e). Une preuve d’achat dispositif de commande, les blocs batteries, les faisceaux de originale sera exigée. À l’exception de ce qui est décrit dans fils, les commutateurs et les chargeurs.
- Page 48 Table Des MaTIÈRes CoNSIgNES dE SÉCuRItÉ ..............49 PIÈCES PouR L’EMAtIC ..............50 CoMMENt ÇA MARChE ..............51 PREMiÈRE SORTiE ....................... 51 UTiliSATiOn DU PORTE-BAGAGE................51 MoNtAgE ..................... 52 inSTAllATiOn DE lA ROUE..................52 inSTAllATiOn DE lA CHAÎnE ..................52 inSTAllATiOn DU PORTE-BAGAGE ................
-
Page 49: Consignes De Sécurité
être recyclées ou jetées conformément à la règlementation locale ou nationale. Pour les consommateurs des États-Unis et du Canada, SRAM s’est associé à la Rechargeable Battery Recycling Corporation. Prière d’appeler le 1-800-8-BATTERy ou de consulter le site www.rbrc.org pour de plus amples informations. -
Page 50: Pièces Pour L'ematic
P I È C E S P o u R L ’ E M A t I C PlATEAU SUPPORT POUR PlAQUE STATiOn RÉFlÉCHiSSAnTE/ D’ACCUEil PHARE PORTE-BAGAGE BARRES DE FiXATiOn CROiSillOn PRiSE COnnECTEUR MOyEU FiCHE BATTERiE Pièces Pour L’ematic... -
Page 51: Comment Ça Marche
C o M M E N t Ç A M A R C h E P R E M I È R E S o R t I E S’assurer que la voie est dégagée et pédaler avec prudence dans les virages. Mettre en marche l’assistance électrique du moyeu en appuyant sur le bouton d’alimentation situé... -
Page 52: Montage
• S’assurer que la chaîne possède la tension appropriée et qu’à aucun point de son parcours elle ne soit trop tendue. • l’EMATiC est conçu pour une distribution à pignon unique seulement et il ne doit pas être utilisé avec des dérailleurs avant ou arrière. -
Page 53: Installation Du Porte-Bagage
I N S t A L L A t I o N d u P o R t E - b A g A g E 1. Si les barres de fixation ne sont pas préassemblées, utiliser les éléments de montage pour assembler les barres de fixation ;... - Page 54 I N S t A L L A t I o N d u P o R t E - b A g A g E 1. Placer les extensions du porte-bagage à la verticale contre les supports inférieurs pour porte-bagage situés sur le cadre.
- Page 55 I N S t A L L A t I o N d u P o R t E - b A g A g E 5. À l’aide d’une clé Allen de 4 mm, installer les deux boulons avec leur rondelle sur les pattes du porte- bagage pour les fixer aux extensions.
-
Page 56: Installation De La Batterie
I N S t A L L A t I o N d E L A b A t t E R I E 1. Relever le support pour plaque réfléchissante/phare. 2. Aligner les rainures situées sur le haut de la batterie avec les rails situés sous le plateau du porte- bagage. -
Page 57: Chargeur
C h A R g E u R AV i S La batterie peut s’endommager irrémédiablement si elle reste totalement déchargée pendant trop longtemps. R E C h A R g E R L A b A t t E R I E 1. -
Page 58: Batterie Et Moyeu
b A t t E R I E E t M o y E u • Pas d’effet mémoire ; la batterie n’a pas besoin d’être totalement chargée ou déchargée entre les recharges. • La capacité de recharge va diminuer légèrement au fil des utilisations : ~20 % par tranche de 500 cycles complets de charge et décharge. -
Page 59: Maintenance Et Entretien
M A I N t E N A N C E E t E N t R E t I E N • Seul votre revendeur est habilité à entretenir l’EMATiC. Un entretien non-homologué annulera la garantie SRAM. Consulter le revendeur si vous avez un doute sur l’état de l’EMATiC. -
Page 60: Dépannage
d É P A N N A g E La batterie ne se recharge pas • Vérifier le niveau de charge pour s’assurer que la batterie a besoin d’être rechargée. • Vérifier que le connecteur est correctement installé. • S’assurer que le connecteur et le câble n’ont pas été endommagés. L’assistance électrique fournit une assistance trop grande ou trop faible par rapport aux besoins •... - Page 61 95-3015-000-000 Rev C © 2013 SRAM LLC...
- Page 62 è stata acquistata la bicicletta o il componente SRAM. È richiesta una prova d’acquisto originale. Eccetto come la presente garanzia non si applica nel caso che il numero...
- Page 63 IStRuZIoNI dI SICuREZZA ..............64 ANAtoMIA dI EMAtIC ................. 65 fuNZIoNAMENto ................66 PRiMO UTiliZZO ......................66 UTiliZZO DEllA RASTRElliERA ................66 INStALLAZIoNE .................. 67 inSTAllAZiOnE DEllE RUOTE .................. 67 inSTAllAZiOnE DEllA CATEnA ................67 inSTAllAZiOnE DEllA RASTRElliERA ..............68 inSTAllAZiOnE DEllA BATTERiA ................
-
Page 64: Istruzioni Di Sicurezza
Per gli utenti negli Stati Uniti e in Canada, SRAM è partner della Rechargeable Battery Recycling Corporation. Per ulteriori informazioni, chiamare il numero 1-800-8-BATTERy o visitare il sito www.rbrc.org. -
Page 65: Anatomia Di Ematic
A N A t o M I A d I E M A t I C POnTE ATTACCO PER PiAnO Di RiFlETTORE/lUCi CARiCO RASTRElliERA BiEllE TRAVERSA PRESA COnnETTORE MOZZO SPinA BATTERiA AnAtomiA Di EmAtic... -
Page 66: Funzionamento
f u N Z I o N A M E N t o P R I M o u t I L I Z Z o Accertarsi che il percorso sia libero e prestare attenzione nel pedalare negli angoli. Attivare il mozzo del servocomando elettrico premendo il pulsante di accensione posizionato sulla batteria. -
Page 67: Installazione
• Accertarsi che la catena utilizzata abbia la giusta tensione e che non sia eccessivamente tesa in nessun singolo punto della trasmissione. • EMATiC è progettata esclusivamente per trasmissione a velocità singola e non va utilizzata con deragliatori anteriori e posteriori. -
Page 68: Installazione Della Rastrelliera
I N S t A L L A Z I o N E d E L L A R A S t R E L L I E R A 1. Se le bielle non sono preassemblate, utilizzare gli attrezzi per montaggio per assemblarle e fissarle con i bulloni alla traversa della rastrelliera. - Page 69 I N S t A L L A Z I o N E d E L L A R A S t R E L L I E R A 1. Posizionare le prolunghe della rastrelliera verticalmente rispetto ai portapacchi inferiori sul telaio. installare il bullone e la rondella, inclusi col telaio, su ciascuna prolunga e nel telaio.
- Page 70 I N S t A L L A Z I o N E d E L L A R A S t R E L L I E R A 5. Utilizzare una chiave esagonale da 4 mm per montare i due bulloni con le rondelle sui bracci della rastrelliera e nelle prolunghe.
-
Page 71: Installazione Della Batteria
I N S t A L L A Z I o N E d E L L A b A t t E R I A 1. Sollevare l’attacco per riflettore/luce. 2. Allineare le scanalature sulla parte superiore della batteria con le rotaiette sotto il ponte della rastrelliera. -
Page 72: Caricatore
C A R I C A t o R E N otA La batteria potrebbe danneggiarsi in maniera definitiva se lasciata completamente scarica. R I C A R I C A d E L L A b A t t E R I A 1. -
Page 73: Batteria E Mozzo
b A t t E R I A E M o Z Z o • nessun effetto sulla memoria; tra i cicli di carica non è necessario caricare o scaricare completamente la batteria. • la capacità diminuirà lentamente con l’uso nella misura di ~20% per 500 cicli di carica-scarica completi. Tempo di carica Batteria agli ioni di litio Voltaggio... -
Page 74: Manutenzione E Cura
M A N u t E N Z I o N E E C u R A • l’assistenza tecnica di EMATiC è fornita solo presso il proprio concessionario. interventi di assistenza non autorizzati annulleranno la garanzia SRAM. Rivolgersi al proprio concessionario se non si è certi delle condizioni del proprio EMATiC. -
Page 75: Risoluzione Dei Problemi
R I S o L u Z I o N E d E I P R o b L E M I La batteria non si carica • Controllare il livello di carica per verificare che la batteria debba essere caricata. •... - Page 76 95-3015-000-000 Rev C © 2013 SRAM LLC...
- Page 77 Tenzij anders aangegeven in deze handleiding, garandeert product is blootgesteld aan krachten of lasten waarvoor het niet SRAM zijn producten voor een periode van twee jaar na de ontworpen is. oorspronkelijke aankoopdatum vrij van defecten in materialen Deze garantie is niet van toepassing als het product werd of vakmanschap.
- Page 78 InHoUDsoPGaVe VEILIghEIdSINStRuCtIES ..............79 ANAtoMIE VAN EMAtIC ..............80 hoE WERkt hEt ................. 81 EERSTE RiT ........................81 HET REK GEBRUiKEn ....................81 INStALLAtIE ..................82 inSTAllATiE VAn HET WiEl ..................82 inSTAllATiE VAn DE KETTinG .................. 82 inSTAllATiE VAn HET REK ..................83 inSTAllATiE VAn DE ACCU ..................
-
Page 79: Veiligheidsinstructies
Gebruikte accu’s moet worden gerecycled of worden weggegooid overeenkomstig de plaatselijke en nationale voorschriften. Voor verbruikers in de Verenigde Staten en Canada heeft SRAM een partnership aangegaan met de “Rechargeable Battery Recycling Corporation”. neem telefonisch contact op met 1-800-8-BATTERy of bezoek www.rbrc.org voor meer informatie. -
Page 80: Anatomie Van Ematic
A N A t o M I E V A N E M A t I C MOnTAGE- OPPERVlAK VOOR REFlECTOR/liCHT VERBinDinGSSTAVEn KRUiSKlAMP BUiSMOF VERBinDinGSSTUK nAAF PlUG ACCU AnAtomie VAn emAtic... -
Page 81: Hoe Werkt Het
h o E W E R k t h E t E E R S t E R I t Zorg dat er zich geen obstakels op uw route bevinden en wees voorzichtig wanneer u in bochten fietst. Schakel de elektrische bijstandsnaaf in door op de aan/uit-knop die zich op de accu bevindt te drukken. -
Page 82: Installatie
• Zorg dat uw ketting onder de juiste spanning staat en op geen enkele plaats in de aandrijflijn te strak is aangespannen. • EMATIC is alleen ontworpen voor een single speed aandrijflijn en mag niet worden gebruikt met voor- of achterderailleurs. -
Page 83: Installatie Van Het Rek
I N S t A L L A t I E V A N h E t R E k 1. Als de verbindingsstaven niet op voorhand zijn gemonteerd, gebruik het montagegereedschap om de verbindingsstaven in elkaar te steken en schroef deze vervolgens in de kruisklamp van het rek. Draai de bouten aan tot 6-8 n•m met behulp van een 4 mm inbussleutel. - Page 84 I N S t A L L A t I E V A N h E t R E k 1. Plaats de rekverlengstukken verticaal tegen de onderste rekmontagegaten op het frame. Breng de bout en sluitring, die met uw frame zijn meegeleverd, door elk rekverlengstuk en in het frame. Draai aan volgens de aanwijzingen van de fabrikant van het frame.
- Page 85 I N S t A L L A t I E V A N h E t R E k 5. installeer twee bouten met sluitringen door de rekstaven en in de verlengstukken met gebruik van een 4 mm inbussleutel. Draai de bouten aan tot 6-8 n•m. Zorg dat de rekstaven aan beide zijden zich op dezelfde hoogte bevinden.
-
Page 86: Installatie Van De Accu
I N S t A L L A t I E V A N d E A C C u 1. Til het montage-oppervlak voor de reflector/licht op. 2. Breng de groeven bovenaan de accu op één lijn met de rails onderaan het dek van het rek. Gebruik de hendel om de accu in het rek te duwen totdat de elektrische contactpunten op de accu op een juiste manier met het rek zijn verbonden. -
Page 87: Lader
L A d E R M e D e D e L i N G de accu kan permanente schade oplopen als deze volledig wordt ontladen. d E A C C u L A d E N 1. De accu kan worden geladen wanneer deze op het rek is geïnstalleerd, of deze kan van de fiets worden afgehaald. -
Page 88: Accu & Naaf
A C C u & N A A f • Geen geheugeneffect; het is niet nodig om de accu tussen laadcycli volledig op te laden of volledig te ontladen. • De capaciteit neemt langzaam af tijdens gebruik tegen een snelheid van ~20% per 500 volledige laad-ontlaadcycli. -
Page 89: Onderhoud En Zorg
• EMATiC kan enkel door uw handelaar worden gerepareerd. Een onbevoegde reparatie maakt de SRAM- garantie ongeldig. neem contact op met uw handelaar als u twijfelt over de toestand van uw EMATiC. • Draai alle bouten en asmoeren regelmatig vast. -
Page 90: Probleemoplossing
P R o b L E E M o P L o S S I N g Accu laadt niet op • Controleer het laadniveau om te checken of de accu dient te worden opgeladen. • Controleer of het verbindingsstuk juist is geïnstalleerd. •... - Page 91 95-3015-000-000 Rev C © 2013 SRAM LLC...
- Page 92 âmbito desta garantia têm de ser feitas através do retalhista com a electrónica, incluindo o motor, controlador, conjuntos de onde a bicicleta ou o componente SRAM foi adquirido. É exigido baterias, conjunto de cabos, interruptores e carregadores. o comprovante de compra. Excepto conforme se descreva aqui, a SRAM não dá...
- Page 93 ÍnDICe INStRuÇÕES dE SEguRANÇA ............94 ANAtoMIA do EMAtIC ............... 95 CoMo fuNCIoNA ................96 A PRiMEiRA VOlTA nA BiCiClETA ................96 UTiliZAÇÃO DA PRATElEiRA ..................96 INStALAÇÃo ..................97 inSTAlAÇÃO DA RODA ....................97 inSTAlAÇÃO DA CORREnTE ..................97 inSTAlAÇÃO DA PRATElEiRA ..................
-
Page 94: Instruções De Segurança
A V I S o Perigos de fogo, explosão e choque. Use apenas o carregador fornecido pela SRAM. O uso de outros carregadores pode fazer com que a bateria sobreaqueça, se inflame ou expluda. Evite temperaturas excessivas; armazene de -20°C a 30°C. -
Page 95: Anatomia Do Ematic
A N A t o M I A d o E M A t I C PlATAFORMA MOnTAGEM DE EnCAiXE REFlECTOR OU lUZ PRATElEiRA VARAS DE liGAÇÃO TRAVESSA TOMADA CUBO COnECTOR RODA FiCHA BATERiA AnAtomiA Do EmAtic... -
Page 96: Como Funciona
C o M o f u N C I o N A A P R I M E I R A V o L t A N A b I C I C L E t A Assegure-se de que o seu caminho está desimpedido e tenha cuidado quando pedalar nas curvas. ligue a assistência eléctrica carregando no botão de energia localizado sobre a bateria. -
Page 97: Instalação
• Assegure-se de que a sua corrente tem a tensão apropriada e não ficou excessivamente justa em nenhum sítio por todo o sistema de propulsão. • O EMATiC foi projectado apenas para um sistema de propulsão de uma só velocidade e não deverá ser usado com mudanças (derailleurs) da frente nem da traseira. -
Page 98: Instalação Da Prateleira
I N S t A L A Ç Ã o d A P R A t E L E I R A 1. Se as varas de ligação não estiverem pré-montadas, use as peças de montagem para instalar as varas de ligação e aparafusá-las à travessa da prateleira. Use uma chave sextavada de 4 mm para apertar os pernos a 6 - 8 N∙m. - Page 99 I N S t A L A Ç Ã o d A P R A t E L E I R A 1. Posicione as extensões da prateleira verticalmente contra os buracos de montagem inferiores da prateleira, no quadro. instale o perno e a anilha, incluídos com o seu quadro, através de cada uma das extensões da prateleira e enfie no quadro.
- Page 100 I N S t A L A Ç Ã o d A P R A t E L E I R A 5. Use uma chave sextavada de 4 mm para instalar dois pernos com anilhas através das pernas da prateleira e para dentro das extensões.
-
Page 101: Instalação Da Bateria
I N S t A L A Ç Ã o d A b A t E R I A 1. Levante a peça de montagem do reflector/luz. 2. Alinhe as ranhuras no lado de cima da bateria com os carris por baixo da plataforma. Use a pega para empurrar a bateria para dentro da prateleira até... -
Page 102: Carregador
C A R R E g A d o R N ot i F i c AÇ Ão A bateria pode ficar permanentemente danificada se a deixar completamente descarregada. C A R R E g A R A b A t E R I A 1. -
Page 103: Bateria E Cubo
b A t E R I A E C u b o • não há efeito de memória; a bateria não exige uma carga nem uma descarga completas entre ciclos de carga. • A capacidade irá decrescendo lentamente com o uso, a um ritmo de ~20% por 500 ciclos de descarga-carga completos. -
Page 104: Manutenção E Cuidados
M A N u t E N Ç Ã o E C u I d A d o S • A manutenção do EMATiC só pode ser feita pelo seu concessionário. Serviços não autorizados irão anular a garantia da SRAM. Consulte o seu concessionário se não tiver a certeza do estado do seu EMATiC. -
Page 105: Resolução De Avarias
R E S o L u Ç Ã o d E A V A R I A S A bateria não carrega. • Verifique o nível da carga para verificar se a bateria precisa de ser carregada. • Verifique se o conector está instalado correctamente. •... - Page 106 95-3015-000-000 Rev C © 2013 SRAM LLC...
- Page 118 1-10% 11-20% 21-40% 41-60% 61-80% 81-100%...
- Page 121 95-3015-000-000 Rev C © 2013 SRAM LLC...
- Page 133 1-10% 11-20% 21-40% 41-60% 61-80% 81-100%...
- Page 136 SRAM llC SRAM Taiwan SRAM Europe 1333 North Kingsbury, 4th floor no. 1598-8 Chung Shan Road Paasbosweg 14-16 Chicago, illinois 60642 Shen Kang Hsiang, Taichung 3862 ZS nijkerk County 429 · Taiwan The netherlands 95-3015-000-000 Rev C © 2013 SRAM LLC...
Need help?
Do you have a question about the Ematic and is the answer not in the manual?
Questions and answers