
Related Manuals for Godex AG2000


Summary of Contents for Godex AG2000
- Page 1 AG2000 LABEL APPLICATOR USER MANUAL GODEX Europe GmbH Arnzhäuschen 36 – 42929 Wermelskirchen – Germany Tel. +49.2193.533.96.13 / +49.2193.533.96.24 Mail. technik@godex.eu www.godexintl.com...
-
Page 2: Table Of Contents
AG2000 USER MANUAL CONTENTS Description Assembly Operation Adjusting the applicator and ventilator unit Control unit Controls Connection of product sensor Warranty Certifications Support Contents... -
Page 3: Description 03
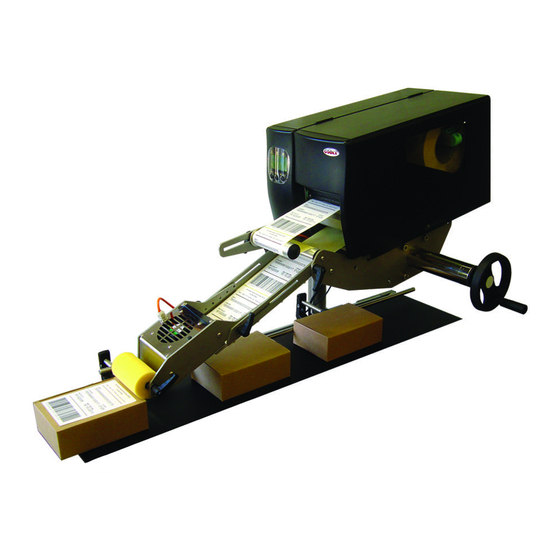
The applicator arm allows automatic applying of labels to products on a driven belt or roller conveyer. The bracket is specifically designed to for use with Godex 4” wide industrial thermal transfer label printers. The printer attaches to the applicator arm with 4 specially modified bolts Printed labels pass around roller 1 attached to bracket 2. -
Page 4: Assembly 04
Assembly Set up the stand and install the applicator arm on the stand tightly in position. Fasten EZ-2000 Plus printer onto the arm using the 4 bolts included: Bolt control box on the side of applicator arm:... - Page 5 Assembly Bolt the ventilator unit 4 on the applicator arm 5 with the easy-release screws: Connect the cable between the control unit and the printer applicator port. Connect the ventilator power cable with the control unit. Connect a sensor with the CAN9 connector on the control unit. Connect the power cable to the printer.
-
Page 6: Operation 06
Operation For correct function the printer must have a label design downloaded and set in "Applicator" mode. Also make sure that the applicator arm 5 is in a correct position and roller no. 3 presses firm enough on the product without slowing it down when passing by. The next step is to adjust the applicator to the label length and bring the first printed label into application position underneath the fan unit and pinch roller 3. -
Page 7: Control Unit
Control unit The control unit for the Godex applicator arm is connected to the printer via the applicator interface of the printer and provides controls to start printing and applying labels either manually or using the product sensor. Size: 90 x 40 x 110mm Max. -
Page 8: Controls 07
Controls Rear Panel Connection of product sensor Use only 24V PNP sensors using the DB9 connector on the rear of the control panel. Sensor is powered from the printer (max 300mA). Printing is triggered with the leading edge of the 24V signal. -
Page 9: Support 09
CE Compliance The AG2000 applicator system is not subject to CE certification as it is a device that can only be operated as a subordinate extension of another device (the printer). The integrated ventilator is CE certified.
Need help?
Do you have a question about the AG2000 and is the answer not in the manual?
Questions and answers