
Related Manuals for LaserPoint Plus 2


Summary of Contents for LaserPoint Plus 2
- Page 1 Laserpoint srl - Via Burona, 51 - 20090 Vimodrone (Milano) - Italy Phone +39 02 27 400 236 - Fax +39 02 25 029 161- www.laserpoint.eu Laserpoint s.r.l. - Plus 2 - Quick Start Guide - All Rights Reserved...
-
Page 2: Quick Introduction
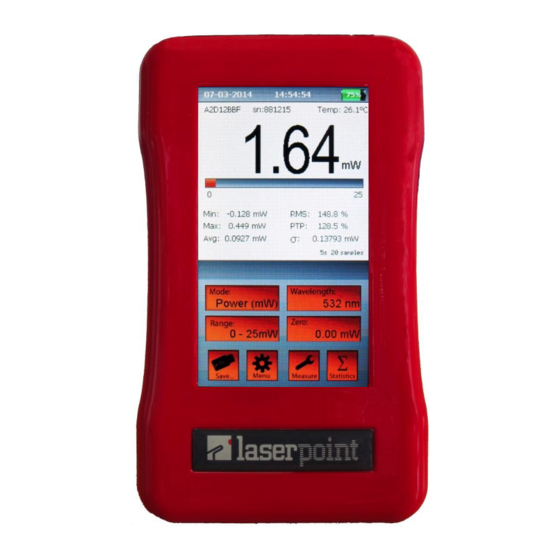
2.1. D ISPLAY STRUCTURE Figure 1 shows an image of Plus 2 meter touch screen display; the upper part of the display reports the measurement information and the lower part is filled with touch buttons for measurement settings. Each part of the display has horizontal sections showing specific... - Page 3 "NO HEAD" blinking notice appearing on the display and the consequent display switch off occurring in few seconds. To turn Plus 2 off press the on-off button for few seconds until the display goes off. The current Plus 2 settings are automatically saved before the instrument switches off.
- Page 4 ETTINGS All meter adjustments, including ADC zeroing, are carried out by Plus 2 firmware. However Laserpoint recommend to reset Plus 2 Meter every time a new sensor head is being plugged in following the instructions given below: Press for more the Zero button...
- Page 5 Set the Energy Mode as described above. The green spot at the right-hand side of the measured value indicates that Plus 2 meter is ready to measure an energy pulse (Figure 8). During the laser pulse, the upper part of the display shows the notice “Acquisition”, but shows no figures and the green spot turns red...
- Page 6 ), while in Energy mode they’ll be displayed as Fluence (unit of measure: J/cm c) To de-activate Irradiance/Fluence mode, select ”none” for Figure 12 shape in “Measure Settings” window. Laserpoint s.r.l. - Plus 2 - Quick Start Guide - All Rights Reserved...
- Page 7 Manual acquisition: check this box to start and stop the acquisition manually. Timed acquisition: de-select the “Manual acquisition” box and input the desired time acquisition value to define when the data acquisition has to be stopped. Laserpoint s.r.l. - Plus 2 - Quick Start Guide - All Rights Reserved...
- Page 8 “Menu” interactive window. c) Display off: after a certain time of Plus 2 inactivity the display turns off showing a stand-by notice only. Selecting ON/OFF activate/deactivate this feature; if ON has been selected, Figure 18 Display off time can be set from 1 to 30 minutes.
- Page 9 ON has been selected, Auto off time can be set from 1 to 600 minutes. Note both “Auto off” and “Display off” features are active only when Plus 2 is powered by its battery. When Plus 2 is plugged in a power line both the instrument and its display will remain on regardless to Auto off and Display off set values.
- Page 10 > 15 hours in stand-by display mode Input 100/240Vac 50/60Hz Out 5Vdc 1A, Charging current is 0.5A (Plus 2 may be charged Supplied Battery Charger through a PC USB port). Laserpoint s.r.l. - Plus 2 - Quick Start Guide - All Rights Reserved...
Need help?
Do you have a question about the Plus 2 and is the answer not in the manual?
Questions and answers