Northern Lights M773LW3 Operator's Manual
Hide thumbs
Also See for M773LW3:
- Operator's manual (44 pages) ,
- Assembly instructions manual (17 pages) ,
- Operator's manual (30 pages)

Related Manuals for Northern Lights M773LW3


Summary of Contents for Northern Lights M773LW3
- Page 1 OPERATOR’S MANUAL OPERATOR’S MANUAL OM773LW3 For Model: M773LW3 and M773LW3G www.northern-lights.com...
- Page 2 4420 14th Avenue NW Seattle, WA 98107 Tel: (206) 789-3880 Fax: (206) 782-5455 Copyright ©2019 Northern Lights, Inc. All rights reserved. Northern Lights™, and the Northern Lights logo are trademarks of Northern Lights, Inc. Printed in U.S.A. PART NO.: OM773LW3 11/20...
-
Page 3: Table Of Contents
OPERATOR'S MANUAL for Model M773LW3 and M773LW3G Read this operator's manual thoroughly before starting to operate your equipment. This manual contains information you will need to run and service your new unit. Table of Contents SERVICING Lubrication - General ........16 Checking Oil ............ 16 INTRODUCTION ..........2... -
Page 4: Introduction
77 mm G - GEM series base frame 3 - US EPA Tier III compliant Northern Lights marine generator set with a 773 engine, PX-309K2 generator end, AVR, US EPA Tier III. M773LW3 M773LW3G Northern Lights marine diesel generator set with a 773 engine, PX-309K2 generator end, GEM series, US EPA Tier III. -
Page 5: Warranty
Safety Rules DANGER: Northern Lights generator sets and /or any other diesel powered equipment provided by NLI is not provided with ignition protected components, and therefore is not to be installed in the presence of combustible gases having a flash point of 43.3 Degrees C (110 Degrees F) or lower, such as Gasoline, Propane, Natural Gas or other similar fuel sources. - Page 6 Updated 4-12-17 Safety Rules (Continued) Handle Fuel Safely - Avoid Flames Wear Protective Clothing WARNING WARNING Diesel is highly flammable and should be treated with care at all times. Do do not refuel while smoking or To prevent catching anything in moving machinery, when near sparks or open flame. always wear close fitting clothes and safety equipment appropriate ALWAYS STOP ENGINE BEFORE FUELING to the job. MACHINE. Always fill Prolonged exposure portable fuel tank outdoors. to loud noise can Never fuel a hot engine. cause hearing loss or Prevent accidental impairment. Wear discharge of starting fluids suitable authorized by storing all cans in a hearing protection, cool, safe place, away such as earmuffs or plugs to protect against loud from sparks or open flame. Store with cap securely noises. on container. Never incinerate or puncture a fuel container.
- Page 7 Updated 4-12-17 Safety Rules (Continued) Never check battery charge Stay Clear of Rotating Drivelines by contacting the posts with DANGER a metal object. Use a volt- meter or hydrometer. Entanglement in rotating Frozen batteries may explode drivelines can cause serious if charged. Never charge injury or death. Keep a battery that has not been shields in place at all times. Make sure that rotating allowed to warm to at least shields turn freely in pace with the drivelines. 16 o C (60 o F). Always remove grounded (-) battery clamp first and Do not wear loose fitting equipment around rotating replace ground clamp last. drivelines. Stop the engine and make sure that all moving parts have stopped before making any Sulfuric acid in battery electrolyte is poisonous and adjustments, connections, or performing any other type strong enough to burn skin, eat holes into clothing and of service to the engine or other driven equipment. other materials, and cause blindness if splashed into eyes. Install all Safety Guards To Avoid Hazards: WARNING • Fill batteries only in well-ventilated areas.
- Page 8 Updated 4-12-17 Safety Rules (Continued) Handle Chemical Products Safely Do not use a chlorinated solvent in an area where welding will occur. Work only in areas that are well WARNING ventilated. Dispose of paint and solvent properly. Service Cooling System Safely Direct exposure to hazardous chemicals can cause serious WARNING injury. Among the potentially hazardous chemicals that may be Opening a pressurized cooling used with Northern Lights system can release explosive fluids products are lubricants, coolants, and causing serious burns. paints and adhesives. Before opening any pressurized cooling system, make sure the All potentially hazardous chemicals come with a Material engine has been shut off. Do Data Safety Sheet (MSDS). The MSDS provides specific not remove a filler cap unless it is cool enough to details on chemical products, including physical hazards, comfortably grip with bare hands. Slowly loosen cap to safety procedures and emergency response techniques relieve pressure before opening fully. Read and understand the MSDS for each chemical before Avoid High Pressure Fluids you start any job that includes it. Follow the procedures and use appropriate equipment exactly as recommended.
- Page 9 Updated 4-12-17 Safety Rules (Continued) Do Not Open High-Pressure Fuel System Avoid creating dust. Never use compressed air for cleaning. Avoid brushing or grinding materials DANGER containing asbestos. When servicing, wear an approved respirator. A special vacuum cleaner is Many Northern Lights engines use high- recommended to clean asbestos. If this vacuum is not pressure fuel injection. High-pressure fluid available, apply a mist of oil or water on the material remaining in fuel lines can cause serious containing asbestos. Keep all bystanders away from injury. Do not disconnect or attempt any area where asbestos dust may be generated. any repair of fuel lines, sensors, or other components between the high-pressure fuel pump Use Proper Lifting Equipment and Techniques and nozzles on engines with high pressure fuel WARNING systems. ONLY AUTHORIZED TECHNICIANS CAN Lifting heavy components incorrectly PERFORM REPAIRS ON AN HIGH PRESSURE can cause severe injury or damage FUEL INJECTION SYSTEMS. to machinery. Avoid unbalanced loads. Do not use lifting eyes. Lift Avoid Hot Exhaust...
-
Page 10: Lock Out / Tag Out Procedures
Scope During maintenance, repairs or retooling of a Northern Lights generator set, simply turning the machine off or unplugging it while it is being worked on does not give enough protection to others who are not performing the maintenance or repair. - Page 11 Notes OM773LW3 11/20...
-
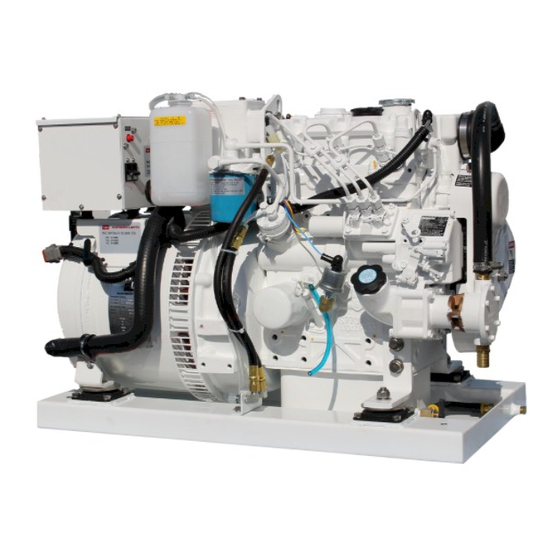
Page 12: Component Locations M773Lw3G Marine Generators
Updated 10-19-20 Marine Generator Component Locations Figure 1 (right): Service side M773LW3G (S/N: 7732-54637 and above) Figure 2 (left): Non-service side M773LW3G (S/N: 7732-54367 and above) 8. Coolant fill 14. Oil dipstick 20. Heat exchanger end caps 1. Generator control box 9. -
Page 13: M773Lw3 Marine Generators
Updated 10-19-20 Marine Generator Component Locations Figure 3 (right): Service side M773LW3 (up to S/N: 7732-54636) Figure 4 (left): Non-service side M773LW3 (up to S/N: 7732-54636) 8. Coolant fill 14. Fuel manifold 20. Heat exchanger end caps 1. Generator control box 9. -
Page 14: Control Panels
Updated 8-14-19 Control Panels 1. SHUTDOWN BYPASS-PREHEAT SWITCH There are two functions built into this switch: 1. Preheats the fuel before beginning the starting process. Press switch 10 seconds before attempting start-up. 2. Bypasses the safety shutdown feature during starting process. Keep switch engaged while starting engine and for up to five seconds afterwards, allowing oil pressure to build beyond shutdown set point. 2. ENGINE CONTROL SWITCH To start the engine, hold this switch in the START Figure 5: Series 1-B Generator Control Panel position until the engine is running. NOTE: Excessive cranking of marine sets equipped with water lift muffler systems can cause engine damage. -
Page 15: Operating Procedures
Updated 10-19-20 Operating Procedures BREAK-IN PERIOD STARTING 1. The first 100 hours on a new or reconditioned 1. Hold the Shutdown Bypass-Preheat switch in the engine are critical to its life and performance. ON position for 10 seconds before starting a cold 2. Operate the engine under various conditions, engine. Holding the switch too long can burn out the particularly heavy loads to help seat engine glow plugs. This step is not necessary if the engine is components properly. 50% load is required; 75% is already warm. preferred. 2. While holding the Shutdown Bypass-Preheat switch 3. Constantly check the engine temperature and oil in the ON position, push the Engine Control switch to pressure gauges (sets with Series 3 or 4 panels). the START position. 4. Oil consumption is greater during break-in as 3. As soon as the engine starts, release the start switch piston rings take time to seat. and continue to hold the bypass/preheat switch for 5. Break-In Oil Changes: Change engine oil and up to five seconds. Do not crank the starter for more filter at 50 hours. Change oil and filter again at than 10 seconds consecutively. If the engine fails to 100 hours, then at every 200 hours (consult start with the first attempt, be sure that it has stopped Lubricants section for oil recommendation). -
Page 16: Shutdowns And Alarms
SPARE PARTS 1. Generator sets have shutdown systems to stop the Northern Lights recommends that you keep the engine in the event of high water temperature, low oil following spare parts on hand for field service. The pressure or high exhaust temperature. parts are available from your local Northern Lights a. Other alarms and shutdowns are available as dealer. Marine models have optional “On-Board- optional equipment. Kits,” a handy box that contains the most common Contact your Northern Lights dealer for parts you will need. troubleshooting assistance if not equipped with optional gauge panels. Northern Lights standard spare parts kit (P/N 2. If optional gauge panels are installed, do the 38-08605)* following when your warning or shutdown system is contains: activated: a. Primary and secondary fuel filter elements a. Engage the preheat switch to check the temperature b. Oil filters... -
Page 17: Servicing Schedule Chart
Updated 8-14-19 Servicing Schedule Chart The Servicing Schedule Chart below shows the service schedule required for proper maintenance of your generator set. More detailed coverage of each Service Point (SP) is listed on the page noted in the ‘page’ column. DAILY: EVERY 500 HOURS: Check oil level in engine Change primary fuel filter element Check primary fuel filter Change secondary fuel filter SP10 Check cooling water level SP15 Change impeller in raw water pump SP16 Check exhaust elbow AFTER FIRST 50 HOURS: EVERY 1000 HOURS: SP2/3 Change engine oil and filter Change air cleaner element SP12 Check injectors AFTER FIRST 100 HOURS: SP2/3 Change engine oil and filter EVERY 2500 HOURS: SP13 Check fuel injection pump EVERY 100 HOURS: SP11 Check and flush cooling system... -
Page 18: Servicing
8. Loosen the clamp on the oil change tube. Remove cap. SAE 5W SAE 5-20W (-23°C) Drain oil. Replace the cap and tube. 9. Refill engine with recommended oil. 10. Engine capacity with new oil filter is: Figure 7: Lube Oils M773LW3(G) - 4.75 quarts (4.9 liters) 4. Some increase in oil consumption may be expected SP-3. CHANGING LUBE OIL FILTER when SAE 5W and SAE 5-20W oils are used. Check oil level frequently. 5. Never put additives or flushing oil in crankcase. 1. Change the lube oil filter with every oil change. 2. Use a filter wrench to remove old filter. Dispose of SP-1. CHECKING OIL LEVEL filter in approved manner. -
Page 19: Air Cleaner
2. To bring the No. 1 cylinder to top dead center in the compression stroke, align the timing mark; the top 2. If dirty, wash element in soapy water. Rinse and dry thoroughly before re-installing. mark of the crank pulley with that of the timing gear Replace if necessary. Part numbers are: case. Remove the rocker arm cover and turn the M773LW3 – #24-28602 crankshaft foward and backward. If the inlet and exhaust valves of the No. 1 cylinder do not move it is NOTE: Failure to change air cleaner at recommended in top dead center position. When the valves move, times can cause severe engine damage. Change or rock, turn the crankshaft one full turn and align the every 1000 hours or two years, whichever comes top mark of the crank pulley with the top mark of the first. -
Page 20: Fuels - General
If the bowl fills with water, change the primary d. Class E, F, G or H industrial or marine fuels. and secondary element immediately. e. ASTM-D975-60T No. 4-D and higher number fuels. SP-9. SECONDARY FUEL FILTER 5. Storing fuel: 2. Change secondary fuel filter every 500 hours or as a. Keep dirt, scale, water, and other foreign matter necessary. out of fuel. a. Remove the spin-on filter by turning it b. Avoid storing fuel for long periods of time. counterclockwise with a filter wrench. Fill the c. Fill the fuel tank at the end of each day’s new element with fuel and install it after operation. This will reduce condensation. applying engine oil to gasket surface. Screw on until the gasket surface comes into contact with sealing surface of filter base. Then, tighten it two-thirds of a turn by hand. Do not overtighten. b. Fuel filter part number is: M773LW3(G): #24-52020 OM773LW3 11/20... -
Page 21: Cooling System - General
Updated 8-14-19 Servicing COOLING SYSTEM - GENERAL SP-10. CHECKING COOLANT LEVEL NOTE: Be sure to close the sea-cock before working 1. Check the coolant level each day before starting the on the engine cooling system. engine. Check the water level by removing the pressure cap from the expansion tank. CAUTION: The cooling water in the engine In order to give the cooling water an opportunity to reaches extremely high temperatures. You must expand, the level should be about 1 in. (2.5 cm) below use extreme caution when working on hot the filler cap sealing surface when the engine is cold. -
Page 22: Injector Service
Updated 8-14-19 Servicing SP-13. INJECTION PUMP SP-12. INJECTOR SERVICE 1. Since operating conditions may vary considerably, it 1. Injectors should be checked every 1000 hours, or is difficult to give a definite interval for checking the whenever necessary. Check should be made by a injection pump. But as a rule, pump settings, Northern Lights dealer or local injection repair maximum speed, idle speed and exhaust smoke station. should be checked after every 2500 hours of operation. Service of the fuel injection pump should CAUTION: Escaping diesel fuel under pressure only be done if checks indicate pump malfunction. can have sufficient force to penetrate the skin 2. Black smoke can be an indication of pump causing serious personal injury. If injured by malfunction. Before servicing the pump, check other escaping diesel fuel, see a doctor at once. - Page 23 Updated 11-8-13 Servicing Figure 10: Remove delivery line flare nuts. Figure 14: Unscrew injector. Figure 11: Remove delivery lines. Figure 15: Remove and replace copper sealing washer. Figure 12: Remove return line nuts. Figure 16: Reinstall injector. Torque to proper tightness. Figure 13: Remove return line.
-
Page 24: Heat Exchanger
Updated 8-14-19 Servicing SP-14. HEAT EXCHANGER GENERATOR ENDS 1. Clean the heat exchanger core every 24 months, or The maintenance and operation recommendations for after 2500 hours of operation, or as needed. the generator end are can be found in Owner’s Manual 2. Drain expansion tank and heat exchanger. OPX300K-2, included with your manual kit. Contact 3. Remove heat exchanger end covers and remove core. your Authorized Northern Lights dealer or factory 4. Clean the inside of exchanger core tubes using representative for additional copies. a metal rod. Flush, inspect and clean again if necessary. ELECTRICAL SYSTEM - GENERAL 5. Reassemble. Fill the cooling system, start the engine and check for leaks. 1. Never switch battery switch off or break the circuit between the alternator and batteries while the engine SP-15. RAW WATER PUMP is running. Regulator damage can result. 2. Do NOT reverse the polarity of battery cables when 1. Change the seawater pump impeller every 500 hours, installing the battery. -
Page 25: Booster Batteries
Updated 8-14-19 Servicing SP-19. WINTERIZING / OUT-OF-SERVICE BOOSTER BATTERIES If the generator set will not be used for more than 3 CAUTION: Battery gas can explode. months the following preparations should be taken for Keep all flames and sparks away from batteries. long term storage. Battery electrolyte is sulfuric acid diluted, which • Change engine oil and filter, as per recommendations can burn or stain body or clothes. on page 16. -
Page 26: Troubleshooting
• Check electrolyte level of each battery. Defective electrical system • Repair or replace. ground wire: Starter Cranks Slowly Low battery output • Battery is too small. • Battery cables are too small. Check specific gravity • Replace battery if necessary. of each battery Check electrolyte level • If low, fill cells with distilled water. of each battery cell (lead acid batteries only) Crankcase oil too heavy • Fill with oil of appropriate viscosity. Loose or corroded connections • Clean and tighten loose connections. Entire Electrical System Check DC circuit breaker • If breaker is tripped, reset it. Does Not Function Faulty connection • Clean and tighten battery and harness plug connections. Sulfated or worn out batteries • Check specific gravity and electrolyte level of each battery. If you cannot correct problems with these procedures, see your Northern Lights dealer. OM773LW3 11/20... -
Page 27: Engine
Updated 2-10-20 Troubleshooting ENGINE PROBLEM POSSIBLE CAUSE RECOMMENDATION(S) Engine Hard to Start Improper starting procedure • See starting section of this manual. Take or Will Not Start special note of Bypass Switch operation. No fuel • Check level of fuel in fuel tank. Low battery output • Check electrolyte level and condition. Excessive resistance • Clean and tighten all battery connections. in starting circuit Crankcase oil too heavy • Use oil of proper viscosity. Improper type of fuel • Consult fuel supplier and use proper type of fuel for operating condition. Water, dirt or air in fuel system • Drain, flush, fill and bleed system. Clogged primary • Clean or replace filter element. fuel filter element Clogged secondary • Replace filter element. fuel filter element Dirty or faulty injection nozzles • Have your dealer check injection nozzles. - Page 28 Water pump impeller worn/broken • Check impeller and replace if necessary. Engine Knocks Insufficient oil • Contact your dealer. Injection pump out of time • Contact your dealer. Below normal engine temperature • Check your thermostats. • Check water temperature to see if temperature gauge is working properly. Engine overheating • See “Engine Overheating” section. High Fuel Consumption Improper type of fuel, or fuel • Use correct fuel for temperature. leaking • Check installation or tightening. Clogged or dirty air cleaner • Service air cleaner. Improper valve clearance • Contact your dealer. Injection nozzles dirty • Contact your dealer. Injection pump out of time • Contact your dealer. Engine overloaded • Check load usage. Engine not at proper temperature • Check thermostats. • Check water temperature with thermometer and replace gauge if necessary. If you cannot correct problems with these procedures, see your Northern Lights dealer. OM773LW3 11/20...
- Page 29 • Use proper viscosity oil. Oil leaks • Check for leaks in lines around gaskets and drain plug. Engine Emits Black Clogged or dirty air cleaner • Service air cleaner. or Gray Exhaust Smoke Defective muffler • Have dealer check back pressure. (back pressure too high) Improper fuel • Use correct fuel for temperature. Injection nozzles dirty • Contact your dealer. Engine timing off • Contact your dealer. Engine Emits Improper fuel • Use correct fuel for temperature. White Smoke Cold engine • Warm up engine to normal operating temperature. Defective thermostat • Remove and check thermostat. Engine timing off • Contact your dealer. If you cannot correct problems with these procedures, see your Northern Lights dealer. OM773LW3 11/20...
-
Page 30: Bleeding The Fuel System
Troubleshooting BLEEDING THE FUEL SYSTEM CAUTION: Escaping diesel fuel under pressure can penetrate skin causing serious personal injury. Before disconnecting lines be sure to relieve all pressure. Before applying pressure, be sure all connections are tight and lines, pipes and hoses aren't damaged. Fuel escaping from a very small hole can be almost invisible. - Page 31 Troubleshooting - Notes OM773LW3 11/20...
-
Page 32: Wiring Diagrams (Current Production) Ac Electrical
Updated 3-10-20 AC Wiring Diagrams OM773LW3 11/20... - Page 33 Updated 3-10-20 AC Wiring Diagrams OM773LW3 11/20...
- Page 34 Updated 10-8-20 AC Wiring Diagrams OM773LW3 11/20...
- Page 35 Updated 3-10-20 AC Wiring Diagrams OM773LW3 11/20...
-
Page 36: Dc Electrical
Updated 10-8-20 DC Wiring Diagrams OM773LW3 11/20... - Page 37 Updated 10-8-20 DC Wiring Diagrams OM773LW3 11/20...
- Page 38 Updated 10-8-20 DC Wiring Diagrams OM773LW3 11/20...
- Page 39 Updated 10-8-20 DC Wiring Diagrams OM773LW3 11/20...
- Page 40 Updated 10-8-20 DC Wiring Diagrams OM773LW3 11/20...
- Page 41 Updated 4-16-20 DC Wiring Diagrams OM773LW3 11/20...
- Page 42 Updated 10-8-20 DC Wiring Diagrams OM773LW3 11/20...
- Page 43 DC Wiring Diagrams OM773LW3 11/20...
- Page 44 Updated 10-8-20 DC Wiring Diagrams OM773LW3 11/20...
-
Page 45: Panel Wiring
Updated 8-22-19 Panel Wiring Diagrams OM773LW3 11/20... - Page 46 Updated 8-22-19 Panel Wiring Diagrams OM773LW3 11/20...
- Page 47 Updated 8-22-19 Panel Wiring Diagrams OM773LW3 11/20...
-
Page 48: Appendix (Non-Current Production Diagrams) Dc Electrical
Updated 8-22-19 DC Wiring Diagrams OM773LW3 11/20... - Page 49 Updated 7-9-12 DC Wiring Diagrams OM773LW3 11/20...
- Page 50 Updated 3-13-12 DC Wiring Diagrams OM773LW3 11/20...
- Page 51 DC Wiring Diagrams OM773LW3 11/20...
-
Page 52: Panel Diagrams
Updated 7-9-12 Panel Wiring Diagrams OM773LW3 11/20... - Page 53 Updated 3-13-12 Panel Wiring Diagrams OM773LW3 11/20...
- Page 54 Updated 7-9-12 Panel Wiring Diagrams OM773LW3 11/20...
- Page 55 Updated 3-13-12 Panel Wiring Diagrams OM773LW3 11/20...
- Page 56 Updated 3-13-12 Panel Wiring Diagrams OM773LW3 11/20...
- Page 58 4420 14th Ave. NW., Seattle WA 98107 Tel: (206) 789-3880 • 1-800-762-0165 • www.northern-lights.com Northern Lights and Lugger are registered trademarks of Northern Lights, Inc. © 2020 All rights reserved. Litho USA.
Need help?
Do you have a question about the M773LW3 and is the answer not in the manual?
Questions and answers