Advertisement
Quick Links
RC146
If parts are missing or you require assistance,
please call:
1-800-267-8494
Have your packing slip ready for reference
RC146_2009_D
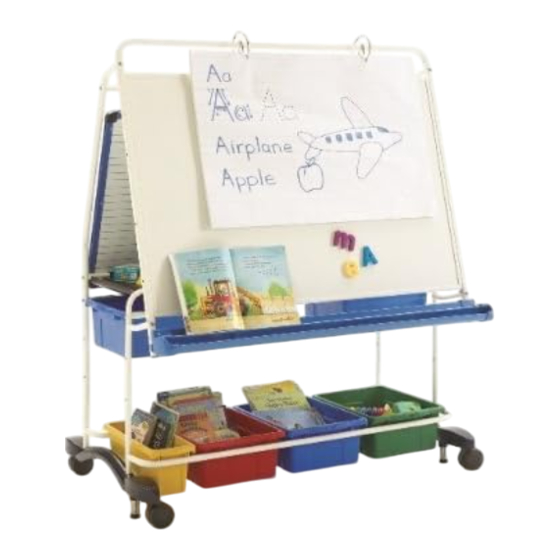
This assembly guide provides instructions to build the King Royal Reading Writing Center.
Check out our full line of products at www.copernicused.com
This product is meant to be assembled by an Adult.
WARNING
In its unassembled state, small parts present a hazard.
This product to be used under the direct supervision of an adult.
Front Frame (1)
Safety Cap
Bookledge (1)
Front Tub Bar (1)
Base (2)
Small Tub (1)
Please Recycle
c
King Royal Reading Writing Center
or
email info@copernicused.com
Front Frame Support (2)
RC146 - Version D - 13 November 2009 - Copernicus Educational Products Inc.
Open Tub (5)
Caster (4)
-
Assembly Guide
Chart Loop Hook (2)
Stretcher (2)
Upper Frame (2)
Shelf (1)
Lower Frame (2)
Tub Channel (2)
Back Tub Bar (1)
Center Frame (1)
Life
Time
Tub
Warranty
Life
Time
Frame
Warranty
Advertisement

Related Manuals for Copernicus King Royal RC146


Summary of Contents for Copernicus King Royal RC146
- Page 1 Back Tub Bar (1) Base (2) Center Frame (1) Small Tub (1) Front Frame Support (2) Life Life Time Time Caster (4) Frame Please Recycle Warranty Warranty RC146 - Version D - 13 November 2009 - Copernicus Educational Products Inc.
- Page 2 Tub Channel Book Ledge Contents - Box 2 Open Tub Small Tub Rear Whiteboard Page Paw Chart Loop Hook 3” Caster Hooks Additional tools required: Adjustable wrench RC146 - Version D - 13 November 2009 - Copernicus Educational Products Inc.
- Page 3 After Assembly; Before Use Remove the plastic film from the Whiteboard before writing on it Clean the Whiteboard surface well with soapy water and then rinse clean RC146 - Version D - 13 November 2009 - Copernicus Educational Products Inc.
-
Page 4: Install Casters
- Caster will click into place - If necessary, place a wrench between the wheels & tap in with a rubber mallet. Repeat for remaining Base Front RC146 - Version D - 13 November 2009 - Copernicus Educational Products Inc. - Page 5 Note the orientation of the Rear Frame Lower’s - They bend back towards the Back of the Unit Back Front Note - Front of base is the end with the brake RC146 - Version D - 13 November 2009 - Copernicus Educational Products Inc.
- Page 6 Align a Tub Channel with the top holes in the Rear Lower and/or Center Frame - Fasten with two Bolt A’s & Washer C’s - Tighten bolts Repeat for remaining Tub Channel Bottom Use top holes RC146 - Version D - 13 November 2009 - Copernicus Educational Products Inc.
- Page 7 - Slide Rear Whiteboard Hooks on before fastening - Fasten with two Bolt A’s & Washer E’s - Tighten bolts Washer E Bolt A Hooks slide on prior to assembly RC146 - Version D - 13 November 2009 - Copernicus Educational Products Inc.
- Page 8 - Fasten with one Bolt A & Washer E - Tighten bolt Repeat for other side with remaining Front Frame Support Bolt A Washer E Use labels to help you assemble correctly RC146 - Version D - 13 November 2009 - Copernicus Educational Products Inc.
- Page 9 - Fasten with four Bolt C’s, Washer E’s & Nut D’s - Tighten bolts Note the orientation of the Shelf when you assemble it Note orientation Bolt C Washer E Nut D RC146 - Version D - 13 November 2009 - Copernicus Educational Products Inc.
- Page 10 - The Front Tub Bar is the one marked with an A Sticker - Fasten with two Bolt A’s & Washer E’s - Tighten bolts Washer E Bolt A RC146 - Version D - 13 November 2009 - Copernicus Educational Products Inc.
- Page 11 Slide Whiteboard Channel up to the Whiteboard surface Fasten the Whiteboard Channel in place - Use two Bolt B’s, Washer H’s & Nut G’s - Tighten fasteners Washer H Bolt B Nut G RC146 - Version D - 13 November 2009 - Copernicus Educational Products Inc.
- Page 12 - It is easiest to fasten the top first, then the bottom bolts Washer E Peel off the plastic film on the Whiteboard before use Peel plastic film before use RC146 - Version D - 13 November 2009 - Copernicus Educational Products Inc.
- Page 13 Insert one hook into the appropriate hole on one side of the Whiteboard Frame Pull out opposite hook & snap into place Note: The spring tension is designed to discourage children from unhooking the Book Ledge RC146 - Version D - 13 November 2009 - Copernicus Educational Products Inc.
- Page 14 Repeat for remaining two M-Racks Note orientation of the M-Racks. The two outside M-Racks are to be installed so that the bend faces inward Bolt B Washer E Nut F RC146 - Version D - 13 November 2009 - Copernicus Educational Products Inc.
- Page 15 In position, tubs will slide smoothly in the Channels & be stopped from sliding out unintentionally Two Open Tubs slide in Channels, the remaining three Open & one Small Tub rest on the Tub Bars RC146 - Version D - 13 November 2009 - Copernicus Educational Products Inc.
- Page 16 Place an empty hardware bag over the frame to prevent the unit from being scratched - Hooks snap onto the frame easily Slide bag free once the Hook has been snapped onto the Frame Plastic Bag RC146 - Version D - 13 November 2009 - Copernicus Educational Products Inc.
- Page 17 User Name: quality Password: safety#1 Enter a draw to win a Copernicus product for your classroom at the same time I hope that the assembly of your NEW King Royal Reading Writing Center went well. If you have any questions, or concerns, please call us at 1-800-267-8494, where someone will be happy to help.
Need help?
Do you have a question about the King Royal RC146 and is the answer not in the manual?
Questions and answers