Table of Contents
Advertisement
Available languages
Available languages
UTILITY/LAUNDRY
SINK PUMP
MODEL #STL001
Español p. 11
ATTACH YOUR RECEIPT HERE
Purchase Date
Serial Number
Questions, problems, missing parts? Before returning to your retailer, call our customer
service department at 1-800-584-8089, 7:30 a.m. - 5:00 p.m., EST, Monday - Friday.
SW1399 A
1
© 2019. All rights reserved.
Advertisement
Table of Contents

Related Manuals for Star STL001


Summary of Contents for Star STL001
- Page 1 UTILITY/LAUNDRY SINK PUMP MODEL #STL001 Español p. 11 ATTACH YOUR RECEIPT HERE Purchase Date Serial Number Questions, problems, missing parts? Before returning to your retailer, call our customer service department at 1-800-584-8089, 7:30 a.m. - 5:00 p.m., EST, Monday - Friday.
-
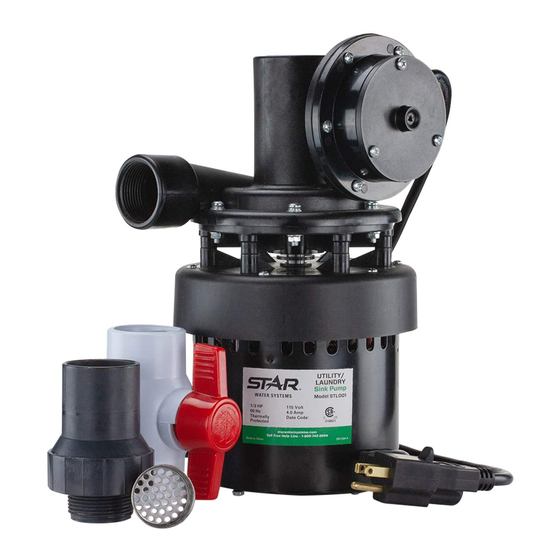
Page 2: Package Contents
PACKAGE CONTENTS ITEM DESCRIPTION QUANTITY Pump Ball Valve Check Valve Strainer SAFETY INFORMATION Please read and understand this entire manual before attempting to assemble, operate or install the product. NOTE: Pumps with the “UL” Mark and pumps with the “US” mark are tested to UL Standard UL778. CSA certified pumps are certified to CSA Standard C22.2 No. -
Page 3: Specifications
DANGER • Do not pump flammable or explosive liquids such as oil, gasoline, kerosene, ethanol, etc. Do not use in the presence of flammable or explosive vapors. Using this pump with or near flammable liquids can cause an explosion or fire, resulting in property damage, serious personal injury, and/ or death. - Page 4 PREPARATION Materials required for assembly: 1-1/2” NPT x 1-1/2” Slip Female Adapter (2) 1-1/4” Schedule 40 PVC Pipe (to fit) 1-1/2” Schedule 40 PVC Pipe (to fit) 1-1/4” Socket to Socket 90° Elbow 1-1/2” NPT x 1-1/2” Slip Male Adapter 1-1/4”...
-
Page 5: Installation Instructions
INSTALLATION INSTRUCTIONS Discharge Pipe Laundry Min. 6.5 ft. Sink Total discharge Check Valve height should be less than 11 feet. Shut-Off/Flow Screen Balancing Valve 1-1/2” Female Adapter 5” 1-1/2” PVC Minimum 1-1/2” Male 1-1/4” Male Adapter 1-1/4” PVC Adapter 1-1/2” Inlet 1-1/4”... - Page 6 7. Do a trial assembly (dry - no glue) of the 11. At this time, wrap the threads on both the pump onto the drain pipe. Swing the pump 1-1/4 in male adapters with 1-1/2 to 2 turns until it accurately faces the discharge piping, of PTFE pipe thread sealant tape.
-
Page 7: Adjusting The Flow
ADJUSTING THE FLOW The drain pump can pump up to 21 gallons per minute (GPM). Normal sink drains allow only 5 to 6 GPM to flow. Adjust the discharge shut-off/flow balancing valve as follows so that the pump does not cycle on and off when the faucets are on full. •... -
Page 8: Care And Maintenance
CARE AND MAINTENANCE This pump requires very little maintenance and should provide a long service life. Problems are rare; when the pump flow drops off, the most likely cause is something solid going down the drain and jamming the impeller. TO CLEAR A JAMMED IMPELLER: •... -
Page 9: Warranty
WARRANTY This product is warranted for one year from the date of purchase or two years from the date of manufacture, whichever occurs first. Subject to the conditions hereinafter set forth, the manufacturer will repair or replace to the original consumer, any portion of the product which proves defective due to defective materials or workmanship. -
Page 10: Troubleshooting
TROUBLESHOOTING DANGER RISK OF ELECTRIC SHOCK. Always disconnect power source before attempting to install, service or maintain the pump. Never handle a pump with wet hands or when standing on wet or damp surface or in water. Fatal electrical shock could occur. PROBLEM POSSIBLE CAUSE CORRECTIVE ACTION... - Page 11 USO GENERAL/LAVADERO BOMBA DE LAVADERO MODELO #STL001 ADJUNTE SU RECIBO AQUÍ Fecha de compra Número de serie ¿Preguntas, problemas, piezas faltantes? Antes de volver a la tienda, llame a nuestro Departamento de Servicio al Cliente al 1-800-742-5044, de lunes a viernes de 7:30 a.m. a 5:00 p.m., hora estándar del Este.
-
Page 12: Contenido Del Paquete
CONTENIDO DEL PAQUETE Artículo DESCRIPCIÓN CANTIDAD Bomba Válvula de bola Válvula de retención Filtro o colador INFORMACIÓN DE SEGURIDAD Lea y comprenda completamente este manual antes de intentar ensamblar, usar o instalar el producto. NOTA: Las bombas con la marca “UL” y con la marca “US” se prueban para cumplir con los estándares UL778 de UL. -
Page 13: Especificaciones
PELIGRO • No bombee líquidos inflamables o explosivos como aceite, gasolina, queroseno, etanol, etc. No usar en presencia de vapores inflamables o explosivos. El uso de esta bomba con o cerca de líquidos inflamables puede causar una explosión o incendio, lo que puede provocar daños a la propiedad, lesiones personales graves y/o la muerte. - Page 14 PREPARACIÓN Materiales requeridos para el ensamblaje: Adaptador hembra deslizante NPT de 3.8 cm x 3.8 Tubería de PVC Schedule 40 (2) de 3.17 cm (1-1/4 cm (1-1/2 pulg. x 1-1/2 pulg.) pulg.) (para ajuste) Tubería de PVC Schedule 40 de 3.8 cm (1-1/2 Codo a 90°...
-
Page 15: Instrucciones De Instalación
INSTRUCCIONES DE INSTALACIÓN Tubería de descarga Lavadero Mínimo de 1.98 m (6.5 pies) La altura total de la línea Válvula de retención de descarga debe ser inferior a 3.35 m (11 pies) Válvula de cierre/válvula Rejilla de equilibrio de flujo Adaptador hembra de 3.8 cm (1-1/2 pulg.) Mínimo de... -
Page 16: Instrucciones De Funcionamiento
7. Haga un ensamblaje de prueba (en seco - uno de los adaptadores en la otra mitad de sin pegamento) de la bomba en la tubería la unión de 3.17 cm (1-1/4 pulg.), apriete de drenaje. Gire la bomba hasta que esté a mano más 1/2 vuelta con una llave o de frente exactamente a la tubería de alicates para junta deslizante. - Page 17 AJUSTE DEL FLUJO La bomba de drenaje puede bombear hasta 21 galones por minuto (GPM). Los desagües normales del lavadero permiten que solo fluyan Tubería de descarga de 5 a 6 galones por minuto. Ajuste la válvula Lavadero de cierre de descarga/equilibrio de flujo de la siguiente manera para que la bomba no Válvula de se active y desactive cuando los grifos estén...
-
Page 18: Cuidado Y Mantenimiento
CUIDADO Y MANTENIMIENTO Esta bomba requiere muy poco mantenimiento y debe proporcionar una larga vida útil. Los problemas son raros; cuando el flujo de la bomba cae, la causa más probable es que algo sólido se haya ido por el desagüe y haya atascado el impulsor. - Page 19 WARRANTY Este producto cuenta con una garantía de un año a contar de la fecha de compra, o de dos años a contar de la fecha de fabricación, lo que ocurra primero. Sujeto a las condiciones establecidas en el presente, el fabricante reparará...
-
Page 20: Solución De Problemas
Solución de Problemas PELIGRO RIESGO DE DESCARGA ELÉCTRICA. Siempre desconecte la alimentación eléctrica antes de instalar la bomba o realizar actividades de servicio o mantenimiento. Nunca manipule la bomba con las manos mojadas o si está de pie en agua o sobre una superficie húmeda o mojada, ya que podría ocurrir una electrocución fatal.
Need help?
Do you have a question about the STL001 and is the answer not in the manual?
Questions and answers
Where can I get parts for my Star STL001?
Parts for the Star STL001 can be found in the "Pumps and Pump Parts" section under "Utility Pumps" and "Sink Pump System" on the Store Seven website.
This answer is automatically generated
Why does the stl001 need a galvanized **** connection at the outlet?
Are they calling the basket strainer the sink tailpiece