
Related Manuals for Renogy Firefly


Summary of Contents for Renogy Firefly
- Page 1 The Renogy Firefly 20W Portable Solar System RNG Group Inc. (Renogy) 14288 Central Ave., Suite A Chino, CA 91710 1-800-330-8678...
-
Page 2: Product Description
This system is specifically designed for mobile off-grid applications, where space and weight limitations are abundant. The Renogy Firefly 20W portable solar system is the perfect system for emergencies providing up to 175 Watt-hours of energy. The built-in solar charge controller allows the expansion of an additional 12v solar panel (Max. -
Page 3: Using The Accessories
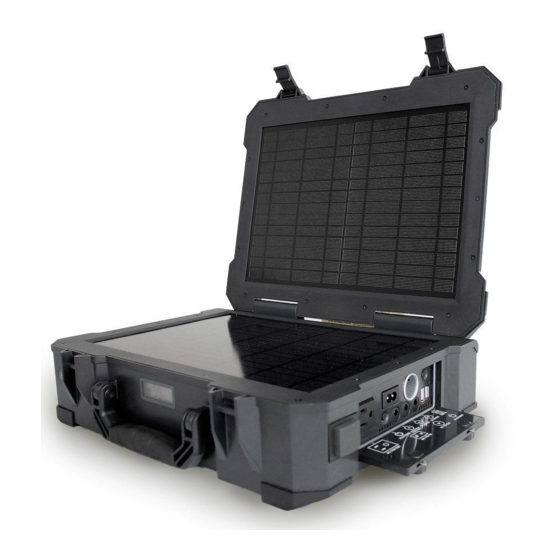
Using the accessories Open the I/O access door by setting the door locks to the “OPEN” position. It is recommended that the unit is placed horizontally as shown in Figure 1. 12V Cigarette Output AC Output AC Input (2-pin inlet) DC Output Switch Exhaust vents AC Output Switch... - Page 4 AC output Once the Main switch is ON, press the AC output switch to turn the internal inverter on. AC Output Switch Figure 3. Turning ON the AC output When the AC output is turned ON, the LCD display will light up blue, and “AC OUT” along with the light bulb icon will be shown.
- Page 5 DC output With Main switch is ON, press the DC output switch to turn the internal inverter on. DC Output Switch Figure 5. Turning ON the DC output When the DC output is turned ON, the LCD display will light up blue, and “DC OUT” along with the light bulb icon will be shown.
- Page 6 12V, 8A Max. 5V, 2A Max. 12V, 5A Max. Figure 7. Maximum current ratings for DC outputs AC and DC outputs The AC and DC outputs can be ON at the same time. When the Main switch is ON, press the AC output switch and then the DC output switch (or vice versa) to turn both outputs When both outputs are turned ON, the LCD display will light up blue, and “DC OUT”...
- Page 7 Flashlight The 20w Firefly portable solar system has a built-in flashlight. To use the flashlight, flip the Main switch to the ON position, this will turn on the digital display. Then press the flashlight switch located next to the left latch.
- Page 8 Charging Charging via Solar If not planning on using the unit while charging with solar, make sure that the Main switch is in the OFF position. Find a dry and sunny location that is free from overhanging tree branches, obstructions or shading.
- Page 9 Male DC Power Plug 2.5 mm inner diameter 5.5 mm outer diameter MC4 to SAE Adapter Compatible solar panels: Renogy 10w Mono Renogy 20w Mono Renogy 30w Mono Additional panels*: Renogy 50w Mono Renogy 50w Poly...
- Page 10 Additional Solar panel Charge Time 10 hours 7.5 hours 6 hours 4.5 hours Table 1 Charging times with additional solar panel If planning on using the unit while charging with solar, make sure that the Main switch is in the ON position. Then turn ON the desired output. AC and DC outputs can also be used while the unit is being charged by solar however, limit the current output to the values mentioned earlier.
- Page 11 Figure 11. Charging via AC power cable It will take about 5 hours to fully recharge the internal battery. Do not cover or block the exhaust vents when charging with the AC cable. The unit can be left plugged in once the battery is fully charged.
-
Page 12: Troubleshooting
Troubleshooting AC output load exceeded the maximum rating of the inverter: If the AC output load exceed the maximum power rating of 150 Watts, the internal inverter will shut off to avoid damaging the unit. When this happens, the digital display will show a flashing “ERROR”... - Page 13 If the unit won’t power on, try to flip the Main switch ON and OFF a couple times to check if there is a connection issue. If the unit still won’t power on please call Renogy Technical Support to find a possible resolution.
- Page 14 Please make sure that the AC power plug is making proper connection. Make sure that both end plugs are all the way in. If none of above fixes the problem, please call Renogy Technical Support to find a possible resolution.
-
Page 15: Do's And Don'ts
Do’s and Don’ts Do’s: Clean the built-in solar panels when dirty with window cleaner or with a wet cloth. Store the unit in a dry place free from moisture, heat, and water. Ensure the solar panels are exposed to sufficient light – ideally position them to face the sun directly. -
Page 16: Specifications
Specifications Solar Panels Description Parameter Maximum Power 10W (x2) Cell Type Monocrystalline Operating Temperature −40°F to +185°F Table 2 Solar panels specifications Built-in Electrical Components Component Parameter Power inverter 150w, AC 110V, 60 Hz Battery Lithium Polymer 12.1V, 16 Ah Charge Controller 12V, 10A (rated current) LED Flashlight... - Page 17 Please note that all outsourced products will not be covered by RNG Group Inc. limited warranty. Instead, outsourced products will be covered under the original manufacturer’s warranty, if applicable. RENOGY is a trademark of RNG Group Inc. 2015 RNG Group Inc. All rights reserved.
- Page 18 14288 Central Ave, Chino, CA 91710 Phone: 909-517-3598 Fax: 888-543-1164 Email: -General Inquiries: Info@renogy.com -Sales Inquiries: sales@renogy.com -Technical Support Inquiries: techsupport@renogy.com -Customer Services Inquiries: customerservice@renogy.com RENOGY is a trademark of RNG Group Inc. 2015 RNG Group Inc. All rights reserved.
Need help?
Do you have a question about the Firefly and is the answer not in the manual?
Questions and answers