Table of Contents
Advertisement
Quick Links
Advertisement
Table of Contents

Related Manuals for KAP RENAULT-MDN-170613


Summary of Contents for KAP RENAULT-MDN-170613
- Page 1 RENAULT-MDN-170613 (VIDEO Interface) MODEL RN-MDN-170613 DATE 2017.07.11...
-
Page 2: Hdmi Input
Main Spec 1. Input Spec. (MULTI VIDEO INTERFACE) - 1 x HDMI Input - 2 x A/V Input (External video source). - 1 x CVBS(REAR CAMERA) Input. (Rear camera source) - 1 x CVBS(FRONT CAMERA) Input. (Front camera source) - 1 x Analog RGB Input (Navigation System output) 2. -
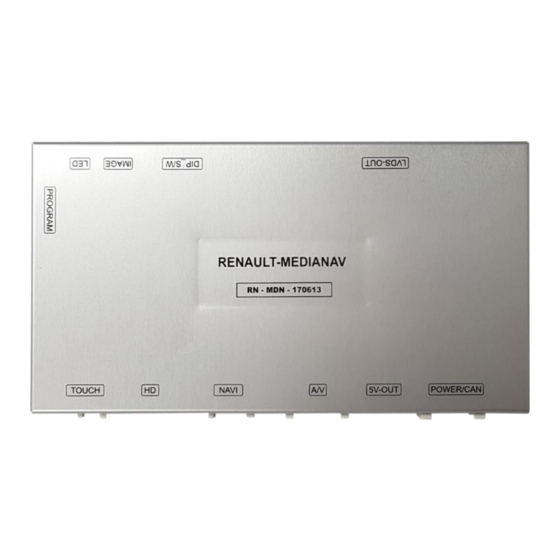
Page 3: External Appearance
External Appearance LVDS-OUT DIP S/W IMAGE 5V-OUT NAVI R-TOUCH HDMI POWER... -
Page 4: Connector Pin Assignment
Connector Pin Assignment *Touch Connect *NAVI Connect *POWER Connect ① ② ③ ④ ① ② ③ ④ ⑤ ⑥ ⑦ ① Y- ① R DATA (Red) 1. ACC (Red) 9. N.C ② X- ② G DATA (Green) 2. N.C 10. N.C ③... -
Page 5: Product Composition
Product Composition A/V Cable(GU-20pin) 1 EA SUB Board 1 EA + Metal bracket 1EA Interface 1 EA FD-PAS-170327 50*50*0.5*P6 FFC Cable 1 EA LVDS Cable(800mm) 1 EA Power Cable 1 EA 40*50*0.5*P6 FFC Cable 1 EA OSD Board 1 EA RGB NAVI Cable 1 EA Mode S/W 1 EA... -
Page 6: Dip S/W Setting
DIP S/W Setting * ON : DOWN , OFF : UP * DIP S/W Example FUNCTION DIP S/W Selection ON : Not Used NAVI OFF : Used Media NAV 7” Model ON : Not used DVB-T OFF : used ON : Not used OFF : used ON : Not used HDMI... - Page 7 DIP S/W Setting OEM TOUCH using manual Not use OEM Touch Ex: Use for rear cam, Use for HDMI OEM TOUCH Not Use. Use OEM Touch Ex: Navigation / DVB-T / DVD control by OEM Touch OEM TOUCH Use.
-
Page 8: Touch Control
Touch Control Touch calibration : Select ①or ② ① Push 7 sec on the NAVI / AV1 / AV2 screen ( just 1 screen) Press+ ②... - Page 9 Touch Control DVB-T/DVD Control DVB-T Press Touch(Anywhere) Press Icon...
- Page 10 Touch Control Touch screen – Switching mode Use HOME Icon, Must set “ON” on OSD menu Back to OEM screen : Press Long HOME icon on Interface screen or Press “Return” icon...
- Page 11 DVB-T / DVD IR Control * IR Memory (Option cable) * IR Memory Cable is an Option cable. 1. On DVB-T/DVD menu -> 2 menu : Sys(OSD List) or User(memory) -> Choose User -> Choose Learn 2. Before use IR memory, Choose ‘All-Clear’ and delete all data. 3.
- Page 12 OSD(On Screen Display) Control OSD Control Board MENU DOWN MENU Push -> OSD menu On/Off Item Selection, Value Selection Item up Increase selected value DOWN Item down Decrease selected value Mode State First Menu Second Menu Third Menu...
- Page 13 OSD(On Screen Display) Control First Menu Second Menu Third Menu Action Original Camera RearCam-Type ExtDevice Use aftermarket Rear camera Rear camera get +12V consistently RearCam-Power AUTO Rear camera get +12V when reverse gear on Shut out the power supply. Original Camera FrontCam-Type Option ExtDevice...
- Page 14 OSD(On Screen Display) Control OSD Setting – Front Camera Auto Mode - Option -> RearCam-RcvOpt -> 0 second = RearCam-RcvOpt menu OFF 1~30 second = RearCam-RcvOpt menu ON & time control NAVI NAVI REAR FRONT AV1(DVB-T) AV1(DVB-T) AV2(DVD) AV2(DVD) 1~30 second...
- Page 15 OSD(On Screen Display) Control OSD Setting – Utility Mode - Factory Reset : Execute - Reset All (Setting Default) - Version : FW Version Finish update FW, check the FW version Last Source : BEPP06SGX-130950 Software Version Software Month Software Year Special Version National : CN=CHINA, KR=KOREA, JP=JAPAN, US=United States Hardware Version...
- Page 16 Install Manual 1. Installation Diagram Monitor Board LVDS MEDIA NAV INTERFACE NAVI POWER/CAN...
- Page 17 Install Manual 2. Installation Navigation Connection *KD-900 navigation SYNC BLUE GREEN Analog RGB KD-900 Resistive Touch...
- Page 18 Install Manual 3. Installation DVB-T Remote Control Connection ① or ② 선택1 ① DVD-IR DVBT-IR SYNC BLUE GREEN GEX-909DTV DVB-T-IR ② 선택2 TUE-T440...
- Page 19 Install Manual 4. Installation DVD Remote Control Connection DVD-IR DVBT-IR SYNC BLUE GREEN DVD-IR DHA-S690...
- Page 20 Install Manual 5. Installation External Reverse(Rear) Camera Connection : OSD Screen selection WIRE 16. GND (Black) 15. GND (Black) 14. Mode (Green) 13. Front-Power (Red) 12. Rear-Power (Red) 11. ACC (Red) 10. CAN-H (Orange) 9. CAN-L (Green) 8. CANout-H (Red) 7.
- Page 21 Install Manual 6. Installation External Front Camera Connection 16. GND (Black) 15. GND (Black) WIRE 14. Mode (Green) +12V 13. Front-Power (Red) 12. Rear-Power (Red) 11. ACC (Red) ON / OFF 10. CAN-H (Orange) 9. CAN-L (Green) 8. CANout-H (Red) 7.
- Page 22 Install Manual 7. Installation HDMI Connection...
- Page 23 Install Manual 8. Installation ② Connect our FFC Cable ③ Connect Original FFC Cable ① Connect our FFC Cable...
- Page 24 Q & A 1. If Interface has a problem, Please check LED. - ACC on (12v), If Interface does not have a problem; GREEN LED is blinking every 1 sec.. LED is turn on (not blinking), Interface has a problem. LED is turn off every 1 sec, there is no input.
Need help?
Do you have a question about the RENAULT-MDN-170613 and is the answer not in the manual?
Questions and answers