
Related Manuals for KAP TYT 2018 TD+ROiK-10


Summary of Contents for KAP TYT 2018 TD+ROiK-10
- Page 1 Instruction Manual TOYOTA 2018 TD for FUJITSUTEN H.U + ROiK-10 VIDEO INTERFACE + ANDROID NAVIGATION TYT 2018 TD+ROiK-10 MODEL. 2019.07.26 D A T E . Korea Auto Parts www.kaptrade.com...
- Page 2 Car Compatibility Sheet Serviceable Model BRAND MODEL YEAR Camry Prius 2018 - 2019 TOYOTA Corolla Check the Head Unit Fujitsuten HeadUnit...
-
Page 3: Product Composition
Product Composition 1 Jack By Jack Interface SUB Board (REV02) Power Cable LVDS Cable(800mm) LVDS Extension Board OSD Board 60PIN-60-0.5-P6 (Reverse) 35PIN-60-0.5-P6 (Reverse) 30PIN-100-1.0-P (Forward) LVDS FFC Cable LVDS FFC Cable LVDS FFC Cable Bolt 2EA Washer... - Page 4 Product Composition ROiK-10 AV Cable CVBS OUT Cable External GLONASS Speaker GPS Antenna Wi-Fi/BT Antenna x 2 LVDS OUT HDMI Cable...
-
Page 5: Video Interface
VIDEO INTERFACE TOYOTA CAMRY 2018 (FUJITSUTEN H.U) - Page 6 Spec TOYOTA CAMRY 2018 - Video Interface 1. Input Spec. (MULTI VIDEO INTERFACE) • 1 x Digital RGB Input (Navigation System source) • 1 x Analog RGB Input (Navigation System source) • 1 x CVBS(REAR CAMERA) Input (Rear camera source) •...
-
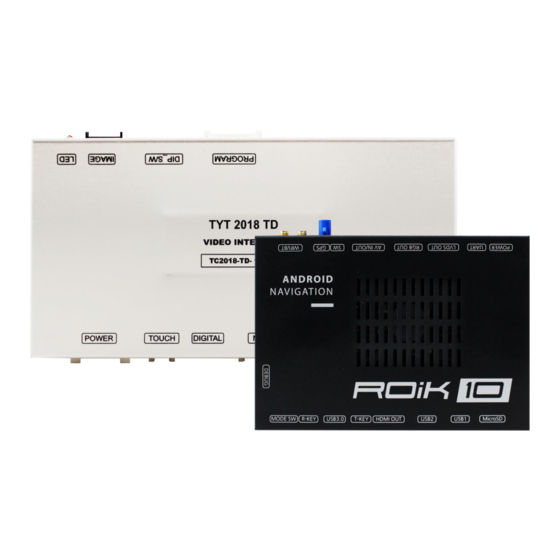
Page 7: External Appearance
External Appearance TOYOTA CAMRY 2018 - Video Interface IMAGE DIP S/W PROGRAM Power/CAN R-Touch Digital Analog FRONT REAR LCD-OUT (Video) -
Page 8: Connector Pin Assignment
Connector Pin Assignment TOYOTA CAMRY 2018 - Video Interface POWER Connect (16Pin) ■ ■ ■ ■ ■ Color BROWN PINK BLACK REAR DET FRONT VCC Connect ■ ■ ■ ■ Color BLUE BLACK FRONT DET REAR VCC Connect NAVI TOUCH Connect (4Pin) ■... -
Page 9: Dip Switch Setting
Dip Switch Setting TOYOTA CAMRY 2018 - Video Interface OFF : ▲UP ON : ▼DOWN FUNCTION DIP S/W Selection ON : Not Used NAVI OFF : Used ON : Not Used DVB-T(AV1) OFF : Used ON : Not Used DVD(AV2) OFF : Used Car Type Select Bottom Picture... - Page 10 Mode Change (to Interface) Mode Change Button HOME / MAP • Long press to switch to interface screen • Short press to switch to OEM screen • If there is no navigation option (No MAP Button), you can change the mode only with the "HOME"...
- Page 11 Mode Change (to OEM) MENU / AUDIO / PHONE / APPS / INFO(If there is no MAP button) • Change mode to OEM screen TUNE·SCROLL / SEEK(or CH)> / <TRACK • Displays the OEM screen for 2 seconds, and returns to the previous state. PWR·VOL •...
-
Page 12: Touch Control
Touch Control Touch Calibration / DVBT, DVD Control Method 1 Method 2 • Touch the screen for 11 seconds • OSD menu ▶ Utility ▶ Calibration Touch Calibration • + Touch according to the shape coordinates. Press Touch (Anywhere) Press Icon DVBT... -
Page 13: Osd Control
OSD Control OSD(On Screen Display) Control Board MENU DOWN • The OSD screen can be switched ON/OFF MENU • Return to previous menu • Select the currently active item • If the OSD screen is off, mode changes can be made. •... - Page 14 OSD Control Option First Menu Second Menu Third Menu Description + 12V continuous supply RearCam-Power AUTO + 12V supply only in Rear camera mode + 12V off Detected by CAN RearCam-Det WIRE Detected by Rear-Det Wire Option Video(REAR) Input (If RearCam-Type is OEM) AV Mode Disable feature Original Camera...
- Page 15 OSD Control Option First Menu Second Menu Third Menu Description + 12V continuous supply FrontCam-Power AUTO + 12V supply only in Front camera mode + 12V off Detected by CAN FrontCam-Det WIRE Detected by Front-Det Wire The time (1-30 seconds) that FrontCam is displayed before returning to the previous FrontCam- state in RearCam.
- Page 16 OSD Control Option First Menu Second Menu Third Menu Description · Pressing button (SEEK, TRACK, TUNE- SCROLL), the OEM screen is temporarily switched for 2 sec. · Pressing button (PWR-VOL), the OEM ScrChg-Btn screen is temporarily switched for 4 sec. Disable feature Option FINE...
- Page 17 OSD Control Option ▶ FrontCam-RcvOpt Front Camera Auto Mode OEM or REAR FRONT OEM or INTERFACE CAMERA CAMERA INTERFACE Select time of display 0~30 second 0 second FrontCam-RcvOpt Menu OFF 1~30 second FrontCam-RcvOpt Menu ON & time control...
- Page 18 OSD Control Image NAVI – RGB Menu First Menu Second Menu Third Menu Description Brightness Adjust the value of brightness Contrast Adjust the value of contrast Color-RED Adjust the value of RED Image Color-GREEN Adjust the value of GREEN Color-BLUE Adjust the value of BLUE Reset Execute...
- Page 19 OSD Control Screen First Menu Second Menu Third Menu Description Horizontal Output screen horizontal movement Vertical Output screen vertical movement Scale X Up Reduce / increase output screen width Screen Scale X Down Scale Y Up Reduce / Increase Output Screen Height Scale Y Down Reset Screen menu all reset...
- Page 20 OSD Control Parking First Menu Second Menu Third Menu Description Show parking line Line Display Do not show parking lines Warnings Lang Set warning text language Parking Horizontal Moving a parking line horizontally Vertical Moving a parking line vertically Transparency Parking line transparency Reset Parking menu all reset...
- Page 21 OSD Control Parking – Change warning message language...
- Page 22 OSD Control Parking – Adjust the position of parking guideline MENU DOWN • Pressing this Horizontal / Vertical menu, The OSD screen automatically disappears. • Possible to adjust the position of parking guide line by Keypad in Horizontal / Vertical menu •...
- Page 23 OSD Control First Menu Second Menu Third Menu Description value Horizontal OSD Menu Horizontal Shift value Vertical OSD menu vertical Shift value Display Time OSD Menu Display Time (in seconds) value Transparency OSD menu transparency Language OSD menu display language Reset Execute Initialize OSD settings...
- Page 24 OSD Control Utility First Menu Second Menu Third Menu Description Factory Reset Execute Initialize all settings Calibration Execute Run Calibration mode Utility FDS302KRX-171004 Version (Check for future upgrades) • Last Source : FDS302KRX-171004 FD S3 02 KR X - 17 10 04 Motor Model Hardware National...
- Page 25 ANDROID PART ROiK-10...
- Page 26 Spec Android 1. Android Spec Android 7.1.2(Nougat) Six-Core 64bit Server Class Cortex-A72 Core @2.0Ghz, Mali-T860 Quad-Core GPU (Total Ten-Core) H.264/H.265/VP9 up to 4Kx2K@60fps (4K Video) Memory 2GB DDR3 USB2.0 High Speed Port x 2 USB 3.0 USB3.0 5.0Gbps Port x 1 Wireless 2.4GHz/5GHz Dual-Band Wi-Fi, Support 802.11a/b/g/n/ac, Bluetooth 4.1...
- Page 27 External Appearance ROiK-10 - Android LVDS Wi-Fi IN/OUT Power UART HDMI Micro Mode R-Key T-Key...
- Page 28 Connector Pin Assignment ROiK-10 – Android Power & AV Yellow Black Power Cable BATTERY Power ACC 12V IN (POWER/CAN) POWER AV/IN OUT AV Cable 9 11 13 15 17 19 21 23 (AV IN/OUT) 8 10 12 20 22 White White Blue White...
- Page 29 Dip Switch Setting ROiK-10 – Android Pin No. SW - 1 ANALOG RGB OUT DIGITAL LVDS OUT / CVBS OUT GPS Power from ROiK-10 GPS Power Self SW - 2 Mode SW Pin No. Mode SW - 1 Capacitive Touch Resistive Touch, UART Touch Mode SW –...
-
Page 30: Screen View
Screen View ※ Screen Size : 1280px X 720px ※ Screen Size : 1578px X 584px ※ This icon will show when Dip s/w set to use “Resistive Touch” , or it will show car have a resistive touch. automatically... - Page 31 Screen View NAVIGATION Quick icon for Navigation Application Multimedia Quick icon for Multimedia Application Music Player Music player Widget File Manager Quick icon for File Manager Application APPS Application List Back Button Return Home Button Home 1. Multitasking Multitasking 2. PIP Mode by Long Press APP Shortcut Quick icon Sound...
- Page 32 SCREEN VIEW – Split Screen Mode ※ Split Screen Press and hold the multi-tasking button to enter the split screen mode. In the split screen mode, press center to reverse the direction. ※ Some apps are not work on Split Screen Mode Long Press Normal...
-
Page 33: Cable Connection
Cable Connection POWER UART LVDS OUT RGB OUT AV IN/OUT WIFI/BT Wi-Fi/BT Antenna x 2 Cable Car battery Antenna CAP - Touch RES - Touch Video UART - Touch Interface Interface SPEAKER AUX OUT R HEADREST MONITOR AUX OUT L [CVBS] VIDEO INTERFACE... - Page 34 Cable Connection ANDROID NAVIGATION MODE SW R-KEY USB3.0 T-KEY HDMI OUT USB2 USB1 MicroSD ※ Play movies or music using USB or Micro-SD Card ※ Firmware update is available only by “USB1” HEADREST MONITOR [HDMI]...
- Page 35 Cable Connection Headrest Monitor ※ Headrest Monitor (CVBS or HDMI) CVBS HDMI INTERFACE ANDROID NAVIGATION USB3. HDMI MODE SW R-KEY T-KEY USB2 USB1 MicroSD...
-
Page 36: Device Settings
Device Settings Function Button RESET SETTINGS Reset settings to default RESTART DEVICE System Reboot External Speaker Turn on/off external speaker Soft key Enable Use soft key or disable (Floating button when disabled) Soft key Position Soft key position setting (side, bottom) Soft key Auto Hiding Set soft key auto-hide time Zoom Button Enable... - Page 37 Device Settings Soft key / Floating Button Settings 1. Soft key Use 2. Floating Button Use (Disable Soft key) Floating Button Enable Using or not using floating button Transparent Adjust the transparency of floating buttons Automatic Hide Floating button auto-hide setting Automatic Close Floating button auto-hide setting time...
- Page 38 Device Settings Select Interface Touch Data is different for each manufacturer, so you should choose the right manufacturer. If you do not know the manufacturer, please contact us at kap@kaptrader.com...
- Page 39 Device Settings FMT Settings 1. FMT Settings 2. Press 'OFF' in the FMT Setting screen. 3. Setting...
- Page 40 Device Settings Calibration (Resistive Touch) ※ Capacitive touch panel no need set calibration Calibration mode Press and hold the center of '+‘, 5 times. A. Device Settings > Touch Calibration B. Push button 2~3 sec after booting DEVICE SETTINGS - USER LOGO UPDATE Set User Boot Logo Activate 1.
- Page 41 Android Firmware Upgrade Recommend Copy ‘system_roik10’ folder to USB Memory root and insert to USB1 Port. Select Upgrade Menu, it will start upgrade *‘/usb disk/system_roik10’ Folder have ‘update.img’ file * If there is no update file, "Upgrade Device" menu is not show ※...
-
Page 42: Factory Reset
Factory Reset Recommend Setting ▶ Backup & Reset ▶ Factory data Reset Select “RESET DEVICE” = Factory Reset Wait until restart unit ※ After reboot system, it takes 3~4 min T-Key USB1 (USB 2.0) Re-connect power cable While Press button ※... - Page 43 Install Interface to Navigation...
- Page 44 Install Manual Installation ROiK Navigation Connection DIP switch No.1 is OFF Interface Dip Switch TYT 2018 TD VIDEO INTERFACE Button Using Navigation AV1, 2 Setting 6,7,8 Select vehicle type REAR LVDS-OUT POWER/CAN TOUCH DIGITAL NAVI FRONT HDMI Cable GND (ROIK-10) ACC 12V (ROIK-10) Battery (ROIK-10) ROiK-10 Dip Switch...
- Page 45 Install Manual Installation ROiK Navigation Connection • After connecting the cables, you need to set the OSD to use the UART touch • Since it is not touch yet, Interface controls OSD board ROiK with Mouse Control INTERFACE Settings (Control with OSD board) Config ▶...
- Page 46 Install Manual Installation ROiK Navigation Connection • Connect INTERFACE [DIGITAL] ROIK [LVDS OUT] with an HDMI cable • Please check the ROIK-10 version. • If version of ROiK is not 1.6V, please refer to homepage (NOTICE) TYT 2018 TD VIDEO INTERFACE REAR LVDS-OUT POWER/CAN...
- Page 47 Install Manual Installation Navigation Connection TYT 2018 TD VIDEO INTERFACE POWER/CAN TOUCH DIGITAL FRONT REAR LVDS-OUT NAVI DVD-IR DVBT-IR SYNC BLUE GREEN Resistive Touch Analog RGB Navigation (Other products except for ROiK)
- Page 48 Install Manual Installation DVB-T Remote Control Connection TYT 2018 TD VIDEO INTERFACE POWER/CAN TOUCH DIGITAL FRONT REAR LVDS-OUT NAVI DVD-IR DVBT-IR SYNC BLUE GREEN DVB-T-IR GEX-909DTV TUE-T440...
- Page 49 Install Manual Installation DVD Remote Control Connection TYT 2018 TD VIDEO INTERFACE POWER/CAN TOUCH DIGITAL FRONT REAR LVDS-OUT NAVI DVD-IR DVBT-IR SYNC BLUE GREEN DVD-IR DHA-S690...
- Page 50 Install Manual Installation External Reverse(Rear) Camera Connection OSD Screen selection WIRE TYT 2018 TD VIDEO INTERFACE POWER/CAN TOUCH DIGITAL FRONT REAR LVDS-OUT NAVI 16. GND (Black) 15. GND (Black) 14. Mode (Green) 13. Front-Power (Red) 12. Rear-Power (Red) 11. N.C REAR-POWER (Red) 10.
- Page 51 Install Manual Installation External Front Camera Connection OSD Screen selection WIRE TYT 2018 TD VIDEO INTERFACE POWER/CAN TOUCH DIGITAL FRONT REAR LVDS-OUT NAVI 16. GND (Black) 15. GND (Black) 14. Mode (Green) 13. Front-Power (Red) 12. Rear-Power (Red) FRONT-POWER (Red) 11.
- Page 52 Install Manual LVDS FPC Cable Connection ▲ Remove the bolts ▲ Genuine FPC cable removal ▲ Connecting the Supplied FFC Cable ▲ Connecting the supplied FFC cable to the supplied SUB board. ▲ Connect genuine cable to sub-board. ▲ Connecting Genuine Board and ▲...
- Page 53 A-912 RM Tera-Tower2, 201 Songpa-Daero, Songpa-gu, Seoul, Korea F. (+82) 6204-0913 E. kap@kaptrader.com...
Need help?
Do you have a question about the TYT 2018 TD+ROiK-10 and is the answer not in the manual?
Questions and answers