Advertisement
Table of Contents
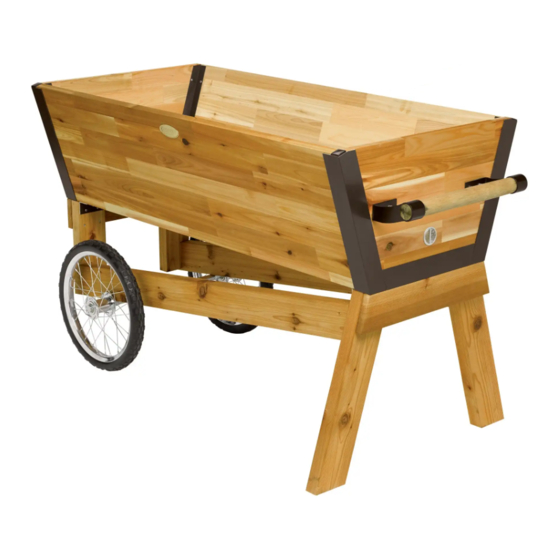
We made our Elevated Rolling U-Garden with rot-resistant North American cedar and rustproof aluminum corners for a long,
beautiful, productive life. Then we added rugged wheels and a handle so you can move your garden on your patio or deck, or even
roll it into the garage on frosty nights. Its 14" depth is perfect for deep-rooted crops like tomatoes and carrots.
Parts Included
(1) End Panel
(1) Vented End Panel
(1) Aluminum Vent
(1) Handle, dowel with brackets
(2) Side Panels, butcher block
(2) Floor Boards, cedar
(1) Fabric Liner
(1) Tall Legs
(1) Short Legs
(2) Wheels
(1) Axle
(2) Side Rails with attached Axle Clamps,
Note there's a left and a right Side Rail
Organize and identify all parts and read through the instructions before beginning. Important: Predrill all screw holes for easiest
assembly or use a power drill to drive in the screws.
Step 1. Insert one Side Panel into the aluminum corner of the End Panel, making sure the tops are flush. Insert 3 screws into the
corner to fasten the Side Panel to the End Panel. Repeat to attach the second Side Panel.
Step 2. Insert the Floor Boards into the aluminum frame of the End Panel and fasten them in place with 4 screws. Note: The floor
boards are two different widths and are rough on one side. They can be installed either rough or smooth side up. There will be
small gaps on both sides of the floor boards to allow water to drain.
Step 3. Slide the aluminum frame of the Vented End Panel over Side Panels and Floor Boards (Figure 1). Be sure the tops of the
panels are all flush and fully inserted. Fasten them together with screws. Tip: It may be easier to tip the partially assembled
U-Garden onto its End Panel or to prop the unfinished end up on a piece of lumber before adding the Vented End Panel.
Step 4. Flip the assembled U-Garden over so that its bottom side is up. Place the preassembled Short Legs at the Vented End Panel
end, as shown in Figure 2. Insert and fasten 4 short Phillips Screws to attach the Short Legs to the bottom of the U-Garden.
Step 5. Place the preassembled Tall Legs at the other end of the box (Figure 3) and use 4 short Phillips Screws to attach.
Figure 1
8589747
Elevated Rolling U-Garden
Cap Pack:
(4) Corner Caps
(20+) Phillips Screws, short
Axle Pack:
(15) Phillips Screws, short
(10) Long Screws,
(4) Bolts
(2) Cotter Pins
Tools Needed
Drill with bits and Phillips driver
Staple gun or tape (optional)
Pliers
Assembly
Figure 2
Figure 3
0665S Rev 09/15
Advertisement
Table of Contents

Related Manuals for Gardener's Elevated Rolling U-Garden


Summary of Contents for Gardener's Elevated Rolling U-Garden
- Page 1 Elevated Rolling U-Garden We made our Elevated Rolling U-Garden with rot-resistant North American cedar and rustproof aluminum corners for a long, beautiful, productive life. Then we added rugged wheels and a handle so you can move your garden on your patio or deck, or even roll it into the garage on frosty nights.
- Page 2 Step 6. Set a Side Rail into the notch on one side of the Short Legs. The Axle Clamp should be closest to the Short Legs and facing up Tall Legs Long (Figure 4). Important: The angled, predrilled holes in the Side Rails Screws Side must face the inside and be at the Tall Legs end, as shown in Figure...
Need help?
Do you have a question about the Elevated Rolling U-Garden and is the answer not in the manual?
Questions and answers