Table of Contents
Advertisement
Quick Links
The Square Galvanized Elevated Raised Bed offers the comfort of waist-high gardening with a sleek, modern look. It is built to last,
easy to use, and the self-watering reservoirs ensure your plants will get all the water they need, while cutting down on your watering
chores. It's perfect for growing vegetables or creating dramatic flower displays.
Parts List
(4) Side Panels
(4) Legs
(4) Leg Caps
(4) Platform Supports
(2) Floor Supports
(2) Floor Inserts
(4) Padded Foot
(8) Small Screws
(24) Medium Screws
(8) Bolts
(16) Large Screws
Caution: Metal edges may be sharp. Please be careful when assembling your
planter. NOTE: Assembly is easiest with two people.
Step 1. Identify and organize all the parts on a clean, level surface. NOTE: Please
notice how there are two styles of Platform Supports that are mirror images of
each other.
Step 2. Line up the holes in the four corners of a Padded Foot with the four holes
on the bottom of a Leg (Figure 1). Use a Phillips screwdriver to insert Medium
Screws through each set of holes. Repeat to attach Padded Feet to the other three Legs.
Step 3. Examine a Leg and notice how there are two predrilled holes near the bottom of the slots
(Figure 2). Take a Platform Support and line up two of the four holes on it with the two holes
on the Leg, as shown in Figure 2. Use a Phillips screwdriver to insert Medium Screws through
both sets of holes. Repeat to attach the remaining Platform Supports to the other three Legs.
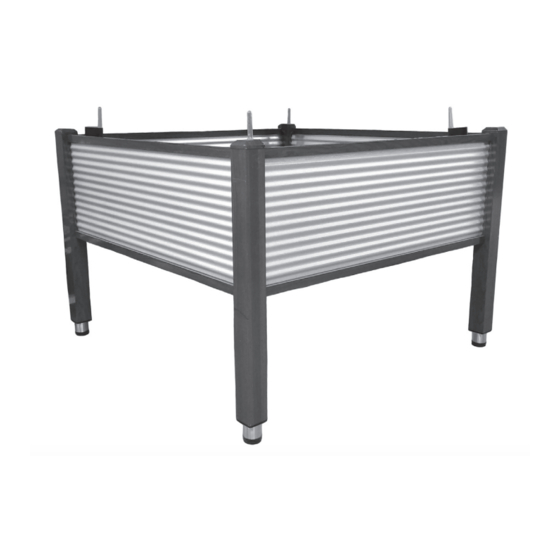
Step 4. Choose 2 Legs with different styles of Platform Supports. Attach
a Side Panel to one of the Legs by placing the plastic knobs into the
openings on the Leg and sliding the Panel down until it sits on the
bottom of the slot (Figure 3). Important: Attach the Side Panel to the
slot where the Platform Support
will sit against the Panel (Figure
4). NOTE: You may need to use
a rubber mallet to tap the Panel
into place. Repeat to attach the
other Leg to the same Side Panel,
making sure the Platform Support is
positioned against the Panel. Place
Small Screws into the top of the slots
on each Leg to help keep the Panel
in Place (Figure 3).
Step 5. Repeat Step 4 to attach the
remaining Legs to a Side Panel.
#8595211
Square Galvanized Elevated Raised Bed
(4) Reservoir Bases
(4) Reservoir Tops
(36) Capillary Tubes
(4) Drainage Plugs
(4) Fill Tubes with Water Level Indicators
Tape
Tools Required
Phillips screwdriver
Rubber mallet
Assembly
Figure 3
knob
Side Panel
over please
Figure 1
Medium
Screws
Small
Screw
Figure 4
Leg
Platform
Support
The Legs should be attached so that the Platform
Supports sit directly against the Side Panel.
Side Panels
Platform
Supports
Padded Feet
Figure 2
Leg
slots
Leg
Padded
Platform
Foot
Support
assembled
Floor Supports
Legs
Insert 2
Medium Screws
through the
lined up holes.
1045V Rev 10/17
Advertisement
Table of Contents

Related Manuals for Gardener's Square Galvanized Elevated Raised Bed


Summary of Contents for Gardener's Square Galvanized Elevated Raised Bed
- Page 1 Square Galvanized Elevated Raised Bed The Square Galvanized Elevated Raised Bed offers the comfort of waist-high gardening with a sleek, modern look. It is built to last, easy to use, and the self-watering reservoirs ensure your plants will get all the water they need, while cutting down on your watering chores.
- Page 2 Step 6. Insert the plastic knobs on the remaining Side Panels into the Figure 5 Floor Supports open slots on the Legs to form a rectangle. Pull down on the Panels to make sure they are sitting at the bottom of the slots, and insert holes Floor Inserts Small Screws into the holes at the top of the Legs (Figure 3).
Need help?
Do you have a question about the Square Galvanized Elevated Raised Bed and is the answer not in the manual?
Questions and answers