
Related Manuals for ROBINHOOD RHBO77B


Summary of Contents for ROBINHOOD RHBO77B
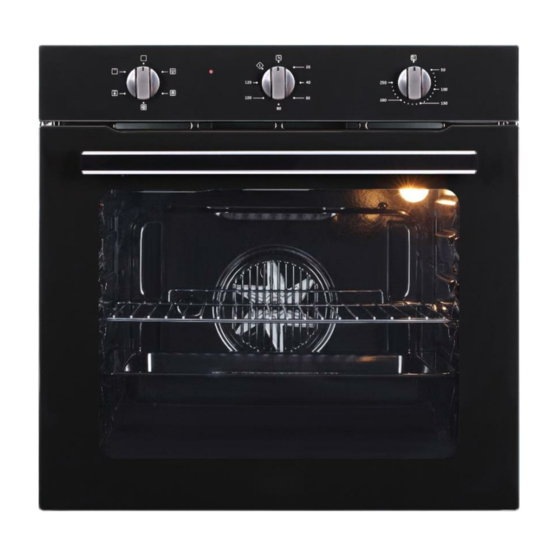
- Page 1 Issue 1 Description: ROBINHOOD 60CM BUILT IN OVEN 5 FUNCTIONS Model Number: RHBO77B Model may vary slightly from image pictured...
- Page 2 Warning and safety information This appliance is not intended for use by persons (including children) with reduced physical, sensory or mental capabilities, or lack of experience and knowledge, unless they have been given supervision or instruction concerning use of the appliance by a person responsible for their safety.
- Page 3 Installing the built in oven Important: the power supply to the appliance must be turned off before any adjustments or maintenance work. PREPARATION FOR INSTALLATION AND USE Manufactured with best quality parts and materials, this modern, functional and practical oven will meet your needs in all respects.
- Page 4 Installation- continued INSTALLATION OF BUILT IN OVEN Insert the oven into cabinet partly by pushing it forward. Open the oven door and insert 4 screws into the holes on the oven frame. While the product frame touches the wooden surface of the cabinet, tighten the screws. If the oven is installed below a built-in hob, the distance between the cooktop and the top panel of the oven must be a minimum of 50mm, and the distance between the cooktop and the top of the oven control panel must be a minimum of 25mm.
- Page 5 Installation- continued In order to ensure adequate ventilation, the back panel of the cabinet unit must be removed. Installing the oven so that it rests on two strips of wood is preferable. If the oven rests on a continuous, flat surface, there must be an aperture of at least 45x560mm.
- Page 6 Instruction on use Parts and Accessories A.Control panel B.Cooking mode selection knob C.Cooking temperature selection knob D.Time knob E. Dripping pan or baking sheet F. Oven Rack G. Guides for sliding the racks or dripping pan in and out...
- Page 7 Instruction on use Thermostat control features The oven has a thermostat control knob to the right hand side of the control panel. This is used to set the cooking temperature of the oven (between 50°C and 250°C). Turn the control knob from off position and clockwise to the desired temperature (do not rotate clockwise from the 250°C setting to off position).
- Page 8 Maintenance and cleaning Replacing the light bulb Before replacing a light bulb, turn off the supply of power to the oven by turning off the circuit breaker connecting it to the mains. Do not turn on the power to the appliance until after the bulb has been changed over & the cover replaced. Remove the glass cover attached to the lamp holder by rotating the glass cover anti-clockwise.
- Page 9 Maintenance How to keep your oven in good condition Important: Before cleaning your oven, or performing maintenance, disconnect it from the power supply. To extend the life of your oven, it must be cleaned frequently, keeping in mind that: •Do not use steam equipment to clean the appliance •The enamelled or stainless steel parts should be washed with lukewarm water without using any abrasive powders or corrosive substances which could ruin them;...
- Page 10 Cooking Guide Selector knob Food to be cooked Weight(in Cooking Preheatin Thermost Cooking rack position time knob time(m) from bottom setting Tarts 20-30 Fruitcakes 2 or 3 40-45 Plum cake 40-50 Circular Sponge cake 25-30 element with Stuffed pancakes (on2 racks) 2 and 4 30-35...
- Page 11 Do not leave food in the oven to cool after it has been cooked and the oven has been switched off. • Use a covered container, where practical, when cooking to reduce the amount of condensation that forms. Technical information Model RHBO77B Oven size Gross 77L Width 598mm...
- Page 12 The following conditions apply in respect of the warranty given in this certificate: 1. Monaco Corporation Limited (“Monaco”) warrants the following Robinhood products against manufacturing defects and faulty materials, under normal use and subject to the exclusions in this certificate, for a period of: Rangehood, Ovens, Cooktops, Dishwashers - 24 months from date of original purchase for domestic use.
- Page 13 1. Shriro Australia Pty Limited (“Shriro”) also warrants the following Robinhood products against manufacturing defects and faulty materials, under normal use and subject to the exclusions in this certificate, for a period of: Rangehood, Ovens, Cooktops, Dishwashers - 24 months from date of original purchase for domestic use.
- Page 14 Issue 1 Description: ROBINHOOD 60CM CERAMIC COOKTOP TOUCH CONTROL Model Number: RHCC64T...
- Page 15 Warning and safety information This appliance is not intended for use by persons (including children) with reduced physical, sensory or mental capabilities, or lack of experience and knowledge, unless they have been given supervision or instruction concerning use of the appliance by a person responsible for their safety. Children should be supervised to ensure that they do not play with the appliance.
- Page 16 Installing the built in cooktop The appliance must be installed by an qualified person in accordance with local and national building regulations. Panels and furniture lining of the kitchen cabinet receiving the cooktop must be treated with temperature resistant adhesives 90°C (otherwise they may become discoloured or deformed due to inadequate temperature resistance). The cooktop is intended for installation into a benchtop above a kitchen cabinet of min 600mm width or more.
- Page 17 Installation Built in Ceramic Cooktop Cut-out Dimensions RHCC64T A (mm) B (mm) C (mm) D (mm) E (mm) F (mm) G (mm) H (mm) Note: In the case of units with base plinths a front grill is necessary Which allows an input section of at least 100mm². Installing the Foam Gasket Before inserting the appliance into the opening in the kitchen benchtop, the supplied foam gasket must be attached to the lower side of the glass ceramic (glass) cooktop between...
- Page 18 Installation - continued Installation procedure. Cooktop must be placed absolutely horizontal. • Suitably protect the edges of the cut aperture. • Connect the cooktop to the mains power supply (see instructions for the connection of the cooktop to the mains power supply).
- Page 19 Installation - continued Technical information Type RHCC64T Product Size (WxDxH) 580x510x50 mm Rated voltage 220-240 V~ 50/60 Hz Type of switch Electronic sensors Cooking Zones Front left 200 mm, 1800 W Rear left 165 mm, 1200 W Rear right 200 mm, 1800 W Front right 165 mm, 1200 W Total Power (W)
- Page 20 Installation - continued Power regulation Heating power of the hotplates may be set at nine different levels. The following chart indicates illustrative use of each power setting. Power Purpose Setting To melt butter, chocolate, and the like. To heat food, keep small amounts of water on the boil, and whip up sauces with egg yolk or butter.
- Page 21 Instructions for use and maintenance Ceramic Glass Cooktop Cooking zone rear left Cooking zone rear right Cooking zone front left Cooking zone front right Cooktop control panel Cooktop Control Panel All the cooktop controls are grouped together on the front panel. Below chart provides a description of the symbols used.
- Page 22 Instructions for use and maintenance Switching on the hob When the hob is not in use, all hob components will be switched off. Hold down switch key for 2 seconds to switch the hob on; a LED will turn on above the symbol to confirm that the hob is lit. If no functions are used within 10 seconds of switching the hob on, it will automatically turn itself off.
- Page 23 Troubleshooting PROBLEM POSSIBLE CAUSES WHAT TO DO The hob doesn’t work -The hob is not wired in or -Switch on at the wall switch on at the wall. - There is a power failure -Check power supply The results of cooking are -Temperature is too high or too -Consult cooking tips unsatisfactory...
- Page 24 Cleaning & maintenance Cleaning and maintenance of ceramic glass cooktop Ceramic glass hob should be cleaned only when completely cooled down, preferably after each use, otherwise even the slightest stains remaining after cooking may burn into the hob surface with each following use. For regular maintenance of ceramic-glass hob use special cleansing agents, produced in such way to create protective film upon the surface.
- Page 25 The following conditions apply in respect of the warranty given in this certificate: 1. Monaco Corporation Limited (“Monaco”) warrants the following Robinhood products against manufacturing defects and faulty materials, under normal use and subject to the exclusions in this certificate, for a period of: Rangehood, Ovens, Cooktops, Dishwashers - 24 months from date of original purchase for domestic use.
- Page 26 The product was used outdoors. 2. All Robinhood Rangehoods are suitable for indoor use only and not suitable over BBQs or charcoal cookers designed for outdoor use. 3. In addition, this warranty does not extend to damage or defects which in our opinion, directly or indirectly arise from or are due to: exposing the product to acidic or corrosive materials or chemicals such as dyes, solvents, denture cleaner or acetone;...
Need help?
Do you have a question about the RHBO77B and is the answer not in the manual?
Questions and answers