Table of Contents
Advertisement
Quick Links
Welcome to bitbox. Bitbox is a very useful tool for capturing and playing back samples. This
manual will walk you through all of the features of bitbox. If you want to start playing right away,
please consult the Quick Start Guide found in the box. The Quick Start Guide and this manual are
also available at 1010music.com.
7/17/19 11:13:00 AM
Page 1 of 42
Bitbox 2.5 User Manual
Digital Heart – Analog Soul
Bitbox 2.5 User's Manual
Copyright 1010music LLC 2019
Advertisement
Table of Contents

Related Manuals for 1010music Bitbox 2.5


Summary of Contents for 1010music Bitbox 2.5
- Page 1 Bitbox 2.5 User’s Manual Bitbox 2.5 User Manual Welcome to bitbox. Bitbox is a very useful tool for capturing and playing back samples. This manual will walk you through all of the features of bitbox. If you want to start playing right away, please consult the Quick Start Guide found in the box.
-
Page 2: Table Of Contents
Bitbox 2.5 User’s Manual TABLE OF CONTENTS WELCOME ............................5 OVERVIEW ............................6 Front Panel Overview ..................................7 Main Screen Overview ..................................8 SETUP BITBOX ............................ 9 Choose an Orientation ..................................9 Rack Installation ....................................9 Connect an Output .................................... 1 0 Connect an Input .................................... 1 0 Global Module Settings .................................. 1 0 Working in Flipped Mode ................................. 1 1 TEST YOUR SETUP ..........................12 Use the Touchscreen to Trigger a Cell . - Page 3 Bitbox 2.5 User’s Manual Work with a Clip Cell .................................. 1 9 Work with Slicer Cells .................................. 2 1 Use Slices to Synchronize Playback of Clip Cells ........................ 2 4 Record a New WAV File .................................. 2 4 To record a WAV file: ...................................... 2 4 Trigger Recording via an External Signal ........................... 2 7 Mute Samples ...................................... 2 7 MANAGING PRESETS ........................28 Save Changes to a Preset ................................... 2 8 Load a Preset ...................................... 2 9...
- Page 4 Bitbox 2.5 User’s Manual Use MIDI to Trigger Playback of specific slices ......................... 3 5 To Use MIDI to Trigger Slice Playback: ................................ 3 5 Use MIDI to Play a Cell Chromatically ............................ 3 6 To Play a Clip or Sample Cell Pitch Shifted: ............................... 3 6 Use Control Voltage to Trigger a Row of Cells ........................... 3 6 Synchronize Playback with a Clock ............................... 3 6 Reset the Clock ..................................... 3 7 Use a MIDI Program Change to Load Presets .......................... 3 7 To Enable or Disable MIDI Program Changes: ............................ 3 7 Export a Set to Ableton Live ................................ 3 8 UPDATE AND SWAP FIRMWARE, AUDIO FILES AND PRESETS ............
-
Page 5: Welcome
If you would rather get a quick overview of how to use the module, see the Bitbox Quick Start Guide that came with the module and that is also available online at https://1010music.com/bitbox-documentation. This document applies to version 2.5 of the bitbox firmware. -
Page 6: Overview
Bitbox 2.5 User’s Manual Overview The bitbox module allows you to record and playback samples in creative ways. When working with bitbox, you create presets that store the selection of samples and parameters that you want to use together. You can create any number of presets, limited only by the space available on your microSD card (up to 32 GB cards). -
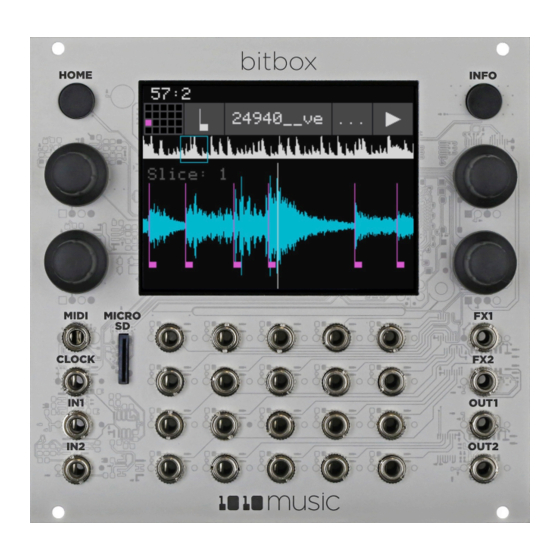
Page 7: Front Panel Overview
Bitbox 2.5 User’s Manual Front Panel Overview The front panel of bitbox contains a touch screen, control knobs, HOME and INFO buttons, a MIDI input jack, and CV input and output jacks as shown in Front Panel Overview. This manual will refer to the controls, inputs and outputs of the module using the labels shown in this figure. -
Page 8: Main Screen Overview
Bitbox 2.5 User’s Manual Main Screen Overview The bitbox touchscreen allows you to do activities on your modular rack that previously required a computer. The user interface allows you to see the waveforms and take actions on them. It also allows you to see the names of WAV files you are working with and to control numerous parameters with the use of 4 knobs. -
Page 9: Setup Bitbox
If the touch screen doesn’t respond right away, turn off the rack and confirm the cable orientation. 1010music modules do contain some buffering to prevent burning out the module but that only buffers for so long. -
Page 10: Connect An Output
Not all mini TRS MIDI jacks work the same way. You can use mini TRS cables to connect the bitbox MIDI input to the MIDI output of another 1010music product, or other compatible products. For other products you may need to use a MIDI adapter. -
Page 11: Working In Flipped Mode
Bitbox 2.5 User’s Manual Parameter Description This is used to specify which MIDI Channel is used to trigger cells. If the channel selected here is also GlobalMIDI chosen as the channel for a cell, the cell selection will override the global setting, and that channel will only trigger the configured cell or cells. -
Page 12: Test Your Setup
Bitbox 2.5 User’s Manual Test Your Setup Before we start creating our own presets, let’s make sure the module is setup properly by playing back some content from a preset that comes with the module and triggering playback through external inputs. -
Page 13: Create And Configure A New Preset
Bitbox 2.5 User’s Manual Create and Configure a New Preset In order to demonstrate the features of bitbox, we will walk through the process of creating a new preset and configuring several different cells. Create and Name the Preset First, you will create a new preset that will be used to store the configuration parameters you select. -
Page 14: To Load A Wav File Into A Cell
Bitbox 2.5 User’s Manual Icon Cell Description Reverse Quantize Play Loop Mode Playback Slices points Use Slicer mode when you have a WAV file with multiple Slicer sections that you want to trigger independently. (This is similar to Atomic Mode in 1.x versions of bitbox.) Slicer mode supports 2-note polyphony. -
Page 15: To Configure Basic Cell Parameters
Bitbox 2.5 User’s Manual stretch touchscreen gestures to zoom in and out of the waveform, or swipe to scroll along the length of the waveform. You can quickly jump to a different section of a long waveform by touching that section of the wave in the top view. -
Page 16: To Configure The Envelope Used For Sample Playback
Bitbox 2.5 User’s Manual Parameter Description Range of Values Target? Level Adjusts the loudness level -96.0 to +12.0 db of the cell Pitch Adjusts the pitch of the cell -24.0 to +24.0 semitones up or down When a stereo output... -
Page 17: To Assign A Cell To An Exclusive Playback Group
Bitbox 2.5 User’s Manual Parameter Description Range of Values Target? Sustain The volume level that the sound maintains when 0.0 to 100.0% you hold a note Release The release specifies how long the note will 0 to 100% The release... - Page 18 Bitbox 2.5 User’s Manual Parameter Description Range of Values Target? Loop Mode Controls whether the WAV file plays in a loop, and None: Plays once from the value the direction of the loop. assigned to the Start parameter through the value assigned to the Length...
-
Page 19: Work With A Clip Cell
Bitbox 2.5 User’s Manual Parameter Description Range of Values Target? Start Point where playback will begin when playing 0 to number of samples in the file forward or ends when playing in reverse. Expressed in samples. LpStr Point where the looping will begin when playing... - Page 20 Bitbox 2.5 User’s Manual Parameter Description Range of Values Target? Quant Size Use Quant Size to quantize when the playback None - always start and stop starts and stops. Quantization will cause playback immediately to snap to a musical grid with intervals specified 1/16 - sixteenth note by the Quant Size parameter.
-
Page 21: Work With Slicer Cells
Bitbox 2.5 User’s Manual Parameter Description Range of Values Target? Sync Sync is only enabled when quantizing is enabled None – playback will occur at the (the Quant Size parameter is not None.) The Sync original rate. Looping will happen as feature prevents timing drift that can occur when soon as the sample ends. - Page 22 Bitbox 2.5 User’s Manual There are four ways to create slice points for a cell: Use a WAV file with pre-defined slices, manually add slices, auto scan, and slice to grid. If you have a file that has slice points identified, bitbox will load those slice points by default. You can then override those slice points for use in this preset, but these changes will not be saved to the WAV file.
- Page 23 Bitbox 2.5 User’s Manual Parameter Description Range of Values Mod Target? Controls whether the slice playback is looped. This Loop Mode On, Off does not work with Launch Mode of Trigger. Use Launch Mode of Gate or Toggle if you want to loop slices.
-
Page 24: Use Slices To Synchronize Playback Of Clip Cells
Bitbox 2.5 User’s Manual Parameter Description Range of Values Mod Target? When Slice Seq is set to a value other than None, None: This parameter will not be Slice Seq each trigger received on the modulation source used to control the order of assigned to this parameter will advance the playback of slices. - Page 25 Bitbox 2.5 User’s Manual Touch a cell in the grid to select it. With the cell selected, press the INFO button. If the cell is empty, bitbox will display the Load and Record screen. If the cell is already loaded, bitbox will display the Waveform screen. Press the Cell Mode icon to the left of the WAV file name at the top of the screen and then touch New Recording.
- Page 26 Bitbox 2.5 User’s Manual Parameter Description Range of Values Controls whether the signals received on the Rec Mon Off - Inputs are never played through the configured input channel are played out through the outputs. configured output channel for monitoring purposes.
-
Page 27: Trigger Recording Via An External Signal
Bitbox 2.5 User’s Manual Trigger Recording via an External Signal It can be awkward to initiate recording a sample while also trying to create the sound to be recorded. To help with this, bitbox has the option to use an external CV signal, for example from a foot pedal, to initiate recording. Here’s how: Press HOME to get to the Main screen if needed. -
Page 28: Managing Presets
Bitbox 2.5 User’s Manual Managing Presets Bitbox stores a set of cell configurations as a preset. You can save as many presets as you want, as long as there is room for the files on your microSD card. When you turn on bitbox, it automatically loads the first preset in the list alphabetically. The microSD card that comes with bitbox has several presets pre-populated. -
Page 29: Load A Preset
Bitbox 2.5 User’s Manual Load a Preset To switch to a different preset: Press the HOME button repeatedly until you get to the Menu screen. Touch the Presets button to view the Preset Management screen. Use the control knobs to scroll through the list of presets. The blue highlight indicates the currently selected preset. -
Page 30: Save Current Changes As A New Preset
Bitbox 2.5 User’s Manual Save Current Changes as a New Preset Sometimes while working on a preset, you decide to save your changes to a different preset in order to save your work while still preserving the original preset state. To save current changes as a new preset: Press Home until you see the Menu screen. -
Page 31: Managing Wav Files
Bitbox 2.5 User’s Manual Managing WAV Files Bitbox comes with hundreds of WAV files bundled with the firmware. You can load WAV files into cells in order to add them to a preset. We talked about how to configure cells previously in this document. Here we will discuss what tasks you can perform to manage the WAV files themselves and what types of tools you can use to edit Loop Points, Slices and other attributes stored in the WAV file. -
Page 32: Work With Wav Files On The Microsd Card
Bitbox 2.5 User’s Manual NOTE • You will not be prompted to confirm the delete action, so please take care when using this feature. • If you delete a WAV file, it will no longer be available for use by presets that were previously using it. The name of the WAV file will still appear in the Preset, but the Waveform screen will be blank until you load a new WAV file into the cell. -
Page 33: Advanced Features
Bitbox 2.5 User’s Manual Advanced Features Processor Management Tips If you have experienced drop outs or crackling sounds with bitbox, you have probably pushed the processor to its limits. Bitbox does not limit what you can do based on anticipated processor load. We have tried to balance the design of the system to optimize what you can do without overdriving the processor while still giving you room to make creative choices. -
Page 34: Use External Signals To Select Slices
Bitbox 2.5 User’s Manual If you are modulating Pitch or Slice Sel, you can optionally turn on the 1V/Octave setting. When this is set to OFF, the Amount parameter controls how the voltage maps to pitch or slice selection. When this is ON, 1V difference in CV maps to one octave difference in pitch playback. -
Page 35: Use Midi To Trigger Playback Of Specific Slices
Bitbox 2.5 User’s Manual 1 through 8), the position of the slice selector cursor may change several times before the note is triggered again, or it might not change at all. It depends on the frequency of the note trigger compared to the frequency of the CV input. -
Page 36: Use Midi To Play A Cell Chromatically
Bitbox 2.5 User’s Manual Use MIDI to Play a Cell Chromatically Bitbox allows you to map a cell to a MIDI channel so that notes played on that MIDI channel will play the WAV file pitch shifted to generate different notes. -
Page 37: Reset The Clock
Bitbox 2.5 User’s Manual Name Description Priority When a MIDI signal is connected to the MIDI jack on the front panel of MIDI Input the module, bitbox will follow MIDI Start, Stop and Clock messages. Bitbox Internal Clock When no other clock input is provided, bitbox will use its own internal clock. -
Page 38: Export A Set To Ableton Live
Bitbox 2.5 User’s Manual Export a Set to Ableton Live Bitbox creates files compatible with Ableton Live. Follow these steps to export them: Save the changes to your preset by following the instructions above. Remove the microSD card and connect it to your computer. -
Page 39: Update And Swap Firmware, Audio Files And Presets
You can find the latest firmware images on the forum at https://forum.1010music.com. You must be a registered user of the forum to access the download files. Forum registration is free. -
Page 40: Reset Bitbox Presets To Factory Settings
Download the bitbox firmware onto your computer. You can find the available firmware images on the forum at https://forum.1010music.com. You must be a registered user of the forum to access the download files. Forum registration is free. -
Page 41: Technical Specs
MIDI connector and the labels of the connection components of a mini TRS jack. 1010music products are compatible with cables that use the following mapping of MIDI signals between female MIDI connectors... -
Page 42: Stay Up To Date
Connect with Other Bitbox Users There is a very active community of users of 1010music modules at forum.1010music.com. If you have a question about the module that isn’t answered in this manual, this is your best source for help. We actively monitor the wish list sub-forums for ideas for future versions of our products.
Need help?
Do you have a question about the Bitbox 2.5 and is the answer not in the manual?
Questions and answers