Table of Contents
Advertisement
Quick Links
Practical Instrument Electronics
A.
j
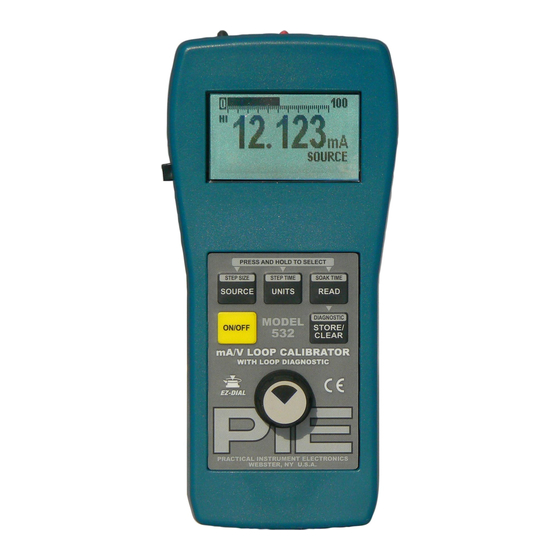
EZ-Check™ Switch/EZ-Step™ Pushbutton
Slide the switch to select the user stored
values for calibration points. Press the
button to adjust the output by the user
defined step size. Press and hold the
button to activate the auto step/ramp
mode.
k
SOURCE/STEP SIZE Button
Press and release SOURCE/STEP SIZE to
change source modes. These are:
Source Milliamps
·
2-Wire Transmitter Simulate
·
·
Source Volts
Press and hold SOURCE/STEP SIZE to
change step size. Refer to section H.
l
ON/OFF Button
Press ON/OFF to turn the Model 532 on or
off.
Test Equipment Depot - 800.517.8431 - 99 Washington Street Melrose, MA 02176
mA/V Loop Calibrator
with Loop Diagnostic
Operating Instructions
Basic Keypad Operations
m
UNITS/STEP TIME Button
Press and release UNITS/STEP TIME to
change how current is displayed: either in
milliamperes or % of 4-20 mA. Voltage is only
displayed in volts.
Press and hold UNITS/STEP TIME to change
step size. Refer to section H.
n
READ/SOAK TIME Button
Press and release READ/SOAK TIME to
change read modes. These are:
Press and hold READ/SOAK TIME to change
soak time. Refer to section H.
†
STORE/CLEAR/DIAGNOSTIC Button
In any source mode:
Press STORE/CLEAR/DIAGNOSTIC to save
the current reading in the EZ-Checkä HI or LO
position. The EZ-Checkä switch must be set to
HI or LO. The display will flash "STORED" to
confirm.
In any read mode:
Press STORE/CLEAR/DIAGNOSTIC to clear
the values saved in the EZ-Checkä HI and LO
positions. The display will flash "CLEARED" to
confirm.
Press and hold STORE/CLEAR/DIAGNOSTIC
to activate diagnostic mode. See section I.
‡
EZ-Dial™ Knob
Turn the EZ-Dialä knob to adjust the output
level. Press and turn to adjust 100X faster.
TestEquipmentDepot.com
Model 532
Read Milliamps
·
·
Power and Measure 2-Wire Transmitter
Read Volts
·
1-8
Advertisement
Table of Contents

Related Manuals for PIE 532


Summary of Contents for PIE 532
- Page 1 Refer to section H. level. Press and turn to adjust 100X faster. ON/OFF Button Press ON/OFF to turn the Model 532 on or off. Test Equipment Depot - 800.517.8431 - 99 Washington Street Melrose, MA 02176 TestEquipmentDepot.com...
- Page 2 ON/OFF (default) If Factory Reset is ON, the unit will restore all factory defaults when the Model 532 is turned OFF and back ON. This will reset any changes made in the Model 532 Configuration options, returning the unit to its simplest factory configuration.
-
Page 3: Auto Step/Ramp
Hint: For faster calibrations, the position of the switch can be felt. This feature allows continuous monitoring of the device being calibrated without looking back at the Model 532 display. This is also useful in poor lighting or under difficult operating conditions. -
Page 4: Quick Reference Bar Graph
Model 532. G. Quick Reference Bar Graph The Quick Reference Bar Graph indicates the input and output level on the Model 532 in % of 4-20 mA with 1% resolution. Test Equipment Depot - 800.517.8431 - 99 Washington Street Melrose, MA 02176... -
Page 5: Manual Step And Auto Step/Ramp Parameter
Note: If the EZ-Step ä option is turned off, the display will flash “EZ-STEP OFF”. Refer to Model 532 Configuration, section B. To Change the EZ-Stepä Time: Press and hold the UNITS/STEP TIME button for more than ¾ of a second. -
Page 6: Loop Diagnostic
Model 532 Operating Instructions Loop Diagnostic Press and hold the STORE/CLEAR/DIAGNOSTIC button for more than ¾ of a second to activate loop diagnostic mode. This is available in each of the Model 532’s operating modes. Read Modes: Read Milliamps Loop current is displayed. -
Page 7: Modes Of Operation
Model 532 Operating Instructions In all loop diagnostic modes, AC voltage is displayed. If more than 2 VAC is present on the Model 532’s terminals, the display is highlighted to alert the user of a potential problem. In all loop diagnostic modes, HARTâ activity is indicated with “© HART DETECTED ©” . The © symbols flash on and off with the actual HARTâ... -
Page 8: Warranty
Claims under guarantee can be made by returning the equipment prepaid to our factory. The equipment will be repaired, replaced or adjusted at our option. The liability of Practical Instrument Electronics (PIE) is restricted to that given under our guarantee.
Need help?
Do you have a question about the 532 and is the answer not in the manual?
Questions and answers