Advertisement
Available languages
Available languages
Quick Links
Dealer/Installer:
Provide a copy of these Instructions to the end user of this product. These
Instructions provide important operating and safety information for proper usage of
this product. Demonstrate the proper use of the product with the end user. Have the
end user demonstrate that they understand the proper use of the product.
Please refer to the husky weight calculator at
www.huskytow.com/support/technical/installation manuals.
End User:
Read and follow all instructions included in this manual. Ask your Dealer / Installer
for assistance if you do not understand the proper use of the product. Never remove
any warning decals from the product.
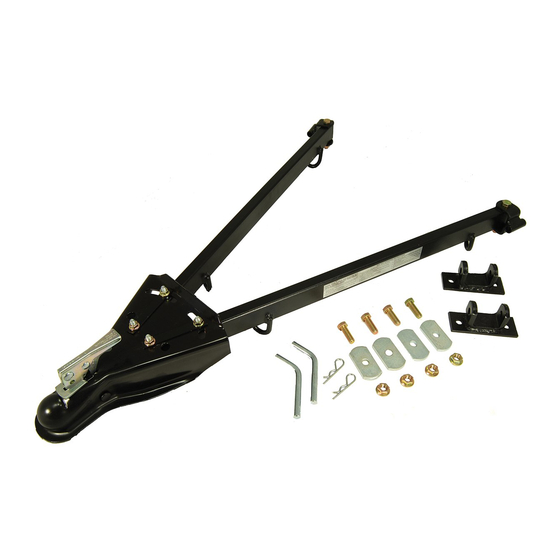
Part Description
1
2" Coupler
2
Tow Bar
3
Tow Bar Bracket
4
Vehicle Mounting Bracket
5
1/2"-13 X 1-3/4" Hex Head Bolt
6
1/2" Flat Washer
7
1/2"-13 Indented Lock Nut
8
1/2"-13 X 3-1/2" Hex Head Bolt
NEVER Use a pickup or van to tow another vehicle as the light rear end of these vehicles can cause
unsafe towing conditions. When braking the towed vehicle will push the rear of the towing vehicle. This
pushing may cause the vehicles to jackknife and/or lose control. The air turbulence from passing vehicles
can also cause loss on control. The total weight of the towed vehicle must not exceed 5,000 lbs. and must
not exceed the towing capacity of the towing vehicle. This tow bar is sold WITHOUT safety chains. Some
states require the use of double safety chains. Use only Class III 1/4" proof coil chain rated for at least
5,000 lbs. capacity..
1. This tow bar should be attached to bumper components which give a solid, unyielding attachment point.
Bumper mounting bracket bolts may be used for tow bar attachment if they are spaced properly and have
secure frame connections. Many applications may require that special mounting brackets be built by the
installer to give adequate frame attachment and reinforcement. Check bumper carefully before attaching only
to bumper face. Most bumpers cannot withstand the towing pressure.
2. This tow bar should be installed by a qualified professional installer that is experienced in fabricating
vehicle attachment brackets and selecting appropriate attachment areas with sufficient strength for
this application.
3. Coupler must be adjusted to fit and lock snugly over a 2" ball used for towing.
4. Check the towing vehicle's manual and receiver hitch for GVWR. Both must exceed 5,000 lbs.
5. Check the towed vehicle's manual to determine if it is acceptable to be flat towed.
See
www.huskytow.com
Assembly, Installation, Operation and Maintenance
Folding Tow Bar 5,000 LB Capacity
Parts List
Qty.
1
2
2
2
4
4
4
2
All Products limited to Vehicle Tow Rating; see Vehicle Owners Manual Feb./ 2013
for Warranty Information / Tech Support. © 2013 Husky Towing Products
Instructions
Part # 30508
Part Description
9
1/2"-13 Flange Lock Nut
10
Bolt Plate
11
Lock Pin
12
3/8"Serrated Washer
13
3/8"-16 Indent Lock Nut
14
Instruction Sheet
! WARNING !
Important:
Tools Required
3/4" Wrench & Socket
Qty.
9/16" Wrench & Socket
2
1/2" Drill Bit
2
2
Drill
4
Rachet
4
Torque Wrench
1
Safety Glasses
1
Advertisement

Related Manuals for Husky 30508


Summary of Contents for Husky 30508
- Page 1 5. Check the towed vehicle's manual to determine if it is acceptable to be flat towed. All Products limited to Vehicle Tow Rating; see Vehicle Owners Manual Feb./ 2013 www.huskytow.com for Warranty Information / Tech Support. © 2013 Husky Towing Products...
- Page 2 Place the reinforcement plates inside the bumper mounting surface. Only hand tighten attachment bolts at this time. All Products limited to Vehicle Tow Rating; see Vehicle Owners Manual Feb./ 2013 www.huskytow.com for Warranty Information / Tech Support. © 2013 Husky Towing Products...
- Page 3 Read and follow the operating instructions attached to the coupler. All Products limited to Vehicle Tow Rating; see Vehicle Owners Manual Feb./ 2013 www.huskytow.com for Warranty Information / Tech Support. © 2013 Husky Towing Products...
- Page 4 5. Connect an adequate wiring harness between the two vehicles so that the stop, turn and running lights operate on the towed vehicle in conjunction with the lights on the towing vehicle Note: The Husky magnetic towing light kit #17929 & 13818 is available for easy hook up of towed vehicle lights.
- Page 5 15. Check lighting requirements and all local laws before beginning your trip. All Products limited to Vehicle Tow Rating; see Vehicle Owners Manual Feb./ 2013 www.huskytow.com for Warranty Information / Tech Support. © 2013 Husky Towing Products...
- Page 6 Tous les produits sont limités à la capacité de remorquage du véhicule; consulter le manuel du propriétaire du véhicule – fév. 2013 Voir www.huskytow.com pour connaître les renseignements sur la garantie/le soutien technique. © 2013 Husky Towing Products...
-
Page 7: Instructions D'installation
39-1/2 po (100 cm) maximum Tous les produits sont limités à la capacité de remorquage du véhicule; consulter le manuel du propriétaire du véhicule – fév. 2013 Voir www.huskytow.com pour connaître les renseignements sur la garantie/le soutien technique. © 2013 Husky Towing Products... - Page 8 NE PAS TROP SERRER. Tous les produits sont limités à la capacité de remorquage du véhicule; consulter le manuel du propriétaire du véhicule – fév. 2013 Voir www.huskytow.com pour connaître les renseignements sur la garantie/le soutien technique. © 2013 Husky Towing Products...
- Page 9 (50 pieds) de remorquage et à tous les 80 kilomètres (50 milles) par la suite. Tous les produits sont limités à la capacité de remorquage du véhicule; consulter le manuel du propriétaire du véhicule – fév. 2013 Voir www.huskytow.com pour connaître les renseignements sur la garantie/le soutien technique. © 2013 Husky Towing Products...
- Page 10 Tous les produits sont limités à la capacité de remorquage du véhicule; consulter le manuel du propriétaire du véhicule – fév. 2013 Voir www.huskytow.com pour connaître les renseignements sur la garantie/le soutien technique. © 2013 Husky Towing Products...
- Page 11 6. Graisser le coupleur et les goupilles de retenue de ½ po avant chaque utilisation. Tous les produits sont limités à la capacité de remorquage du véhicule; consulter le manuel du propriétaire du véhicule – fév. 2013 Voir www.huskytow.com pour connaître les renseignements sur la garantie/le soutien technique. © 2013 Husky Towing Products...
-
Page 12: Instructions De Fonctionnement
15. Vérifier les exigences d’éclairage et toutes les lois locales avant le voyage. Tous les produits sont limités à la capacité de remorquage du véhicule; consulter le manuel du propriétaire du véhicule – fév. 2013 Voir www.huskytow.com pour connaître les renseignements sur la garantie/le soutien technique. © 2013 Husky Towing Products... - Page 13 Tous les produits sont limités à la capacité de remorquage du véhicule; consulter le manuel du propriétaire du véhicule – fév. 2013 Voir www.huskytow.com pour connaître les renseignements sur la garantie/le soutien technique. © 2013 Husky Towing Products...
- Page 14 5. Consulte el manual del vehículo remolcado para determinar si es aceptable que sea remolcado o si presenta cualquier restricción de remolque. Todos los productos son limitados a la capacidad del remolque; consulte el Manual del Propietario del Vehículo- Feb./ 2013. Ingrese a www.huskytow.com para obtener información sobre la garantía / soporte técnico. © Husky Towing Products 2013...
- Page 15 Sólo ajuste a mano los pernos de sujeción por ahora. Todos los productos son limitados a la capacidad del remolque; consulte el Manual del Propietario del Vehículo- Feb./ 2013. Ingrese a www.huskytow.com para obtener información sobre la garantía / soporte técnico. © Husky Towing Products 2013...
- Page 16 50 millas. Todos los productos son limitados a la capacidad del remolque; consulte el Manual del Propietario del Vehículo- Feb./ 2013. Ingrese a www.huskytow.com para obtener información sobre la garantía / soporte técnico. © Husky Towing Products 2013...
- Page 17 5. Conecte un arnés de cableado adecuado entre los dos vehículos para que las luces de detención, de giro y de marcha funcionen en el vehículo remolcado junto con las luces del vehículo remolcador. Nota: El juego de luces magnéticas de remolque Husky #17929 y 13818 está disponible para un fácil enganche de las luces del vehículo remolcado.
- Page 18 6. Lubrique el enganche y los pernos de seguridad de ½” antes de cada uso. Todos los productos son limitados a la capacidad del remolque; consulte el Manual del Propietario del Vehículo- Feb./ 2013. Ingrese a www.huskytow.com para obtener información sobre la garantía / soporte técnico. © Husky Towing Products 2013...
- Page 19 15. Verifique los requisitos de iluminación y todas las leyes locales antes de iniciar su viaje. Todos los productos son limitados a la capacidad del remolque; consulte el Manual del Propietario del Vehículo- Feb./ 2013. Ingrese a www.huskytow.com para obtener información sobre la garantía / soporte técnico. © Husky Towing Products 2013...
Need help?
Do you have a question about the 30508 and is the answer not in the manual?
Questions and answers