Advertisement
Available languages
Available languages
Quick Links
Dealer / Installer:
Provide a copy of these instructions to the end user of this product. These
instructions provide important operating and safety information for proper usage of
this product. Demonstrate the proper use of the product with the end user. Have the
end user demonstrate that they understand the proper use of the product.
End User:
Read and follow all instructions included in this manual. Ask your Dealer / Installer
for assistance if you do not understand the proper use of the product. Never remove
WARNING
any decals from the product. Failure to follow these instructions can result in injury
or death.
APPLICATION:
For use on GMC Sierra 2500/3500 & Chevrolet Silverado 2500/3500
WARNING
DO NOT EXCEED Recommended towing limits. SEE VEHICLE'S OWNER'S MANUAL.
Use with 10 bolt 30686 base rails. Base Rails are not included with this kit.
WARNING
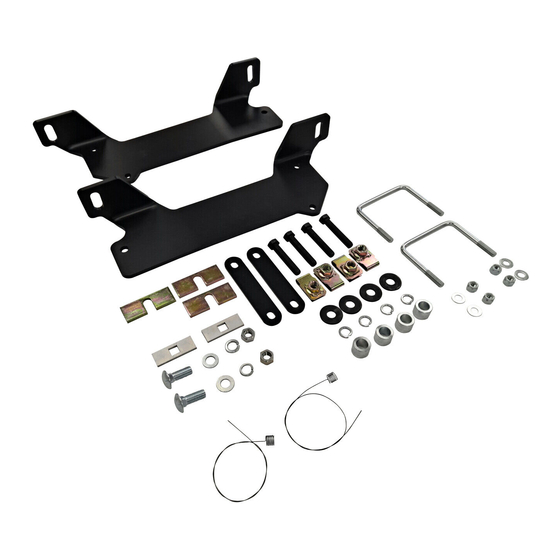
ITEM NO.
1
2
3
4
SPACER PLATE FOR 5/8" CARRIAGE BOLT
5
6
7
5/8" -11 UNC X 2.00 CARRIAGE HEAD BOLT
8
9
See www.huskytow.com for Warranty Information / Tech Support / Product Updates.
©2021 Keystone Automotive Operations, Inc. All Rights Reserved. 08/26/2021-Rev1
Assembly, Installation, Operation
and Maintenance Instructions
GMC Sierra/ Chevrolet Silverado
2500/3500 Base Rail Bracket Kit – 2 Piece
Center Bolt Kit 33156 (sold separately) must be used when towing with a 26K hitch,
Gooseneck, or Maneuvering System.
Description
DRIVER SIDE BRACKET
PASSENGER SIDE BRACKET
CLIP-ON NUT
5/8" FLAT WASHER
5/8" LOCKWASHER
5/8" -11 HEX NUT
5/8" -11 X 3.5" HEX HEAD BOLT
Complete Parts List
QTY
ITEM NO.
1
10
1
11
4
12
2
13
2
14
2
15
2
16
2
17
4
18
TOOLS REQUIRED
3/4" WRENCH & SOCKET
15/16" WRENCH & SOCKET
5/8" DRILL BIT
5/8" TRANSFER PUNCH
SAFETY GLASSES
PART NUMBER:
33220
Install Time:
90-120 MINUTES
Description
5/8" FLAT WASHER (BLACK)
5/8" LOCKWASHER (BLACK)
U-BOLT SPACER
U-BOLT
1/2" -13 NYLOCK NUT
1/2" FLATWASHER
SPACER PLATE
PULL WIRE
SPACER TUBE
Page-1 of 20
QTY
4
4
2
2
4
4
4
1
4
Advertisement

Related Manuals for Husky 33220


Summary of Contents for Husky 33220
- Page 1 PART NUMBER: Assembly, Installation, Operation 33220 and Maintenance Instructions Install Time: GMC Sierra/ Chevrolet Silverado 90-120 MINUTES 2500/3500 Base Rail Bracket Kit – 2 Piece Dealer / Installer: Provide a copy of these instructions to the end user of this product. These instructions provide important operating and safety information for proper usage of this product.
- Page 2 Parts Diagram Figure : 1 Use with 10 bolt 30686 base rails. Base Rails are not included with this kit. See www.huskytow.com for Warranty Information / Tech Support / Product Updates. ©2021 Keystone Automotive Operations, Inc. All Rights Reserved. 08/26/2021-Rev1 Page-2 of 20...
- Page 3 Check for obstructions before drilling. Failure to do so could result in damaged fuel or brake lines, structural members, etc. HUSKY TOWING PRODUCTS does its best to communicate tow vehicle manufacturer changes; however, it is ultimately the responsibility of the installer to prevent damage due to installation.
- Page 4 (10 Bolt Base Rails #30686) 22” 30-1/8” 8’ Box Forward 27-1/8” 6’-4” Box Figure: 2 Diagonal measurements must be the same both directions as shown. Use the 2nd slot from the end of the base rail to drill hole for 5/8” bolt in rear rail location.
- Page 5 A roller/glider should be used when installing a fifth wheel with a truck bed shorter than 8’. Consult the Husky Towing Products catalog to select the product that best matches your needs. 9. When the hitch is correctly positioned in the bed and the bed rails are parallel (See Figure 2 for measurements) mark the four attachment points on the truck bed using the 5/8"...
- Page 6 12. Position the clip-on nuts (#3) on the driver side bracket (#1) as shown. See Figure 6. Forward Driver Side Shown Figure: 6 13. Position the driver side bracket (#1) up against the outer surface of the truck frame with the mounting tabs positioned over the frame and under the bed in-line with previously drilled holes in the truck bed.
- Page 7 16. Loosely install ½” nylock nuts (#14) and ½” washer (#15) as shown. See Figure 8. Figure: 8 Driver Side Shown 17. Attach pull wire (#17) to 5/8” carriage bolt (#7) and slide 5/8” spacer plate (#4) over pull wire onto carriage bolt. Pull carriage bolt and spacer through the hole on the back side of the truck frame and pull through the front of the driver side bracket.
- Page 8 17.Loosely install 5/8” flat washer (#5), 5/8” lock washer (#6) and 5/8” nut (#8) onto 5/8” carriage bolt (#7) as shown. See Figure 10. Truck Frame Driver Side Bracket Figure: 10 Driver Side Shown 18. Loosely install the 5/8” bolt (#9), 5/8” lock washer (#11) and 5/8” flat washer (#10) through the base rail, the 1”...
- Page 9 18. Repeat Steps 11 through 18 for the passenger side bracket (#2). 19. Tighten all 1/2” attachment fasteners to 75 ft.-lbs. and the 5/8” fasteners to 150 ft.-lbs. torque. Failure to tighten bolts as described may result in fastener loss or failure. DO NOT TIGHTEN CLIP-ON NUTS (#3).
-
Page 10: Warranty Terms
Husky Towing Products and Keystone Automotive Operations Inc. with proof of purchase by the original purchaser. The original purchaser shall pay all transportation and shipping costs associated with the return of the defective product and the defective product shall become the property of Keystone Automotive Operations Inc. -
Page 11: Outils Requis
PARTIE N° Instructions de montage, d’installation, 33220 d’utilisation et d’entretien Temps d’installation: GMC Sierra / Chevrolet Silverado 90-120 MINUTES Kit de supports de traverses inférieures 2500/3500 – 2 Revendeur / Fournissez une copie de ces instructions à l'utilisateur final de ce produit. Ces pièces... - Page 12 Schéma des pièces Figure 1 S'utilise avec les traverses inférieures 30686 à 10 boulons. Les traverses inférieures ne sont pas incluses dans ce kit. Consultez www.huskytow.com pour les informations sur la garantie / l'assistance technique / les mises à jour des produits. 2021 Keystone Automotive Operations Inc.
- Page 13 Vérifiez l'absence de tout obstacle avant de percer. Le non-respect de cette consigne peut entraîner la détérioration des conduites de carburant ou de freins, des éléments structurels, etc. HUSKY TOWING PRODUCTS fait de son mieux pour communiquer les modifications apportées par les fabricants de véhicules de remorquage.
- Page 14 (Traverses inférieures à 10 22” boulons 30686) Avant Boîte 30-1/8” 8’ Boîte 27-1/8” 6’-4” Figure 2 Les mesures en diagonale doivent être les mêmes dans les deux sens, comme indiqué. Utilisez la deuxième fente à partir de l'extrémité de la traverse inférieure pour percer un trou pour un boulon de 5/8"...
- Page 15 Lors de l'installation d'une sellette sur un véhicule dont la caisse mesure moins de 8’, un dispositif à galet/de glissement doit être utilisé. Consultez le catalogue Produits de remorquage Husky pour choisir le produit qui correspond le mieux à...
- Page 16 12. Positionnez les écrous à clipser (#3) sur le support côté conducteur (#1) comme indiqué. Voir figure 6. Avant Côté conducteur Figure 6 13. Positionnez le support côté conducteur (#1) contre la surface extérieure du châssis du véhicule, les pattes de fixation étant positionnées au-dessus du châssis et sous la caisse, en alignement avec les trous précédemment percés dans la caisse du véhicule.
- Page 17 16. Installez, sans serrer, les écrous nylock ½" (#14) et la rondelle ½" (#15) comme indiqué. Voir figure 8. Figure 8 Côté conducteur 17. Fixez la tirette (#17) au boulon de carrosserie 5/8“ (#7) et faites glisser la plaque d'écartement 5/8“ (#4) sur la tirette et le boulon de carrosserie.
- Page 18 17. Installez, sans serrer, la rondelle plate 5/8" (#5), la rondelle de blocage 5/8" (#6) et l'écrou 5/8" (#8) sur le boulon de carrosserie 5/8" (#7) comme indiqué. Voir figure 10. Châssis véhicule Support côté conducteur Figure 10 Côté conducteur 18.
- Page 19 18. Répétez les étapes 11 à 18 pour le support côté passager (#2). 19. Serrez tous les boulons 1/2" à un couple de 75 ft.-lbs. et les boulons 5/8" à un couple de 150 ft.-lbs. Des boulons mal serrés peuvent entraîner la rupture ou la perte des fixations. NE SERREZ PAS LES ÉCROUS À CLIPSER (#3) SOUS PEINE DE LES ENDOMMAGER.
-
Page 20: Conditions De Garantie
Si un produit présente un défaut de fabrication ou de matériau, il sera remplacé ou réparé au choix de Husky Towing Products et de Keystone Automotive Operations Inc. avec une preuve d'achat par l'acheteur d'origine. L'acheteur d'origine doit payer tous les frais de transport et d'expédition liés au retour du produit défectueux et le produit défectueux devient la propriété...
Need help?
Do you have a question about the 33220 and is the answer not in the manual?
Questions and answers