Table of Contents
Advertisement
Quick Links
Provide a copy of these Instructions to the end user of this product. These Instructions provide important
Dealer /
operating and safety information for proper usage of this product. Demonstrate the proper use of the
Installer:
product with the end user. Have the end user demonstrate that they understand the proper use of the
product.
Read and follow all instructions included in this manual. Ask your Dealer / Installer for assistance if you
End User:
do not understand the proper use of the product. Never remove any decals from the product.
APPLICATION: 2011 - 2017 Chevrolet & GMC Silverado & Sierra 2500 & 3500 HD Pick-ups
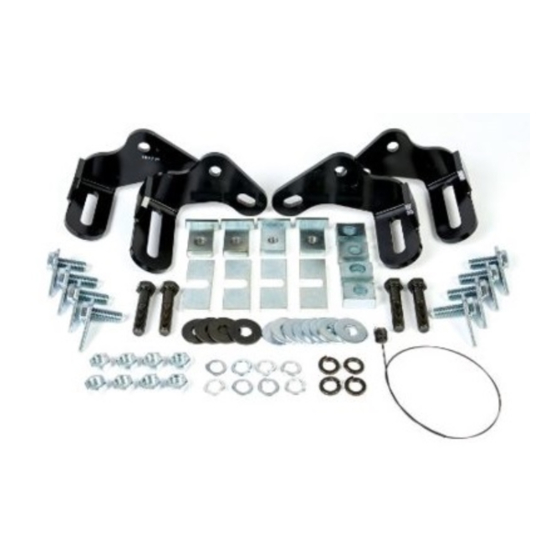
ITEM NO.
1
2
3
PASSENGER SIDE FRONT "L" BRACKET
4
PASSENGER SIDE REAR "L" BRACKET
5
6
7
8
PULL WIRE FOR 5/8"-11 THREADED BOLT
9
5/8" -11 GRADE 5 HEX NUT, CLEAR
10
Ø5/8" X Ø1.079" LOCK WASHER, CLEAR
11
Ø5/8 X Ø1-3/4 FLAT WASHER, CLEAR
12
5/8"-11 BOLT AND ANTI-ROTATION PLATE
13
Ø5/8" X Ø1.079" LOCK WASHER, BLACK
14
Ø5/8 X Ø1-3/4 FLAT WASHER, BLACK
15
5/8"-11 X 3.25" GRADE 5 HEX BOLT, BLOT
CAUTION: Do not install base rails over plastic bed
liners. Plastic bed liners must be cut out of the way.
Rails may be installed on spray in liners. Consult
spray liner installer for recommended curing time.
All Products limited to Vehicle Tow Rating, see Vehicle Owners Manual. See www.huskytow.com for Warranty Information / Tech
Support / Product Updates. ©2017 DTS Mfg. All Rights Reserved. April 5, 2017 REV14. Page 1 of 8
Assembly, Installation, Operation and Maintenance Instructions
Kit, Base Rail Bracket
.
Complete Parts List
Description
DRIVER SIDE FRONT "L" BRACKET
DRIVER SIDE REAR "L" BRACKET
5/8" -11 CLIP NUT
1" SPACER TUBE
1/4" SPACER PLATE
Part # 31853
(Can be used with 4 Bolt Rails
#31323 or 10 Bolt Rails #30686)
WARNING! Never exceed the towing
QTY.
capacity of the tow vehicle.
1
Center Bolt Kit 32059 (sold separately)
1
1
must be used when towing with a 26K
1
hitch, Goose Neck, or Maneuvering
4
System.
4
4
Base Rails Not Included
2
8
Tools Required
8
3/4" Socket & Wrench
8
15/16" Socket & Wrench
8
4
11/16" Drill Bit
4
Torque Wrench
4
5/8" Drill Bit
Safety Glasses
Advertisement
Table of Contents

Related Manuals for Husky 31853


Summary of Contents for Husky 31853
- Page 1 Assembly, Installation, Operation and Maintenance Instructions Kit, Base Rail Bracket Part # 31853 (Can be used with 4 Bolt Rails #31323 or 10 Bolt Rails #30686) Provide a copy of these Instructions to the end user of this product. These Instructions provide important Dealer / operating and safety information for proper usage of this product.
- Page 2 For #31323 4 Bolt Rails If using 10 Bolt Rails #30686 31-1/16” Long Bed Dimension 26-3/16” Short Bed Dimension GM 2500 FRAME IS SHOWN, GM 3500 FRAME HAS OVER LOAD SPRINGS AND BRACKETS THAT ARE NOT SHOWN. Figure 1 All Products limited to Vehicle Tow Rating, see Vehicle Owners Manual. See www.huskytow.com for Warranty Information / Tech Support / Product Updates.
- Page 3 1. Place the two bed rails across the truck bed between the wheel wells. Position the 5 wheel uprights between the bed rails so that the tabs in the base of each upright will fit into the slots in the ends of the bed rails. Secure the uprights in place with the rail hitch pins and hair pins supplied with the 5 wheel installation kit.
- Page 4 7. Position item #1 (DS Front "L" Bracket) and item #2 (DS Rear "L" Bracket) up against the outer surface of the truck frame with the long slotted part of the bracket positioned over the frame and under the bed and guide the 5/8" hex bolts that were installed in step 6 through the long slots in the brackets.
- Page 5 Install item #12 (5/8 bolt and anti-rotation plate), item #11 (5/8 flat washer), item #10 (lock washer), item #9 (5/8 hex nut) as follows: Insert pull wire through hole in bracket. Guide pull wire coils through hole on inside of frame. Bend end of pull wire to prevent from going through slot in bracket and hole in frame.
- Page 6 Continue to retrieve pull wire until bolt appears through slot in bracket, carefully un-thread pull wire from bolt and place item #11 (flat washer), item #10 (lock washer) and item #9 (5/8 hex nut) on bolt and finger tighten only at this time.
- Page 7 All Products limited to Vehicle Tow Rating, see Vehicle Owners Manual. See www.huskytow.com for Warranty Information / Tech Support / Product Updates. ©2017 DTS Mfg. All Rights Reserved. April 5, 2017 REV14. Page 7 of 8...
- Page 8 Husky Towing Products and DTS Mfg. are not responsible for any labor costs incurred for removal or replacement of the defective product. Husky Towing Products and DTS Mfg. are not responsible for repair or replacement of any product under the limited warranty where the product was improperly installed, misapplied, altered, abused, neglected, overloaded, misused or damaged as a result of an accident, including any use of the product not in accordance with all product operating and safety instructions.
Need help?
Do you have a question about the 31853 and is the answer not in the manual?
Questions and answers