Panasonic NN-CD87KS Owner's Manual
Convection / broil / microwave oven household use only, inverter precision cook technology
Hide thumbs
Also See for NN-CD87KS:
- User manual ,
- Manual (75 pages) ,
- Operating instruction and cook book (50 pages)
Table of Contents
Advertisement
Owner's Manual
Convection / Broil / Microwave Oven
Household Use Only
Model No.
NN-CD87KS
PLEASE READ THESE INSTRUCTIONS CAREFULLY BEFORE USING THIS PRODUCT,
AND SAVE THIS MANUAL FOR FUTURE USE.
Inverser le manuel pour lire les instructions en français.
Panasonic Canada Inc.
F0003CD70CP
5770 Ambler Drive
PA0220-0
Mississauga, Ontario
Printed in China
L4W 2T3
© Panasonic Appliances Microwave Oven (Shanghai) Co., Ltd. 2020
www.panasonic.com
F0003CD70CP_EN_0302.indd 1
2020/3/3 9:52:11
Advertisement
Table of Contents

Related Manuals for Panasonic NN-CD87KS


Summary of Contents for Panasonic NN-CD87KS
- Page 1 AND SAVE THIS MANUAL FOR FUTURE USE. Inverser le manuel pour lire les instructions en français. Panasonic Canada Inc. F0003CD70CP 5770 Ambler Drive PA0220-0 Mississauga, Ontario Printed in China L4W 2T3 © Panasonic Appliances Microwave Oven (Shanghai) Co., Ltd. 2020 www.panasonic.com F0003CD70CP_EN_0302.indd 1 2020/3/3 9:52:11...
-
Page 2: Table Of Contents
CONTENTS Safety Information Melt & Soften ............37 Convection Bake/Combo ......38-39 IMPORTANT SAFETY INSTRUCTIONS ......3-5 Beverage ..............40 Installation and Grounding Instructions ......6 Re-Bake Bread ............41 Food Preparation ..............7-8 Auto Steam Clean ............42 Operation Defrosting Tips & Techniques ........43 Microwave shortcuts .......... -
Page 3: Important Safety Instructions
(d) The oven should not be adjusted or repaired by anyone except properly qualified service personnel. Thank you for purchasing a Panasonic Microwave Oven Your microwave oven is a cooking appliance and you should use as much care as you use with a stove or any other cooking appliance. - Page 4 IMPORTANT SAFETY INSTRUCTIONS (continued) When cleaning surfaces of the door and oven that come together on closing the door, use only mild, non-abrasive soaps or detergents applied with a sponge or soft cloth. 10. DO NOT allow children to use this appliance, unless closely supervised by an adult. DO NOT assume that because a child has mastered one cooking skill he/she can cook everything.
- Page 5 IMPORTANT SAFETY INSTRUCTIONS (continued) WARNING Safety Precautions TO AVOID THE RISK OF SHOCK: Glass Tray DO NOT remove top or outer panel 1. DO NOT operate the oven without the Roller Ring and the Glass from oven. Repairs must be done Tray in place.
-
Page 6: Installation And Grounding Instructions
2. If the oven is designed for installation into a wall cabinet, microwave oven (120 V, 60 Hz). Using a higher voltage is only use the proper Panasonic trim kit available from a local dangerous and may result in a fire or oven damage. Using a lower voltage will cause slow cooking. -
Page 7: Food Preparation
Food Preparation Follow these Safety Precautions when cooking in your oven. 4) FOODS WITH NONPOROUS SKINS IMPORTANT • DO NOT COOK / REHEAT WHOLE EGGS, WITH OR WITHOUT THE SHELL. Proper cooking depends upon the power, the time setting and quantity of food. If you use a smaller portion than Steam buildup in whole recommended but cook at the time for the recommended eggs may cause them to... - Page 8 • Do not use a steam cleaner to clean this appliance. The steam from the cleaning appliance could penetrate live components and permanently damage the oven or cause injury. • The use of accessories not recommended by Panasonic may cause injury. F0003CD70CP_EN_0302.indd 8...
-
Page 9: Cookware And Utensil Chart
Cookware and Utensil Chart Combo Microwave Broil Convection Airfry Combo 1 Combo 2 (Broil + Microwave) (Convection + Microwave) Aluminium foil for shielding for shielding for shielding Ceramic plate Browning dish Brown paper bags Dinnerware oven/microwave safe non-oven/microwave safe Disposable yes* yes* yes*... -
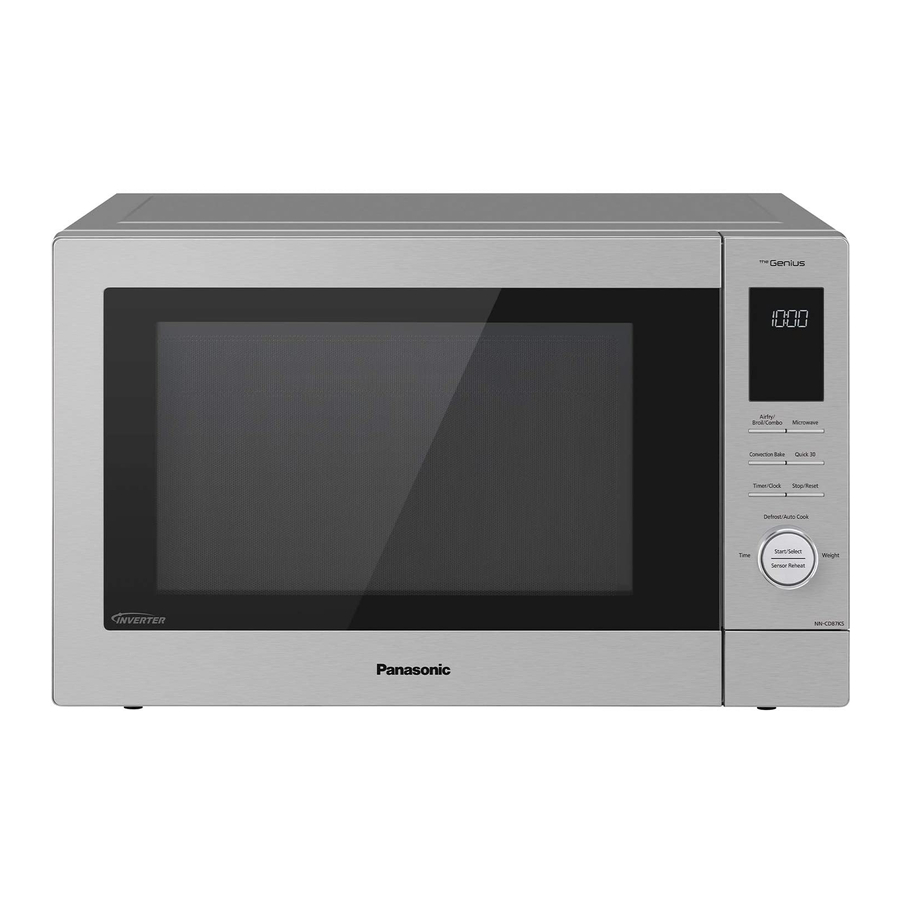
Page 10: Location Of Controls
Location of Controls 11 7 Oven Window Enamel Tray Airfry, a. The enamel tray is for cooking on Broil, Convection and Door Safety Lock System Combo. Do not use enamel tray in Microwave mode only. Door Release Button b. The enamel tray must always be in place on the glass Push to open the door. -
Page 11: Oven Accessories
Oven Accessories The following chart shows correct use of the accessories in the oven. Glass Tray Enamel Tray Wire Rack Airfry Basket Mode Microwave Broil Airfry Convection Combo 1 (Broil + Microwave) Combo Combo 2 (Convection + Microwave) F0003CD70CP_EN_0302.indd 11 2020/3/3 9:52:13... -
Page 12: Control Panel
Control Panel Display Window (page 13) Airfry/Broil/Combo Button Microwave Button (pages 25) (pages 18-22) Convection Bake Button Quick 30 Button (pages 23-24) (page 26) Timer/Clock Button Stop/Reset Button (pages 27-29, 17) Before cooking: One press clears your instructions. During cooking: One press temporarily stops the cooking process. -
Page 13: Display Window
Display Window To help you operate the oven conveniently, the present state will appear in the display window. Preheating Child Safety Lock Setting Temperature Number/Character Time (Minute/Second) Popcorn Display Weight Defrost Mode/Frozen Food Mark Beverage 3-Stage Display Auto Cook Program Convection Mode Sensor Cook Program Broil Mode... -
Page 14: Cooking Modes
Cooking Modes The diagrams shown below are examples of the accessories. It may vary depending on recipe/dish used. Recommended Cooking modes Uses Containers accessories Defrosting Reheating Microwave Melting: butter, chocolate, cheese. Cooking: fish, vegetables, fruits, eggs, rice and Use your own porridge. -
Page 15: Operation
Spanish display. mode. Imperial Units display. Display Window Plug into a properly grounded electrical outlet. "WELCOME TO PANASONIC REFER TO OWNER’S MANUAL BEFORE Press Start (Dial) twice. Press Start (Dial) 3 times. USE" scrolls across display Press Start (Dial) once. -
Page 16: Demo Mode
Operation (continued) Demo Mode Menu Action ON/OFF When "DEMO MODE This feature helps you to NOTES: PRESS ANY KEY" or "D" program your oven by 1. To set Demo Mode, repeat appears in the display prompting the next step to step 1-3. -
Page 17: Setting The Clock
Operation (continued) Setting the Clock Setting the Child Safety Lock NOTES: 1. This feature prevents the electronic operation of the oven until cancelled. It does not lock the door. 2. To set or cancel Child Safety Lock, Stop/Reset button must be pressed 3 times within 10 seconds. -
Page 18: Airfry
Operation (continued) Airfry The Airfry function combines Oven accessories to use intense heat and maximized Airfry basket on wire rack on airflow to cook food crispy enamel tray and brown. No need to set temperature and preheating, turn the Dial to set the cooking time up to 9 hours after selecting Airfry function. -
Page 19: Airfry Chart
Operation (continued) Airfry Chart Recommended Food Weight range time Hints (minute) 8 - 16 oz. (225 - 450 g) 20-30 of total time for over 16 oz. (450 g) Thin frozen fries stir at 16 - 32 oz. (450 - 900 g) 30-40 Thick frozen fries/Frozen 16 - 32 oz. -
Page 20: Broil
Operation (continued) Broil Directions for Broiling: Oven accessories to use NOTES: There are two power levels for When broiling foods the glass There is no microwave Broil. When broiling, heat is tray should be in position, with power on the Broil only radiated from heater. -
Page 21: Combo
Operation (continued) Combo Combo 1 (Casserole) This function is suitable for cooking casserole dishes. The cooking power combines microwave and broil. Follow the recommended recipes and cooking time on the next page, use microwaveable dishes, and cook without lids. For other recipe of casserole, please set cooking time as you desired. -
Page 22: Casserole Recipes
Operation (continued) Casserole Recipes Macaroni and cheese (4-6 servings) Potato casserole (4-6 servings) 2½ tbsp. (40 g) 1½ lb. (750 g) butter potatoes, peeled and sliced 1½ tbsp. (25 g) chopped onion ½ cup (125 ml) sour cream ½ clove minced garlic ½... -
Page 23: Convection Bake
Operation (continued) Convection Bake The oven can be used as a With Preheating: NOTES: conventional oven using the 1. * Open the door using Convection mode which the door release button, incorporates a heating element because if the Stop/ with a fan. There is a choice of Reset button is pressed Convection temperatures 100 °F the program may be... - Page 24 Operation (continued) Convection Bake Without Preheating: NOTES: Oven accessories to use 1. When the selected cooking When using the Convection (100 °F (40 °C) is available time is less than one hour, oven the glass tray should be in Convection without the time counts down in position and must have the preheating.)
-
Page 25: Microwave
Operation (continued) Microwave This feature allows you to set NOTES: the desired power and time to 1. Opening the door and cook food. Do not place food taking out the defrosted directly on the glass tray. Use parts during the operating microwave safe dishes, plates time is recommended. -
Page 26: Keep Warm
Operation (continued) Keep Warm Quick 30 (Will keep “cooked“ food warm for up to 30 minutes after cooking) (Set or add cooking time in 30 seconds increments) NOTES: 1. If desired, you can use other power levels. Select desired power level before pressing Quick 30. -
Page 27: Setting The Kitchen Timer
Operation (continued) Setting the Kitchen Timer NOTES: 1. If the oven door is opened during Kitchen Timer, Standing Time, Delay Start, the time in the display window will continue to This feature allows you to count down. program the oven as a kitchen 2. -
Page 28: Setting A Standing Time
Operation (continued) Setting a Standing Time NOTES: 1. If the oven door is opened during Kitchen Timer, Standing Time, Delay Start, the time in the display window will continue to Press Timer/Clock once. count down. 2. Standing Time and Delay Start can not be programmed together with auto programs (such as Defrost, Sensor... -
Page 29: Setting A Delayed Start
Operation (continued) Setting a Delayed Start NOTES: 1. If the oven door is opened during Kitchen Timer, Standing Time, Delay Start, the time in the display The start time can be delayed window will continue to to start cooking at a later time. count down. -
Page 30: Add Time
Operation (continued) Add Time (Example: To add cooking time after Broil 1 (High).) NOTES: This feature is not available for auto programs (such as Defrost, Sensor Reheat, Auto/Sensor Cook and Steam Clean). 2. The Add Time function will be cancelled if you do not perform any operation within 1 minute after cooking. -
Page 31: 3-Stage Setting
Operation (continued) 3-Stage Setting (Example: Continually set [800 W] 2 minutes, [Combo 2 (Frozen foods)] 3 minutes and [Broil 2 (Low)] 2 minutes.) Press twice to select 800 W. Press 5 times to select Combo 2 Press 3 times to select Broil 2 (Frozen foods). -
Page 32: Sensor Reheat (One Push Reheating)
Operation (continued) Sensor Reheat (One Push Reheating) Program Weight Accessories Instructions This unique feature ‘the All foods must be pre-cooked. Foods Genius’ built-in sensor allows should be at refrigerator tempera- you to reheat a chilled meal ture approx. 41 °F (+ 5 °C). Reheat in with one push of the dial. -
Page 33: Auto Defrost
Operation (continued) Auto Defrost (No.1) To allow auto program Press the dial to confirm the Select the weight of the food Press dial to Start. The time program. appears in the display window operation, ensure the oven is in by turning dial. Turning the dial and begins to count down. -
Page 34: Auto Cook (Sensor)
Operation (continued) Auto Cook (Sensor): Popcorn (No.2) Press dial to Start. The food category will be repeated in To allow auto program Press the dial to confirm the the display window until the operation, ensure the oven is in program. oven calculates the cooking clock mode. - Page 35 Operation (continued) Auto Cook (Sensor): (No.3 - No.5) Press dial to Start. The food category will be repeated in To allow auto program Press the dial to confirm the the display window until the program. operation, ensure the oven is in oven calculates the cooking Clock mode.
- Page 36 Operation (continued) Menu Weight Range Recommended Container Accessory and Placement 0.1 - 6.0 lb Defrost microwave safe dish Directly on the glass tray (0.1 - 3.0 kg) 1.5 - 3.2 oz. Popcorn orignal bag Directly on the glass tray (42 - 90 g) 8 - 56 oz.
-
Page 37: Auto Cook
Operation (continued) Auto Cook: Melt & Soften (No.6 - No.8) Press the dial to confirm the Press dial to Start. The time To allow auto program Select the weight of the food by operation, ensure the oven is in program. turning dial. -
Page 38: Convection Bake/Combo
Operation (continued) Auto Cook: Convection Bake/Combo (No.9 - No.16) Press the dial to preheat the oven. “PREHEAT” will scrolls across display window once then a “P” will appear in the display window. (Skip this step when preheating is not required) After preheating, the oven will beep and “P END”... - Page 39 Operation (continued) 9. Cake Toppings: 2 oz. (55 g) tomato sauce Ingredient: 3 oz. (80 g) 15 oz. (420 g) pepperoni cake mix 4 oz. (110 g) shredded mozzarella cheese, or more to taste eggs 4 oz. (110 g) vegetable oil 10 oz.
-
Page 40: Beverage
Operation (continued) Auto Cook: Beverage (No.17 - No.18) (Example: To reheat 1 cup milk.) Press the dial to confirm the Press dial to Start. The time To allow auto program Select the weight of the food by operation, ensure the oven is in program selection. -
Page 41: Re-Bake Bread
Operation (continued) Auto Cook: Re-Bake Bread (No.19 - No.20) To allow auto program Press the dial to confirm the Select the weight of the food by Press dial to Start. The time program. appears in the display window operation, ensure the oven is in turning dial. -
Page 42: Auto Steam Clean
Operation (continued) Auto Steam Clean: (No.21) Place 1¼ cups (300 ml) Five beeps sound at tap water with 1 tbsp the completion of the (15 ml) lemon juice in a program. Open oven microwaveable container door and wipe the cavity (e.g. -
Page 43: Defrosting Tips & Techniques
Defrosting Tips & Techniques Preparation For Freezing: After Defrosting: 1. Freeze meats, poultry, and fish in packages with only one or two 1. Large items may be icy in the center. Defrosting will complete layers of food. Place wax paper between layers. during Standing Time. -
Page 44: Microwave Shortcuts
Microwave shortcuts FOOD POWER TIME (in mins.) DIRECTIONS To separate refrigerated Bacon, 1000 W 30 sec. Remove wrapper and place in microwave safe dish. After 16 oz. (450 g) heating, use a plastic spatula to separate slices. To soften refrigerated Butter, 300 W 1 stick, 4 oz. - Page 45 Microwave shortcuts (continued) FOOD POWER TIME (in mins.) DIRECTIONS Cup of liquid To boil water, broth, etc. 1 cup, 8 oz. (250 ml) 1000 W 1½ - 2 2 cups, 16 oz. (500 ml) 2½ - 3 Heated liquids can erupt if not stirred. Do not heat liquids in microwave oven Cup of liquid without stirring before heating.
-
Page 46: Defrosting Chart
Defrosting Chart Select Defrost microwave. The times given below are a guideline only. Always check the progress of the food by opening the oven door and then re-starting. For larger quantities adjust times accordingly. Food should not be covered during defrosting. Food Defrosting Time Method... -
Page 47: Reheating Chart
Reheating Chart The times given in the charts below are a guideline only, and will vary depending on starting temperature, dish size etc. Weight/ Time to Select Food Power Level Instructions/Guidelines Quantity (approx) Canned beans, pasta 8 oz. (225 g) 1000 W 2 mins Baked beans... -
Page 48: Cooking Chart
Cooking Chart The times given in the charts below are a guideline only, and will vary depending on starting temperature, dish size etc. Weight/ Time to Select Food Power Level Instructions/Guidelines Quantity (approx) Bread – Frozen 8 oz. (225 g) Part-baked rolls Combo 2 3-4 mins... - Page 49 Cooking Chart (continued) Weight/ Time to Select Food Power Level Instructions/Guidelines Quantity (approx) Fish – Fresh from raw Place on enamel tray on wire rack on glass tray. 10 oz. (280 g) Breaded fillets Broil 1 10-15 mins Turn halfway. 1000 W 3-4 mins Place in micro-safe dish.
- Page 50 Cooking Chart (continued) Weight/ Time to Select Food Power Level Instructions/Guidelines Quantity (approx) Potato products part cooked – frozen Place on enamel tray on wire rack on glass tray. 12 oz. (340 g) Croquettes Combo 1 9-11 mins Turn halfway. Place on enamel tray on wire rack on glass tray.
-
Page 51: Food Characteristics
Food Characteristics Bone and Fat Shape Both bone and fat affect cooking. Bones may cause irregular cooking. Uniform sizes heat more evenly. The thin end of a drumstick will cook Meat next to the tips of bones may overcook while meat positioned under more quickly than the meaty end. -
Page 52: Cooking Techniques
Cooking Techniques Piercing Standing Time Foods with skins or membranes must be pierced, scored or have a strip of Most foods will continue to cook by conduction after the microwave oven skin peeled before cooking to allow steam to escape. Pierce clams, oysters, is turned off. -
Page 53: Care And Cleaning Of Your Microwave Oven
DO NOT SPRAY DIRECTLY INSIDE THE OVEN. A steam cleaner is not to be used for cleaning. Shop Accessories Purchase Parts, Accessories and Instruction Books online for all Panasonic Products by visiting our Web Site at: shop.panasonic.ca Parts Available to Order Owner’s Manual (this book) ..................F0003CD60AP... -
Page 54: Before Requesting Service
Before Requesting Service See below before calling for service, as most problems can easily be remedied by following these simple solutions: Problem Solution Some radio, TV, Wi-Fi, cordless telephone, baby monitor, blue tooth or other wireless equipment interference might occur when you cook with the microwave oven. This The oven causes TV interference is similar to the interference caused by small appliances such as mixers, interference. -
Page 55: Warranty
In-home Service will be carried out only to locations accessible by roads and within 50 km of an authorized Panasonic service facility. This warranty is given only to the original purchaser, or the person for whom it was purchased as a gift, of a Panasonic brand product mentioned above sold by an authorized Panasonic dealer in Canada and purchased and used in Canada, which product was not sold “as is”, and which product was deliv-... -
Page 56: Specifications
(380 mm x 228.4 mm x 390 mm) Net Weight ........................................Approx. 39.1 lbs (17.7 kg) *IEC Test procedure Specifications subject to change without notice. Trim Kit Information NN-CD87KS Trim Kit for Model Number ............................................. NN-TK81KC Outside Dimensions (W x H) ......................................23 1⁄2” x 16 5⁄32”...
Need help?
Do you have a question about the NN-CD87KS and is the answer not in the manual?
Questions and answers