Table of Contents
Advertisement
Available languages
Available languages
Installation and
Operation Manual
Models
FX61 E 2
FX101 E 2
FX82 E 2
FX82 E 2T
FX122 E 2
FX122 E 2T
FX201 E 2
FX202 E 2
Read and understand this manual completely before attempting to
install, operate, or service this equipment. This manual is intended
for use only by quali ed installers of electric appliances.
RETAIN THIS MANUAL FOR FUTURE REFERENCE
PN 3206912
141201
Advertisement
Chapters
Table of Contents

Related Manuals for Angelo Po FX61 E 2


Summary of Contents for Angelo Po FX61 E 2
- Page 1 Installation and Operation Manual Models FX61 E 2 FX101 E 2 FX82 E 2 FX82 E 2T FX122 E 2 FX122 E 2T FX201 E 2 FX202 E 2 Read and understand this manual completely before attempting to install, operate, or service this equipment. This manual is intended for use only by quali ed installers of electric appliances.
- Page 2 This manual is intended for use only by quali ed installers of electric appliances to install and set up the Angelo Po America oven models listed on the cover of this document. It also contains operational instructions for the users of the appliance.
-
Page 3: Table Of Contents
TABLE OF CONTENTS Safety Precautions ....5 General Information ....11 . -
Page 5: Safety Precautions
Section 1 Safety Precautions SAFETY PRECAUTIONS GENERAL SAFETY INFORMATION detergents. manufacturer has paid special attention to factors which may cause risks to the health and substances harmful to your health. safety of anyone interacting with the appliance. The manufacturer has complied with all legal requirements in the manufacture and assembly always after each use of the appliance. - Page 6 WARNING ANGELO PO AMERICA accepts WARNING Burn risk! Do not leave the core no responsibility for any situation resulting from...
- Page 7 Repair work must only performed by ANGELO PO AMERICA or one of its quali ed service agents. ANGELO PO AMERICA accepts no responsibility for any situation resulting from work performed by untrained technicians. WARNING Burn risk! Always wear heat resistant gloves when handling accessories or other objects which have been inside the hot oven.
- Page 8 Section 1 Safety Precautions SAFETY LABEL AND SIGN LOCATION Combination Oven Installation and Operation Manual...
- Page 9 Section 1 Safety Precautions SAFETY LABELS AND SIGNS G) Wiring diagra ) CAUTION: To reduce the risk of electric A) 1 serviceable parts inside. Refer servicing to 3 Read the manual 4 This equipment is to be installed to comply L) NAME PLATE M) WARNING: Type and rating of fuse B) WATER DRAIN...
- Page 10 Section 1 Safety Precautions 10 Combination Oven Installation and Operation Manual...
-
Page 11: General Information
Section 2 General Information GENERAL INFORMATION INFORMATION FOR T E READER PURPOSE OF T E MANUAL refer to the index at the beginning of the manual. which becomes an integral part of the appliance and provides necessary information for those This manual contains all information necessary for authorized to interact with it during its working authorized users of the appliance. - Page 12 Section 2 General Information SAFETY DEVICES ELECTRICAL LOCKOUT/TAGOUT PROCEDURE WARNING Before perfor ing any service that involves electrical connection additional devices must be added to comply with all disconnection and/or exposure to electrical co ponents al ays follo the Electrical LOCKOUT/TAGOUT Procedure.
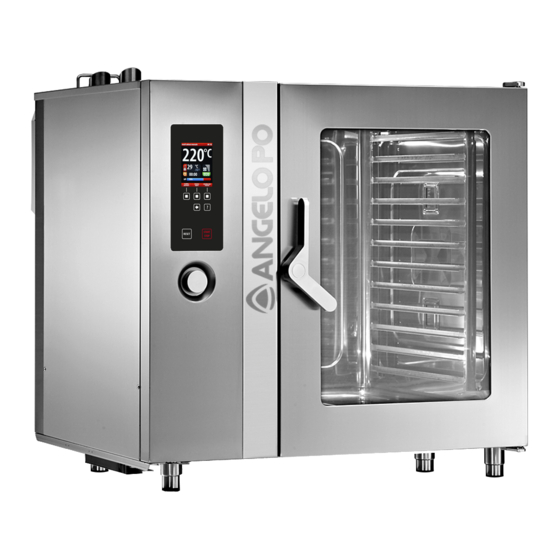
- Page 13 Section 3 TEC NICAL SPECIFICATIONS GENERAL DESCRIPTION Main Parts A .– . is designed and manufactured to cook foods in B .– .Control board C .– .Oven door environment. D .– .Cooking chamber Functions are controlled by an electronic control E .–...
- Page 14 Section 3 DATAPLATE LOCATION AND APPLIANCE SPECIFICATIONS information for operating safety. B – Type of customization E – Year of manufacture F – Serial number G – Protection rating H – Country of destination Q – Test voltage indicator M N S PROCEDURE FOR REQUESTING SERVICE Contact one of the authorized service centers for all requirements.
- Page 15 Section 3 MODEL F 61 101 TEC NICAL SPECIFICATIONS Description FX 61 E2 FX 101 E2 Oven dimensions 36.25 × 30.57 × (24.82 + 4 36.25 × 30.57 × (24.82 + 4 Rated power Power supply wire gauge Chamber opening dimensions 17.34 ×...
- Page 16 Section 3 MODEL F 82 122 TEC NICAL SPECIFICATIONS Description FX 82 E2 FX 122 E2 Oven dimensions 46.4 × 38 × (51.8 + 5.9 46.4 × 38 × (62 + 5.9 Rated power 26.0 kW Power supply wire gauge Chamber opening dimensions 25.22 ×...
-
Page 17: Handling And Installation
Section 4 Handling and Installation ANDLING AND INSTALLATION RECOMMENDATIONS FOR ANDLING TRANSPORT AND INSTALLATION on the destination. IMPORTANT _________________________ The chart below shows the most commonly used When handling and installing the appliance alternatives. co ply ith the infor ation provided y the anufacturer directly on the packaging on prevent unwanted shifting. - Page 18 Section 4 Handling and Installation CASTER MOUNTED OVENS APPLIANCE INSTALLATION installation must be made with a connector that complies with the Standard for Connectors for authorized to perform these operations must organize a “safety plan” to protect people directly means must be provided to limit the movement of the appliance without depending on the connector The location of the installation must have all the piping to limit appliance movement.
- Page 19 Section 4 Handling and Installation LEVELLING (A) to level the appliance. Description Value Pressure 30 – 60 psi or WATER CONNECTION Make connections WARNING co pliance ith the relevant local codes using appropriate reco ended aterials. WATER SUPPLY CONNECTION 40÷150 ppm IMPORTANT _________________________ Hardness This...
- Page 20 Section 4 Handling and Installation WATER DRAIN CONNECTION 1. Connect the water supply line pipe (A) to the appliance’s connection pipe (C). 2. Connect the vent pipe (D) to the appliance connection pipe (C) and attach it to the support (E). 3.94 in The appliance s drain line is tted with the plug (B) to allow discharge of the any waste.
- Page 21 Section 4 Handling and Installation AD USTMENTS IMPORTANT _________________________ RECOMMENDATIONS FOR Cooking convection AD USTMENTS rotate clock ise counter clock ise direction. IMPORTANT _________________________ TESTING T E APPLIANCE Before aking any type of ad ust ent activate all the safety devices provided and decide hether staff at ork and...
- Page 22 Section 4 Handling and Installation 22 Combination Oven Installation and Operation Manual...
-
Page 23: Operation
Section 5 Operation OPERATION RECOMMENDATIONS FOR USE DESCRIPTION OF CONTROLS IMPORTANT _________________________ while the list details the descriptions and functions of The rate of accidents resulting fro the individual controls. the use of appliances depends on 1. Convection cooking button: selects convection factors hich cannot al ays e predicted... - Page 24 Section 5 Operation Press the button and turn knob (21) to modify the value set. With the appliance in STOP mode (icon (16) (12) longer than 3 seconds (the whole panel Press button (5) and turn knob (21) to turn the automatic preheating on or off.
- Page 25 Section 5 Operation 9. Humidity percentage display the display shows the value of percentage humidity set. 10. “Product core probe” “vacuum” temperature setting button: the product measured by the core probe knob (21). during cooking: press once to show the temperature value on display (8).
- Page 26 Section 5 Operation will show the message “P03”. will show the message “P13”. will show the message “P04”. will show the message “P14”. will show the message “P05”. will show the message “P15”. From P16 to P94 the programs are described in the following table.
- Page 27 Section 5 Operation Regeneration Combined Regeneration Convection Regeneration steam Low temperat. rare meat Low temperat. welldone meat Low temperat. white meat ( rst choice) Low temperat. white meat (second choice) deltaT ham, leg of pork P16 ÷ P94 personalise programs smoked (oil) smoked (salt) smoked (cheeses)
- Page 28 Section 5 Operation regeneration programs. Press the button to show the program of choice on display (7). Press button (16) to start the selected program. Once the program has been started, only keys (4 5 6 10) and knob (21) can be used to modify the values set for the current stage.
- Page 29 Section 5 Operation If you wish to start cooking before the set time has (5) and turn knob (21) to bring the value displayed (8) to “0”. 21. Control knob: varies the values of the functions selected (see buttons (4 5 6 10) Turn knob clockwise to increase value and parameters.
- Page 30 Section 5 Operation SWITC ING APPLIANCE ON AND OFF Proceed as follows. Lighting 1. Operate the appliance’s master switch to connect it to the electrical main. 2. Turn on water supply valve. 4. Press button (22) to turn on the appliance. Turning off IMPORTANT _________________________ 1.
- Page 31 Section 5 Operation STARTING AND STOPPING T E COOKING CYCLE Starting 1. Switch on the appliance (see: Switching the Appliance ON and OFF 2. Press one of the buttons (1 2 3) to set Cooking Mode. 3. Press button (4) and turn knob (21) to set Cooking Temperature.
- Page 32 Section 5 Operation 32 Combination Oven Installation and Operation Manual...
-
Page 33: Maintenance
Section 6 Maintenance MAINTENANCE MAINTENANCE RECOMMENDATIONS ELECTRICAL LOCKOUT/TAGOUT PROCEDURE WARNING Before perfor ing any service performing the scheduled maintenance procedures that involves electrical connection recommended manufacturer. Proper disconnection and/or exposure to electrical co ponents al ays follo the Electrical longer working life and constant maintenance of LOCKOUT/TAGOUT Procedure. - Page 34 Section 6 Maintenance STAINLESS STEEL CARE RECOMMENDATIONS FOR CLEANING Cleaning Since the appliance is used for preparing foods for human surrounding environment must constantly be kept clean. Table of Cleaning Products Description Products For washing and rinsing Tap water at room follow these steps: temperature CAUTION...
- Page 35 Section 6 Maintenance 9. Take special care not to damage stainless steel the surfaces of the cooking chamber. products or chlorines and do not use abrasive materials or sharp tools. 8. Spray on the polishing product and leave it to act for a few minutes.
- Page 36 Section 6 Maintenance CLEANING T E COOKING C AMBER (A) and (B) greaser. 1. Switch off the appliance. IMPORTANT _________________________ the electrical main. We reco ashing the in the dish asher. CLEANING T E CONDENSATION COLLECTION C ANNEL AND TANK F 61 101 82 122) 1.
- Page 37 Section 6 Maintenance WAS ING LEVEL 2 APPLIANCE IMPORTANT _________________________ Whenever the cooking ode is changed clean the cha er thoroughly. Washing 1 mode 1. In STOP mode press button (19) once (icon (16) Display (7) shows the message “CLE” “Pr”...
- Page 38 Section 6 Maintenance 38 Combination Oven Installation and Operation Manual...
-
Page 39: Parts Replacement
Section 7 Parts Replacement PARTS REPLACEMENT REPLACING PARTS RECOMMENDATIONS C ANGING T E LAMP WARNING Before perfor ing any service Before performing component replacement that involves electrical connection disconnection and/or exposure to electrical decide whether staff at work and those in the vicinity co ponents al ays follo the Electrical LOCKOUT/TAGOUT Procedure. - Page 40 Section 7 Parts Replacement DECOMMISSIONING T E APPLIANCE WARNING Before perfor ing any service that involves electrical connection disconnection and/or exposure to electrical co ponents al ays follo the Electrical LOCKOUT/TAGOUT Procedure. Disconnect all circuits. Failure to co ply can cause property da age in ury or death.
-
Page 41: Troubleshooting
Section 8 Troubleshooting TROUBLES OOTING The appliance has been tested before being put into The user can solve some of these problems on their service. or skill is required. More advanced troubleshooting The information provided below is intended to assist may need to be done by an authorized service agent. - Page 42 Section 8 Troubleshooting KEY TO ALARM TABLE Fault Remedy Notes Check that incoming water Convection cooking cycles pressure too low can still be performed an authorized service agent H2O. Check that incoming water Convection and steam pressure too low cooking cycles can still be performed an authorized service agent Oven door opening or closure...
- Page 43 Section 8 Troubleshooting KEY TO ALARM TABLE (Continued Alarm Fault Remedy Notes The oven solves the problem The oven’s functions are enabled compartment has overheated on its own so cooking cycles can be carried Contact an authorized service The oven’s functions are disabled diagnostics tripped agent so no cooking cycles can be...
- Page 44 Section 8 Troubleshooting 44 Combination Oven Installation and Operation Manual...
-
Page 45: Connection And Wiring Diagrams
Section 9 Connection and Wiring Diagrams CONNECTION AND WIRING DIAGRAMS OVEN CONNECTION DIAGRAM (MODEL FX 61 E2) Combination Oven Installation and Operation Manual... - Page 46 Section 9 Connection and Wiring Diagrams OVEN CONNECTION DIAGRAM (FX 101 E2) 46 Combination Oven Installation and Operation Manual...
- Page 47 Section 9 Connection and Wiring Diagrams OVEN CONNECTION DIAGRAM (MODEL FX82 E2T) Combination Oven Installation and Operation Manual...
- Page 48 Section 9 Connection and Wiring Diagrams OVEN CONNECTION DIAGRAM (MODEL FX122 E2T) 48 Combination Oven Installation and Operation Manual...
- Page 49 Section 9 Connection and Wiring Diagrams OVEN CONNECTION DIAGRAM (MODEL FX82 E2) Combination Oven Installation and Operation Manual...
- Page 50 Section 9 Connection and Wiring Diagrams OVEN CONNECTION DIAGRAM (MODEL FX122 E2) 50 Combination Oven Installation and Operation Manual...
- Page 51 Section 9 Connection and Wiring Diagrams OVEN CONNECTION DIAGRAM (MODEL FX201 E2) Combination Oven Installation and Operation Manual...
- Page 52 Section 9 Connection and Wiring Diagrams OVEN CONNECTION DIAGRAM (MODEL FX202 E2) 52 Combination Oven Installation and Operation Manual...
- Page 53 Section 9 Connection and Wiring Diagrams ELECTRICAL SYSTEM DIAGRAM (MODEL FX 61 E2 208V3 / 240V3) Combination Oven Installation and Operation Manual...
- Page 54 Section 9 Connection and Wiring Diagrams ELECTRICAL SYSTEM DIAGRAM (MODEL FX 101 82 E2 208V3 / 240V3) 54 Combination Oven Installation and Operation Manual...
- Page 55 Section 9 Connection and Wiring Diagrams ELECTRICAL SYSTEM DIAGRAM (MODEL FX 61 101 82 122 E2 480V3) Combination Oven Installation and Operation Manual...
- Page 56 Section 9 Connection and Wiring Diagrams ELECTRICAL SYSTEM DIAGRAM (MODEL FX122 E2 208V3 / 240V3 A) 56 Combination Oven Installation and Operation Manual...
- Page 57 Section 9 Connection and Wiring Diagrams ELECTRICAL SYSTEM DIAGRAM (MODEL FX122 E2 208V3 / 240V3 B) Combination Oven Installation and Operation Manual...
- Page 58 Section 9 Connection and Wiring Diagrams ELECTRICAL SYSTEM DIAGRAM (MODEL FX201/202 E2 480V3 A) 58 Combination Oven Installation and Operation Manual...
- Page 59 Section 9 Connection and Wiring Diagrams ELECTRICAL SYSTEM DIAGRAM (MODEL FX201/202 E2 480V3 B) Combination Oven Installation and Operation Manual...
- Page 60 60 Combination Oven Installation and Operation Manual...
-
Page 61: Index
Section 10 Index INDEX ......21 Optional accessories .........12 ...........41 ........18 Packaging and unpacking .........17 ........30 Procedure for requesting service ......14 Prolonged downtimes of appliance ....31 ........36 Purpose of the manual ........11 Changing the lamp ..........39 Cleaning the condensation collection channel and tank..........36 ....21 Recommendations for cleaning ......34... - Page 62 Angelo Po A erica 427 Sargon W “E” UITE Horsham, Pennsylvania 19044 www.angelopoamerica.com...
- Page 63 Manuel d’installation et mode d’emploi Modèles FX61 E 2 FX101 E 2 FX82 E 2 FX82 E 2T FX122 E 2 FX122 E 2T FX201 E 2 FX202 E 2 Lisez et familiarisez-vous avec ce manuel avant d’essayer d’installer, faire fonctionner ou dépanner ce matériel. Ce manuel est destiné...
- Page 64 IMPORTANT POUR VOTRE SÉCURITÉ Ce manuel est destiné à être utilisé uniquement par des installateurs d’électroménagers quali és pour installer et con gurer le modèle de four Angelo Po America gurant sur la couverture de ce document. Il contient également les modes d’emploi destinés aux utilisateurs de cet électroménager.
- Page 65 TABLE DES MATI RES Avertissements de sécurité ... . . 5 Informations générales....11 Caractéristiques Techniques ... 13 Manutention et Installation .
-
Page 67: Avertissements De Sécurité
Section 1 Avertissements de sécurité AVERTISSEMENTS DE SÉCURITÉ AVERTISSEMENTS GÉNÉRAUX DE SÉCURITÉ de toute contamination. fabricant a fait particulièrement attention aux produits détergents pour usage alimentaire. facteurs qui peut provoquer des risques pour la santé et la sécurité de toute personne en contiennent des substances nocives à... - Page 68 Risque de conta ination des AVERTISSEMENT ali ents ! Avant de cuisiner avec l’appareil, AVERTISSEMENT assurez-vous qu’il n’y a pas de détergents ou ANGELO PO AMERICA décline d’autres résidus de nature caustique dans le toute responsabilité pour toute situation four.
- Page 69 Toutes les AVERTISSEMENT de service. Il n’y a aucun élément réparable sous pièces non fournies par ANGELO PO AMERICA les panneaux de service. Seuls les réparateurs doivent être approuvées au préalable avant quali és sont autorisés à retirer les panneaux de l’installation.
- Page 70 Section 1 Avertissements de sécurité ÉTIQUETTE DE SÉCURITÉ ET EMPLACEMENT DU SIGNAL Manuel d’installation et mode d’emploi du four combiné...
- Page 71 Section 1 Avertissements de sécurité ÉTIQUETTE DE SÉCURITÉ ET DES G) SC ÉMA LECTRIQUE SIGNES ) CAUTION: Pour réduire le risque de shock A) 1 de protection. Ne pas laisser des outils dedans. Il faut se référer seulement aux techniciens 2 Borne équipotentiel L) PLAQUE D’IDENTIFICATION locales en vigueur sur les travaux de plomberie.
- Page 72 Section 1 Avertissements de sécurité 10 Manuel d’installation et mode d’emploi du four combiné...
-
Page 73: Informations Générales
Section 2 Informations générales INFORMATIONS GÉNÉRALES INFORMATIONS POUR LE LECTEUR BUT DU MANUEL manuel. fournir les informations nécessaires à ceux qui sont autorisés à interagir avec celui-ci pendant manuel contient toutes informations sa vie. nécessaires pour les utilisateurs autorisés de l’appareil. - Page 74 Section 2 Informations générales DISPOSITIFS DE SÉCURITÉ PROCÉDURE DE VERROUILLAGE/ ÉTIQUETAGE ÉLECTRIQUE Avant d’effectuer toute AVERTISSEMENT r paration qui i plique la connexion ou la d connexion lectrique et / ou l’exposition pour respecter les lois en vigueurs. des co posants lectriques suivez tou ours les proc dures de VERROUILLAGE...
-
Page 75: Caractéristiques Techniques
Section 3 Caractéristiques Techniques CARACTÉRISTIQUES TEC NIQUES DESCRIPTION GÉNÉRALE Organes principaux A .– .Boîtier des composants électriques B .– .Tableau de commandes et fabriqué pour faire cuire des aliments dans un C .– .Porte du four environnement de restauration professionnel de D .–... - Page 76 Section 3 Caractéristiques Techniques EMPLACEMENT DE LA PLAQUE SIGNALÉTIQUE ET SPÉCIFICATIONS DE L’APPAREIL A – Modèle de l’appareil E – Année de fabrication F – Numéro de série G – Degré de protection Q – Indicateur de tension d’essai R – Marques de conformité S –...
- Page 77 Section 3 Caractéristiques Techniques MOD LE FX61 101 CARACTÉRISTIQUES TECHNIQUES Description FX 61 E2 FX 101 E2 Dimensions du four 36.25 × 30.57 × (24.82 + 4 36.25 × 30.57 × (24.82 + 4 Alimentation électrique Puissance nominale Section des câbles d’alimentation 10 AWG Dimensions ouverture de la 17.34...
- Page 78 Section 3 Caractéristiques Techniques MOD LE FX82 122 CARACTÉRISTIQUES TECHNIQUES Description FX 82 E2 FX 122 E2 Dimensions du four 46.4 × 38 × (51.8 + 5.9 46.4 × 38 × (62 + 5.9 Alimentation électrique Puissance nominale 26.0 kW Section des câbles d’alimentation 8 AWG Dimensions ouverture de la...
-
Page 79: Manutention Et Installation
Section 4 Manutention et Installation MANUTENTION ET L’INSTALLATION RECOMMANDATIONS POUR LA TRANSPORT MANUTENTION ET L’INSTALLATION IMPORTANT _________________________ Effectuer la anutention et l’installation courantes. en respectant les infor ations fournies par le fa ricant report es directe ent correctement pour éviter tout déplacement non sur l’e allage sur l’appareil et dans les désiré. - Page 80 Section 4 Manutention et Installation FOURS MONTÉS SUR ROULETTES INSTALLATION DE L’APPAREIL considérées selon l’étude du site et l’emplacement débranchement rapide conforme à la norme pour les ces opérations doivent développer un «plan de dispositifs de débranchement rapide à utiliser avec sécurité»...
- Page 81 Section 4 Manutention et Installation MISE À NIVEAU Agir sur les pieds d’appui (A) pour mettre de niveau l’appareil. Description Valeur Pression 30 – 60 psi or 200 - 400 kPa RACCORDEMENT DE L’EAU Effectuer raccorde ent AVERTISSEMENT confor ent aux lois en vigueur ce su et en utilisant le at riel appropri et prescrit.
- Page 82 Section 4 Manutention et Installation RACCORDEMENT VIDANGE DE L’EAU (A) à la conduite de raccordement de l’électroménager (C). (D) à la conduite de raccordement de l’électroménager (C) (E). 3.94 in Sur la tuyauterie de vidange de l’appareil, se trouve le bouchon (B) pour évacuer les détritus déposés. BRANCHEMENT ÉLECTRIQUE 1.
- Page 83 Section 4 Manutention et Installation RÉGLAGES IMPORTANT _________________________ RECOMMANDATIONS POUR LES Le ventilateur d’air puls de la cha re de RÉGLAGES cuisson peut tourner en sens horaire ou anti horaire. IMPORTANT _________________________ ESSAI DE L’APPAREIL Avant d’effectuer tout type de r glage, activer tous les dispositifs de s curit pr vus IMPORTANT _________________________ et valuer s’il faut infor...
- Page 84 Section 4 Manutention et Installation 22 Manuel d’installation et mode d’emploi du four combiné...
-
Page 85: Fonctionnement
Section 5 Fonctionnement FONCTIONNEMENT RECOMMANDATIONS POUR L’UTILISATION sélectionné. 3. Touche de cuisson à vapeur: pour sélectionner IMPORTANT _________________________ le mode de cuisson à vapeur. Le taux d’accidents r sultant de l’utilisation dell’appareil d pend de no reux facteurs sélectionné. qui ne peuvent pas tou ours tre pr dits et contr l s. - Page 86 Section 5 Fonctionnement Pour activer désactiver préchauffage automatique. (16) la touche (12) pour un temps supérieur à 3 Presser la touche (5) et agir sur la manette (21) pour activer ou désactiver le préchauffage (21) pour 6. Touche sélection pourcentage d’humidité...
- Page 87 Section 5 Fonctionnement température relevée par la sonde. 9. Af cheur pourcentage d’humidité d’humidité introduite. fonction qui a été sélectionnée (seulement si 10. Bouton de sélection de la température « sonde à coeur » ou « sous vide»: interne du produit relevée par la sonde à la température par la manette (21).
- Page 88 Section 5 Fonctionnement 18. Bouton « Rappel des programmes »: (7). (7). (7). “P01 (7). (7). “P02 (7). De P16 à P94 les programmes sont décrits dans le (7). “P03 tableau suivant. Il est possible de le personnaliser (utilisez le bouton pour sélectionner rapidement (7).
- Page 89 Section 5 Fonctionnement Régénération Mixte Régénération À air pulsé Regeneration Vapeur Basse temp -viande saignante Basse temp - viande bien cuite Basse temp -viande blanche (premier choix) Basse temp -viande blanche ( deuxième choix ) DeltaT - jambon, cuisse de porc P16 ÷...
- Page 90 Section 5 Fonctionnement (7) le programme désiré. Presser la touche (16) pour faire partir le programme sélectionné. Seulement après avoir fait partir le programme, par les touches (4-5-6-10) et la manette (21), il est possible de modi er les valeurs introduites pour la phase courante.
- Page 91 Section 5 Fonctionnement 19. Touche Lavage semi-automatique: (19) pour démarrer le lavage semi-automatique. 20. Bouton “démarrage retardé”: il sert à démarrer la cuisson en modalité retardée. (20) retardé (1 heure (5) et agir sur le bouton de réglage (21) mémoriser la valeur et ensuite sur le bouton (16) pour lancer le démarrage retardé.
- Page 92 Section 5 Fonctionnement ALLUMAGE ET EXTINCTION DE L’APPAREIL Procéder comme suit. Allumage 1. Agir sur l’interrupteur sectionneur de l’appareil pour activer le branchement à la ligne électrique principale. 2. Ouvrir le robinet d’alimentation de l’eau. 3. Presser la touche (22) pour activer l’appareil. Extinction IMPORTANT _________________________ Tou ours...
- Page 93 Section 5 Fonctionnement MISE EN MARCHE ET ARR T DU CYCLE DE CUISSON Mise en marche 1. Allumer l’appareil (voir: Allumage et extinction de l’appareil (1-2-3) pour sélectionner le mode de cuisson. (4) et agir sur la manette (21) pour sélectionner la température de cuisson. 4.
- Page 94 Section 5 Fonctionnement 32 Manuel d’installation et mode d’emploi du four combiné...
-
Page 95: Entretien
Section 6 Entretien ENTRETIEN RECOMMANDATIONS POUR IMPORTANT _________________________ L’ENTRETIEN Contacter l’usine, le repr sentant de l’usine ou une entreprise locale de services pour Maintenir l’appareil en parfait état de fonctionnement effectuer tout entretien ou r paration. en effectuant les opérations d’entretien programmé PROCÉDURE DE VERROUILLAGE/ longue durée et un maintien constant des conditions ÉTIQUETAGE ÉLECTRIQUE... - Page 96 Section 6 Entretien SOINS DE L’ACIER INOXYDABLE RECOMMANDATIONS POUR LE NETTOYAGE Nettoyage Étant donné que l’appareil est utilisé pour la préparation de rouiller s’il n’est pas bien entretenu. Il anche contient Tableau des produits pour le nettoyage se décomposer. Pour prévenir la dégradation de l’acier Description Produits ATTENTION...
- Page 97 Section 6 Entretien 6. Vaporiser le détergent pour usage alimentaire et 9. De faire attention aux surfaces en acier inox pour de matériau abrasif ou d’outils tranchants. Pour vaporiser le détergent sur les parties internes de la chambre de cuisson, il est éviter qu’ils durcissent.
- Page 98 Section 6 Entretien NETTOYAGE DES FILTRES À AIR (A) et (B) placés sous dégraissant approprié. 1. Eteindre l’appareil. IMPORTANT _________________________ 2. Agir l’interrupteur sectionneur pour désactiver l’alimentation électrique. Il est conseill d’effectuer le lavage au lave vaisselle. NETTOYAGE DU CANAL ET DE LA CUVE DE RÉCUPÉRATION DE LA VAPEUR D’EAU CONDENSÉE (FX61 101 82 122) vapeur d’eau condensée (A).
- Page 99 Section 6 Entretien LAVAGE DE L’APPAREIL NIVEAU 2 IMPORTANT _________________________ A chaque change ent de ode de cuisson, nettoyer soigneuse ent la cha Mode de lavage 1 (19) une (16) (7) on peut lire “CLE” (8) “Pr” (9) “P01”. 2. Presser la touche (16) (7) apparaît “CLE (8) apparaît “...
- Page 100 Section 6 Entretien 38 Manuel d’installation et mode d’emploi du four combiné...
-
Page 101: Pièces De Rechange
Section 7 Pièces de rechange PI CES DE RECHANGE RECOMMANDATIONS POUR LE REMPLACEMENT DES PI CES portefusible et le panneau latéral. Remarque: le schéma de câblage de l’appareil se Avant d’effectuer les procédures de remplacement des trouve à la page “Etiquette de sécurité et emplacement fournis et décider si le personnel prépose ou celui REMPLACEMENT DE LA LAMPE Avant... - Page 102 Section 7 Pièces de rechange ÉLIMINATION DE L’APPAREIL Avant d’effectuer AVERTISSEMENT service qui i plique la connexion ou la d connexion lectrique et / ou l’exposition des co posants lectriques, tou ours suivre les proc dures de VERROUILLAGE / ÉTIQUETAGE lectriques. D ranchez tous les circuits.
-
Page 103: Dépannage
Section 8 Dépannage DÉPANNAGE sont nécessaires. Des opérations de dépannage plus avancées peuvent exiger l’intervention d’un présenter en cours d’utilisation. réparateur agréé. Inconvénient Cause Solution Fusible sauté Carte électronique endommagée Carte électronique du tableau de commandes endommagée à l’improviste Alarme activée Consulter le tableau “Signalisation des Intervention d’un dispositif de sécurité... - Page 104 Section 8 Dépannage TABLEAU SIGNALISATIONS DES ALARMES Alarme Inconvénient Solution Remarques Il manque de l’eau dans la Il est possible d’effectuer les dans le réseau ou régler la chambre ou la pression est service assistance. H2O. Il manque de l’eau à l’évacuation Il est possible d’effectuer les dans le réseau ou régler la et à...
- Page 105 Section 8 Dépannage TABLEAU SIGNALISATIONS DES ALARMES Alarme Inconvénient Solution Remarques Excès de température à l’intérieur du boîtier des façon autonome activées; il est donc possible composants électriques panne agréé. désactivées; il n’est donc pas cuisson agréé. désactivées; il n’est donc pas cuisson Presser le bouton «...
- Page 106 Section 8 Dépannage 44 Manuel d’installation et mode d’emploi du four combiné...
-
Page 107: Schémas De Connexion Et De Câblage
Section 9 Schémas de connexion et de câblage SCHÉMAS DE CONNEXION ET DE C BLAGE SCHÉMAS DE CONNEXION DU FOUR (MOD LE FX 61 E2) Manuel d’installation et mode d’emploi du four combiné... - Page 108 Section 9 Schémas de connexion et de câblage SCHÉMAS DE CONNEXION DU FOUR (MOD LE FX 101 E2) 46 Manuel d’installation et mode d’emploi du four combiné...
- Page 109 Section 9 Schémas de connexion et de câblage SCHÉMAS DE CONNEXION DU FOUR (MOD LE FX82 E2T) Manuel d’installation et mode d’emploi du four combiné...
- Page 110 Section 9 Schémas de connexion et de câblage SCHÉMAS DE CONNEXION DU FOUR (MOD LE FX122 E2T) 48 Manuel d’installation et mode d’emploi du four combiné...
- Page 111 Section 9 Schémas de connexion et de câblage SCHÉMAS DE CONNEXION DU FOUR (MOD LE FX82 E2) Manuel d’installation et mode d’emploi du four combiné...
- Page 112 Section 9 Schémas de connexion et de câblage SCHÉMAS DE CONNEXION DU FOUR (MOD LE FX122 E2) 50 Manuel d’installation et mode d’emploi du four combiné...
- Page 113 Section 9 Schémas de connexion et de câblage SCHÉMAS DE CONNEXION DU FOUR (MOD LE FX201 E2) Manuel d’installation et mode d’emploi du four combiné...
- Page 114 Section 9 Schémas de connexion et de câblage SCHÉMAS DE CONNEXION DU FOUR (MOD LE FX202 E2) 52 Manuel d’installation et mode d’emploi du four combiné...
- Page 115 Section 9 Schémas de connexion et de câblage SCHEMA ELECTRIQUE (MOD LE FX 61 E2 208V3 / 240V3) Manuel d’installation et mode d’emploi du four combiné...
- Page 116 Section 9 Schémas de connexion et de câblage SCHEMA ELECTRIQUE (MOD LE FX 101 82 E2 208V3 / 240V3) 54 Manuel d’installation et mode d’emploi du four combiné...
- Page 117 Section 9 Schémas de connexion et de câblage SCHEMA ELECTRIQUE (MOD LE FX 61 101 82 122 E2 480V3) Manuel d’installation et mode d’emploi du four combiné...
- Page 118 Section 9 Schémas de connexion et de câblage SCHEMA ELECTRIQUE (MOD LE FX122 E2 208V3 / 240V3 A) 56 Manuel d’installation et mode d’emploi du four combiné...
- Page 119 Section 9 Schémas de connexion et de câblage SCHEMA ELECTRIQUE (MOD LE FX122 E2 208V3 / 240V3 B) Manuel d’installation et mode d’emploi du four combiné...
- Page 120 Section 9 Schémas de connexion et de câblage SCHEMA ELECTRIQUE (MOD LE FX201/202 E2 480V3 A) 58 Manuel d’installation et mode d’emploi du four combiné...
- Page 121 Section 9 Schémas de connexion et de câblage SCHEMA ELECTRIQUE (MOD LE FX201/202 E2 480V3 B) Manuel d’installation et mode d’emploi du four combiné...
- Page 122 60 Manuel d’installation et mode d’emploi du four combiné...
-
Page 123: Index
Section 10 Index INDEX ..31 Mise en place de l’appareil .......18 Accessoires sur demande .........12 Allumage et extinction de l’appareil ....30 Avertissements généraux de sécurité ....5 ....35 .........36 Branchement électrique ........20 de la vapeur d’eau condensée ....36 But du manuel ........... 11 ......30 Caractéristiques techniques ......13 Procédure de verrouillage/étiquetage électrique ... - Page 124 Angelo Po A erica 427 Sargon W “E” UITE Horsham, Tel: 215-323-4917 Fax: 267-803-6975...
Need help?
Do you have a question about the FX61 E 2 and is the answer not in the manual?
Questions and answers