Table of Contents
Advertisement
Advertisement
Table of Contents

Subscribe to Our Youtube Channel
Related Manuals for SystemAir changeair Freshman Series


Summary of Contents for SystemAir changeair Freshman Series
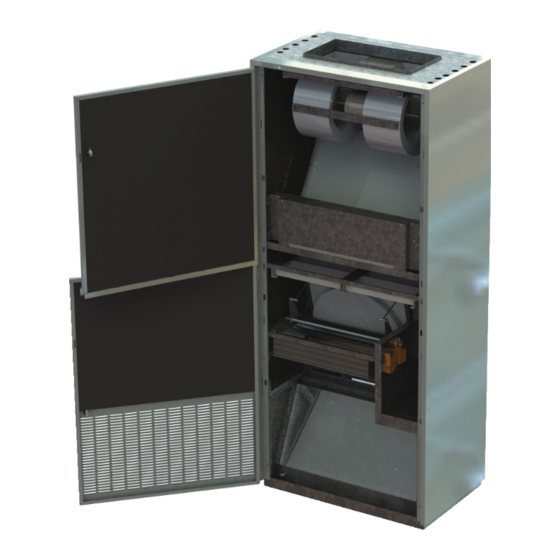
- Page 1 OWNER’S MANUAL Installation, Operation, and Service Instructions Version 1.1 Freshman Series Dehumidification Classroom Air Handler www.changeair.com This manual contains instructions for installation and operation of your unit. Keep it in a safe place for ready reference.
-
Page 2: Table Of Contents
Owner’s Manual OWNER’S MANUAL INSTALLATION, OPERATION, AND SERVICE INSTRUCTIONS Identification and Warranties Unit Inspection Safety Labeling Warranties General Preventative Maintenance General Preventative Maintenance Filter Maintenance Removing Supply Fan(s) Removing Intake Fan(s) Cleaning Supply and Intake Fan(s) Coil Maintenance Installation Guide 8-11 General Assembly and Installation Electrical Connections... -
Page 3: Unit Inspection
Owner’s Manual Identification Unit Inspection Please keep this page for future reference Inspected For Freight Damages You have just purchased a Change’Air Freshman Series Your air handling unit was carefully packed for shipping. This means Dehumidification Air Handling Unit. This design is certified by the that the packaged product, with normal handling, will withstand the Canadian Standards Association (CSA) and bears the label load conditions encountered in normal transit and in handling. -
Page 4: Warranties
Owner’s Manual Warranties No claim or demand may be asserted against Change'Air or its employees, agents, LIMITED STANDARD PARTS ONLY WARRANTY (14 months) directors, officers, representatives and/or suppliers hereunder unless the injury, loss or damage giving rise to such claim or demand is sustained within the applicable warranty This Change'Air Products and Services Ltd. - Page 5 LIMITED WARRANTY LIMITED STANDARD PARTS ONLY WARRANTY (14 months) This Changeair product is warranted to the original purchaser to be free from defects in material and workmanship under normal use and maintenance, consistent with Changeair instructions or recommendations for use and maintenance, for a period of 14 months from shipping date.
- Page 6 No claim or demand may be asserted against Changeair or its employees, agents, directors, officers, representatives and/or suppliers hereunder unless the injury, loss or damage giving rise to such claim or demand is sustained within the applicable warranty period referred to above and unless such claim or demand is first asserted within twelve months after the injury, loss or damage has occurred.
-
Page 7: General Preventative Maintenance
Owner’s Manual General Preventative Maintenance Cleaning your vertical classroom unit: By performing proper preventative maintenance your unit will operate Exterior economically and dependably. Instructions for basic maintenance are found below. Annually or as needed, thoroughly clean cabinet exterior using a soft absorbent cloth, mild soap and water and/or non abrasive non-acidic cleaner. -
Page 8: Removing Supply Fan(S)
Owner’s Manual Removing Supply Fan(s) W A R N I N G A qualified service technician should perform the following. Remove SUPPLY FAN MOTOR(s) as follows. 6. Replace fan assembly in track and re-secure with fastening 1. Turn OFF electrical supply to the unit. screws. -
Page 9: Cleaning Supply And Intake Fans
Owner’s Manual Cleaning Supply and Intake Fans 1. Remove Fan from unit (Refer to Pg 6) 2. Take a brush or similar cleaning tool and clean blades of fan to remove built up attached dirt. 3. Use a vacuum or compressed air and clean entire fan including the blades. CAUTION 4. -
Page 10: General Assembly And Installation
Owner’s Manual GENERAL ASSEMBLY AND INSTALLATION INSTRUCTIONS Lag the vertical classroom unit to a couple of the wall studs, or other structural wall components, through the Unit Mounting It is important to read and understand the instructions outlined Strip located inside the across the back and near the top. (Use in this document, as well as any job specific documentation lags and shields if necessary). -
Page 11: Wall Sleeve
Owner’s Manual Wall Sleeve Tip: Be careful not to insert screws where they may interfere with the insertion of the Exterior Louver. Do not insert Wall sleeves are typically shipped knocked down and must be field screws into the bottom pan of the wall sleeve as this may assembled. -
Page 12: Relief Damper
Owner’s Manual Relief Damper 1. On a clean, flat, unobstructed floor surface, lay out the pieces of 1. On a clean, flat, unobstructed floor surface, lay out the pieces of 1. On a clean, flat, unobstructed floor surface, lay out the pieces of 1. -
Page 13: Rear Plenum Assembly (Rpa)
Owner’s Manual Tip: At this time, it may be easiest to cut any necessary holes or become more difficult to relocate the unit.) service knockouts that may be required in the plenum and 5. Place the RPA tight against the back of the unit so that it is flush install any plenum takeoffs or supply grilles before with the sides and top of the unit, as shown in the installation proceeding. - Page 14 Owner’s Manual Dehumidification Unit Installation Drawings Freshman - NA 00 1000 B C (SV - STANDARD) NOTE: All installation drawings provide information for installation of hot water, steam and electric heat units.
-
Page 15: Trouble Shooting Guide
Owner’s Manual TROUBLE SHOOTING GUIDE ATTENTION: Change’Air is not responsible for injury to untrained or unauthorized personnel who attempt to do repairs based on the trouble shooting procedures outlined in this section. Your Change’Air Classroom Air Handling Unit has been manufactured with great care and top rated quality control. Should you experience problems with the operation of your Change’Air Air Handler, follow one or more of the procedures below. -
Page 16: Controls
Owner’s Manual ATTENTION: Change’Air is not responsible for injury to untrained or unauthorized personnel who attempt to do repairs based on the trouble shooting procedures outlined in this section. CONTROLS Cool When cooling is required, an economizer circuit will process the Control of the classroom unit is achieved through an external device, signal. - Page 17 Owner’s Manual a) Check for evaporator coil or filter, clean as necessary b) Test for over or under charged unit; adjust accordingly. c) Confirm fan is running at full speed, and check amperage draw. d) Check for unit running low suction psi, possible dirty evaporator or filter, clean as needed.
- Page 18 Owner’s Manual Replacement parts and service are available through your local Change’Air representative. To find your local representative contact: Canada (519) 688-6363 U.S.A. (517) 676-0700 or visit www.changeair.com ATTENTION Improper installation, adjustment, alteration, service or maintenance can cause property damage, personal injury or loss of life.
Need help?
Do you have a question about the changeair Freshman Series and is the answer not in the manual?
Questions and answers