Graco A Series Instructions-Parts List Manual
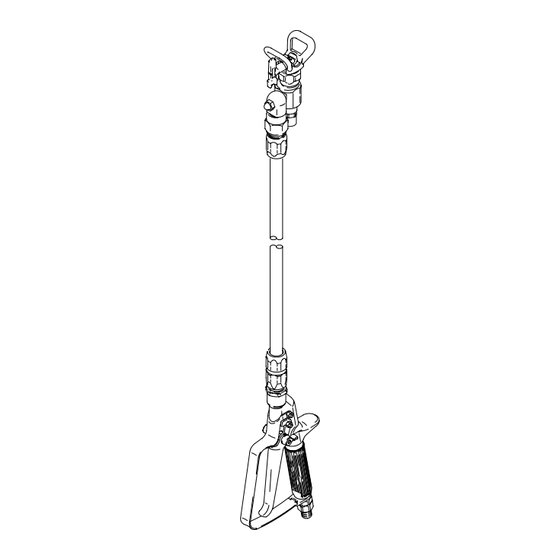
Pole gun with cleanshott shut-off valve and contractort in-line valve
Hide thumbs
Also See for A Series:
- Instructions - parts manual (52 pages) ,
- Instructions-parts list manual (48 pages) ,
- Manual (36 pages)
Advertisement
INSTRUCTIONS- -PARTS LIST
Pole Gun with Cleanshott
Shut-off Valve and
Contractort In-line Valve
Important Safety Instructions
Read all warnings and instructions in this
manual. Save these instructions.
3600 psi (24.8 MPa, 248 bar) Maximum Working Pressure
Model 287023, Series A (North America)
With 3-ft (0.9 m) extension (244163)
Model 287024, Series A (North America)
With 6-ft (1.8 m) extension (244164)
Model 244161, Series A (North America)
Contractor In-line Valve
Model 287026, Series A, (Europe)
With 3-ft (0.9 m) extension (244163)
Model 287027, Series A (Europe)
With 6-ft (1.8 m) extension (244164)
Model 244364, Series A (Europe)
Contractor In-line Valve
Table of Contents
. . . . . . . . . . . . . . . . . . . . . . . . . . . . . . . . . . . . . .
. . . . . . . . . . . . . . . . . . . . . . . . . . . . . . . . . . . . .
. . . . . . . . . . . . . . . . . . . . . . . . . . . . . . . . . . . . .
. . . . . . . . . . . . . . . . . . . . . . . . . . . . . . . . . . . . . . . . .
. . . . . . . . . . . . . . . . . . . . . . . . . . . . . . . . . . . . .
Operation
. . . . . . . . . . . . . . . . . . . . . . . . . . . . . . . . . . . .
. . . . . . . . . . . . . . . . . . . . . . . . . . . . . . . .
. . . . . . . . . . . . . . . . . . . . . . . . . . . . . . . . . . . . .
Graco Phone Number
. . . . . . . . . . . . . . . . . . . . . . . . . .
GRACO INC. P.O. BOX 1441 MINNEAPOLIS, MN 55440- -1441
Model 244368, Series A (Asia)
With 3-ft (0.9 m) extension (244163)
Model 244369, Series A (Asia)
With 6-ft (1.8 m) extension (244164)
Model 287028, Series A (Asia)
With 3-ft (0.9 m) extension (244163)
Model 287029, Series A (Asia)
With 6-ft (1.8 m) extension (244164)
Model 244365, Series A (Asia)
Contractor In-line Valve Model
WARNING: HIGH PRESSURE.
Keep Clear of Nozzle.
Read these instructions carefully.
2
4
6
6
15
17
18
20
20
ECOPYRIGHT 2001, GRACO INC.
Graco Inc. is registered to I.S. EN ISO 9001
309237
Rev. G
TI0666
Advertisement

Related Manuals for Graco A Series


Summary of Contents for Graco A Series
-
Page 1: Table Of Contents
......TI0666 GRACO INC. P.O. BOX 1441 MINNEAPOLIS, MN 55440- -1441 ECOPYRIGHT 2001, GRACO INC. -
Page 2: Symbols
D Handle and route hoses and tubes carefully. Keep hoses and tubes away from moving parts and hot surfaces. Do not use the hoses to pull equipment. Do not expose Graco hoses to temperatures above 150_F (65_C) or below --40_F (--40_C). - Page 3 D Use the equipment only for its intended purpose. If you are uncertain about the usage, call your distributor. D Do not alter or modify this equipment. Use only genuine Graco parts and accessories. D Check the equipment daily. Repair or replace worn or damaged parts immediately.
-
Page 4: Installation
Installation Installation 4. Rotate the spray valve knob counter--clockwise to the out/flush position. Fig. 2. 1. Connect grounded fluid hose to the Contractort 5. Hold metal part of pole gun firmly to side of groun- In--line valve. ded metal waste container. Trigger in-line valve to 2. - Page 5 Installation Electrical Grounding D Ground the pump or sprayer as instructed in its separate manual. WARNING D Ground the air compressor or hydraulic power FIRE AND EXPLOSION HAZARD supply according to the local electrical code and Improper grounding could cause static the manufacturer’s recommendations.
-
Page 6: Operation
Operation Startup WARNING 1. Start pump. Adjust fluid pressure so spray is INJECTION HAZARD completely atomized. Always use lowest pressure To reduce the risk of a fluid injection that gets desired results. Higher pressure may not injury, do not operate the pole gun with improve spray pattern and causes premature tip the tip guard or trigger guard removed. - Page 7 Operation Changing Spray Pattern Orientation Clearing a Clogged Spray Tip Frequently during the job and at the end of each WARNING workday, relieve the pressure and manually clean the tip with a solvent-soaked brush. Frequent cleaning To reduce the risk of a fluid injection injury, never helps keep fluid buildup from drying and clogging the spray without the tip guard.
- Page 8 Operation Flushing the Cleanshott Shut- - off Valve 3. If flushing with water, flush last with a rust inhibitor or Graco Pump Armor to protect the system from Rotate the spray valve knob counter--clockwise to the corrosion. flush position (see Using the Cleanshott Shut- -off 4.
- Page 9 Operation Cleaning the Filter (Fig. 6) Clean the filter assembly (5) daily, as follows: 1. Follow Pressure Relief Procedure on page 4. 2. Push up on the trigger guard (3) and swing it away from the trigger (2). 3. Unscrew the gun handle (13) from the housing (11).
- Page 10 Service Changing the Needle (Fig. 7) 2. Install bracket (10) and locknut (D) loosely on threaded end of needle (C). Squeeze trigger to pull NOTE: Needle (C), diffuser/seat (A), gasket (B) and needle assembly (C) into gun body (11). Tighten locknut (D) must be replaced together.
- Page 11 Service Replacing the Swivel (Fig. 8) Disassembly 1. Follow Pressure Relief Procedure on page 4. 2. Push up on trigger guard (3) and rotate trigger guard away from trigger (2). 3. Unscrew gun handle (13) from housing (11). Remove filter (5) and clean in compatible solvent. 4.
- Page 12 Service Changing the Needle (Fig. 9) Disassembly (upper module) 1. Follow Pressure Relief Procedure (page 4). NOTE: The components included in the Cleanshot Valve Repair Kit 244162 are packaged as two separate 2. Remove tip guard.(not shown) modules; individual pieces cannot be ordered sepa-- rately.
- Page 13 Service Replacing the Swivel (Fig. 10) Disassembly 1. Remove nut (35B). 2. Slide module off stud (a). NOTE: O--rings (35C and/or D) may remain on stud. Remove and discard old o--rings. Use new o--rings included in Swivel Repair Kit. Reassembly 1.
- Page 14 Notes 309237...
-
Page 15: Parts
Parts Model 287030 Cleanshott Shut- -off Valve Model 244161 Contractort In- -line Gun (North America) Model 244364 Contractort In- -line Gun (Europe) Model 244365 Contractort In- -line Gun (Asia) (included in kits 286517, LTX517, PAA517) 40/41 Page 16 TI0667 309237... - Page 16 Parts Cleanshott Repair Kit 244162 (31) Torque 26--32 ft-lb Swivel Repair Kit 244363 (35)† Valve Body Repair Kit 245687 (36)*† Torque 55--60 in-lb Torque 26--32 ft-lb * 36 Valve Body Kit must be purchased separately † Series A and B ti0947 309237...
-
Page 17: Parts List
Parts List Model 287030 Cleanshott Shut- -off Valve Model 244161 Contractort In- -line Gun (North America) Model 244364 Contractort In- -line Gun (Europe) Model 244365 Contractort In- -line Gun (Asia) Ref. Ref. Part No. Description Qty. Part No. Description Qty. 243161 HandTitet Guard 218070... -
Page 18: Technical Data
Technical Data Maximum fluid working pressure ..........3600 psi (24.8 MPa, 248 bar) Gun fluid inlet size . - Page 19 Notes 309237...
-
Page 20: Warranty
With the exception of any special, extended, or limited warranty published by Graco, Graco will, for a period of twelve months from the date of sale, repair or replace any part of the equipment determined by Graco to be defective.
Need help?
Do you have a question about the A Series and is the answer not in the manual?
Questions and answers