
Related Manuals for Axminster Trade AT150PPL


Summary of Contents for Axminster Trade AT150PPL
- Page 1 Code 508477 Original Instructions AT150PPL Precision Pro Lathe AT&M: 12/02/2020 BOOK REF: 101738 BOOK VERSION: 2...
-
Page 2: Eu Declaration Of Conformity
EN 60204-1 :2006+AC :2010 Type Precision Pro Lathe Model AT150PPL and conforms to the machinery example for which the EC Type-Examination Certificate No RA/2014/80020C, KC-2014002-A1 has been issued by KINGCRAFT MACHINERY COMPANY LIMITED Signed at: No. 26, GONG YEH 12RD., DAH LI DISTRICT, TAICHUNG CITY, TAIWAN and complies with the relevant essential health and safety requirements. -
Page 3: What's Included
What’s Included Quantity Item Part Model Number AT150PPL 1 No Precision Pro Lathe 1 No Push Rod 1 No 150mm Tool Rest 1 No 80mm Tool Rest 4 No Rubber Feet with a 10mm thread and height adjusting nut 1 No... - Page 4 General Instruction for 230V Machines Good Working Practices/Safety KEEP THE WORK AREA AS UNCLUTTERED AS IS PRACTICAL, THIS INCLUDES PERSONNEL The following suggestions will enable you to observe good AS WELL AS MATERIAL. working practices, keep yourself and fellow workers safe and UNDER NO CIRCUMSTANCES SHOULD maintain your tools and equipment in good working order.
-
Page 5: Specification
7. If your lathe has the facility to run in reverse, you must ensure of your work. that the mounting accessories (chucks, faceplates etc.) can be Specification Code 508477 Model AT150PPL Rating Trade Power 375W 230V Speed 400-3,600rpm Spindle Type... - Page 6 Assembly Fig 03 Important Notes Please take some time to read the section entitled ‘Illustration and Description’ to identify the various parts of your machine so that you are familiar with the terminology we will use to enable you to set up and operate your table lathe safely and correctly.
- Page 7 Assembly Fig 12-13-14 150mm Tool rest Tailstock Tailstock barrel 5. Locate the collet chuck (F), Evolution hollow revolving centre (G), Pen mandrel assembly (H), ‘C’ spanner (I) and push rod (B). 6. Put to hand the ER20 collet chuck nut with the 6-5mm collet (F) attached.
- Page 8 Assembly 2. Loosen the collet chuck using the ‘C’ spanner (I) and push rod Fig 19-20 Mandrel spacer (B), loosen the tailstock locking handle and move the tailstock assembly to the end of the lathe bed, see fig 16-17. Bushing Project blank 3.
-
Page 9: Illustration And Parts Description
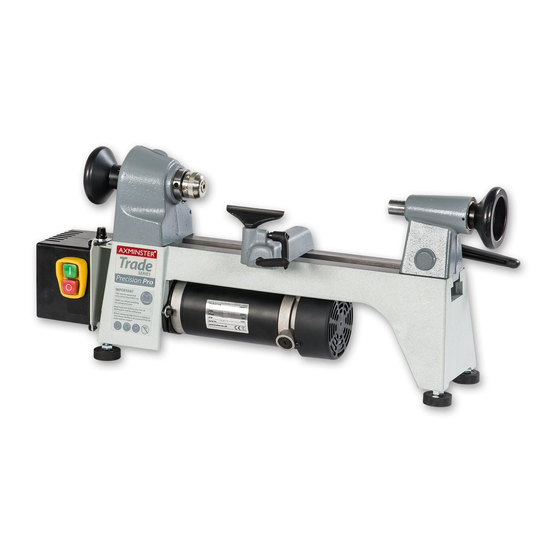
Illustration and Parts Description Headstock wheel Headstock Spindle collar Collet chuck Tailstock barrel lock LED power indicator Tool rest locking handle Evolution revolving live centre Tailstock wheel NVR On/Off switch Motor cap head bolt lock Banjo locking handle Motor air vent 80mm Tool rest Drive pulley access panel Variable speed control knob... - Page 10 Illustration and Parts Description 270mm 315mm 699mm Mandrel spacer Mandrel shaft Bushings Mandrel spacer...
- Page 11 Illustration and Parts Description NVR ON/OFF Switch Variable speed control knob (A) (400-3,600rpm) LED Power Indicator (B) comes on when the ‘ON’ switch is pressed Barrel locking handle Barrel with an 1MT taper Spindle type ER20 Collet Tailstock assembly with an 1MT taper Spindle thread M24 x 1mm ER20 Collet nut with 6-5mm collet Axminster Evolution revolving live centre with a 1MT taper...
- Page 12 Illustration and Parts Description Motor brush access port 6-5mm collet ER20 Collet nut with 6-5mm collet attached Motor air intake vent Motor clamp cap head bolt Pulley and drive belt rear access panel Rear access panel locking cap head bolt...
- Page 13 Operating Instructions 2. Unscrew the chuck from the spindle taper, see fig 26. Start Up Procedures Remove all tools away from working area. Go round and make Note: The collet chuck nut has an off centred ring, see a final check that everything is secure and connect the lathe to fig 27 for easy removal of the collet.
- Page 14 Operating Instructions Fig 30-31 Fig 33-34 5. Screw on the collet chuck assembly (F), replace the pen Drive Belt Tension mandrel assembly (H) and project blank/s as detailed on page 8 and tighten with the push rod (B) and ‘C’ spanner (I), see fig 32. When operating the lathe, if you suddenly notice the drive spindle stops moving or stops altogether when using your Fig 32...
-
Page 15: Maintenance
Operating Instructions Fig 37 Maintenance Fig 38-39-40 Daily After Use • Clean wood shavings away from the lathe bed and tool rest. • Smear a light coat of wax, Protec Tool Wax Polish code. 211835’ , see fig 38 over the lathe bed to allow the banjo and tailstock to run more smoothly over the bed and to prevent corrosion. -
Page 16: Optional Accessories
Maintenance Motor Brushes 1. After 100 hours of use check the profile of the commutator in that 3. If they are in good condition, re-fit. If position. If you fit them reversed, it condition of the motor brushes by they are badly worn, replace with new can cause excessive sparking and heat brushes, For after sales enquires, call unscrewing each access port cap in... - Page 17 Optional Accessories Code 101535 Axminster Precision Pro 50mm Faceplate Code 101515 " (38mm) Wood Screw Chuck Code 101521 Axminster Precision Pro Polishing Mob Arbour Code 101511 Axminster Precision Pro Light Pull Drive...
- Page 18 Exploded Diagrams/Parts Lists...
- Page 19 Exploded Diagrams/Parts Lists Description Size Motor Pulley Spindle Motor Label Bearing 6004 Power Plug Set Screw M6X10mm Motor Headstock Pulley Nylon Nut Cap Screw M4X12mm Clamp Plate Washer Foot Pad Headstock Headstock Cover Knob Spring Pin 4X12 Shaft Teeth Washer Tool Rest Clamping Shaft Wave Washer...
-
Page 20: Wiring Diagram
Wiring Diagram... - Page 21 Notes...
- Page 22 Notes...
- Page 23 Notes...
- Page 24 The Axminster guarantee is available on Craft, Trade, Engineer, Air Tools & CNC Technology Series machines Buy with confidence from Axminster! So sure are we of the quality, we cover all parts and labour free of charge for three years! For more information visit axminster.co.uk/3years The packaging is suitable for recycling.
Need help?
Do you have a question about the AT150PPL and is the answer not in the manual?
Questions and answers