
Related Manuals for Axminster Trade AT350WL


Summary of Contents for Axminster Trade AT350WL
- Page 1 Code 501214 Original Instructions AT350WL Woodturning Lathe The AT350WL utilises the very reliable inverter technology usually found on much larger machines AT: 02/08/2021 BOOK REF: 104251 BOOK VERSION: 07...
-
Page 2: Eu Declaration Of Conformity
INDEX OF CONTENTS EU Declaration of Conformity What’s in the Box Optional Accessories General Instructions for 230V Machines 04-05 Specific Safety Instructions Specifications Assembly Instructions 06-07 Illustration and Description 08-09 Indexing Operation Removing Drive/Live Centres Removing the Faceplate Changing the Belt Speed 12-13 Maintenance Exploded Diagram/Parts List... -
Page 3: What's Included
Quantity Item Model Number AT350WL AT350WL Woodturning Lathe ( Headstock and Tailstock fitted) Tool Rest Arm (Fitted to Lathe Bed) 152mm Tool Rest (Fitted to Tool rest Arm) 80mm Faceplate (Fitted to Headstock) Axminster 4 Prong Drive Centre (Fitted to Headstock) Axminster Standard 60˚... -
Page 4: Optional Accessories
OPTIONAL ACCESSORIES Quantity Item Extension Bed Code: 107031 Stand Assembly Code 104794 GENERAL INSTRUCTIONS FOR 230V MACHINES that you have unimpeded access to all parts of the Good Working Practices/Safety machine. The machine is designed for indoor use, do not use when or where it is liable to get wet. Keep the The following suggestions will enable you to observe machine clean;... -
Page 5: Specific Safety Instructions
7. If your lathe has the facility to run in reverse, you SPECIFICATION Code 501214 Model AT350WL Rating Trade Power 230V 50Hz 750W L = Low 80-800, M = Medium 170-1700, S = High 350-3,700rpm... - Page 6 ASSEMBLY INSTRUCTIONS Please take some time to read the section entitled Figure 02 “Illustration & Parts Description” to identify the various parts of your machine so that you are familiar with the terminology we will use to enable you to set up and operate your table lathe safely and correctly.
- Page 7 (H) & lightly screw them into the lathe bed, using a Hex key. Clamp the tailstock over the two beds and adjust until both beds are aligned then tighten the bolts, (DO NOT OVERTIGHTEN). (See figures 7-8) Replace the carrying handle (E) and screws to the end of the extension bed (H). AT350WL Lathe Extension Bed...
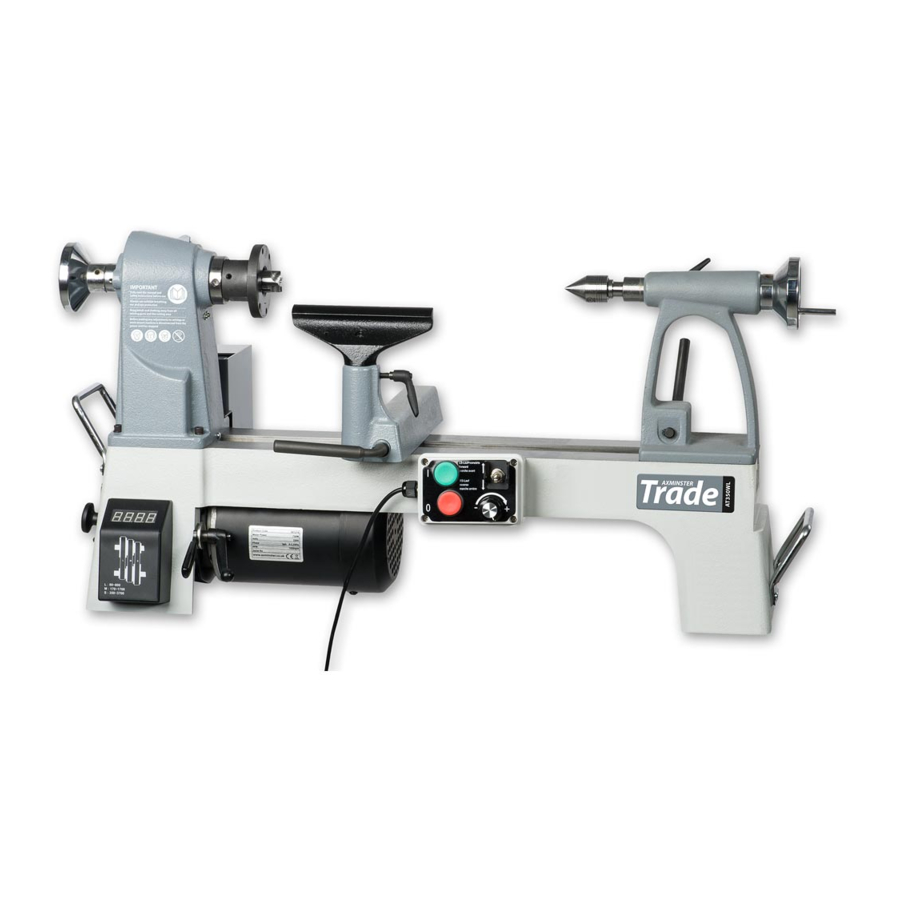
- Page 8 ILLUSTRATION AND DESCRIPTION Tailstock barrel lock Access panel Access panel lock Drive centre Live centre Tailstock lock Power cable hooks Lathe bed Motor Electronic inverter Headstock wheel control unit Headstock Faceplate Tailstock wheel Tool rest Tool rest lock Carrying handle Banjo lock Banjo Lift and shift clamping handle...
- Page 9 ILLUSTRATION AND DESCRIPTION Electronic Inverter Control Unit General Purpose AC Micro Drive from “Delta Electronics” . The VFD-E drive is famous for its low noise carrier frequency. For more information see manufacturer’s manual. Note: The inverter comes preset from the factory and you should not need to make any adjustments.
-
Page 10: Indexing Operation
INDEXING OPERATION The indexing facility is useful for fluted columns, clock faces and accurate hole positioning. The indexing pulley has 24 positions (15°) indexing using the supplied index pin (F). Figure 09 Figure 10 1-24 index positions Open the access panel, turn the headstock wheel until the pre-drilled hole in the headstock lines up with one of the 24 pre-drilled hole positions on the index pulley. -
Page 11: Removing Drive/Live Centres
REMOVING DRIVE/LIVE CENTRES To remove the Drive Centre (A), locate the push rod (C), while holding the tool insert the push rod (C) through the centre hole of the headstock wheel and push the drive centre out. (See figs 15-16-17) Repeat the procedure for the Live Centre in the tailstock. - Page 12 CHANGING THE BELT SPEED Note. The lowest speed pulley combination is furthest from the faceplate, i.e. smallest motor When the belt is located, turn the spindle to ensure pulley diameter to largest spindle pulley the belt is correctly seated. Check that the belt is diameter.
-
Page 13: Maintenance
CHANGING THE BELT SPEED Figure 22 Figure 23 With the motor access door open, gives Loosen the motor’s lift and shift handle and lift access to the motor pulley. the motor plate handle to give enough slack in the belt to enable it to be moved. MAINTENANCE Daily after use Monthly... -
Page 14: Exploded Diagram/Parts List
EXPLODED DIAGRAM/PARTS LIST... - Page 15 EXPLODED DIAGRAM/PARTS LIST...
- Page 16 EXPLODED DIAGRAM/PARTS LIST PART DESCRIPTION SPECIFICATION Q’ty Bushing C-Ring S-14 Face plate 3” Clamp bolt Spur Center Clamp 5*5*25 M10*1.5P Spindle M33XP3.5 Shaft Set Screw 1/4x1/4 Motor 3/4HP-60HZ Spindle Pulley 3 SPEED Motor Lable Bearing 6005VV Locking Handel Set Screw 3mmx16mm Hex head 5/16”x1-1/4”...
- Page 17 EXPLODED DIAGRAM/PARTS LIST Set Screw 1/4-20*3/8 Washer Inverter Nylon Nut Nylon Nut 3/16” Round Head M3x30 Screw Inverter board ID label Round Head M5x10MM Screw Warning label Juncition box Motor wire Strain relief Round head #10-24X3/8” screw Wire clamp ACC-1.5 Hex head 3/8”x2”...
- Page 18 AT350WL LATHE STAND (OPTIONAL) 104794 Stand Assembly...
-
Page 19: Wiring Diagram
WIRING DIAGRAM... - Page 20 The Axminster guarantee Buy with confidence from Axminster! So sure are we of the quality, we cover all parts and labour free of charge for three years! For more information visit axminstertools.com/3years The packaging is suitable for recycling. Please dispose of it in a responsible manner. EU Countries Only Do not dispose of electric tools together with household waste material.
Need help?
Do you have a question about the AT350WL and is the answer not in the manual?
Questions and answers