
Related Manuals for Ladybug PowerSensor+ LB480A


Summary of Contents for Ladybug PowerSensor+ LB480A
- Page 1 Models LB480A/LB680A USB PowerSensor+™ Product Manual PPA (Pulse Profiling Application) Product Manual for the PULSE PROFILING APPLICATION MODELS LB480A/LB680A Revision: 08/02/11...
-
Page 2: Table Of Contents
Models LB480A/LB680A USB PowerSensor+™ Product Manual PPA (Pulse Profiling Application) Table of Contents Table of Contents ................................2 NOTICES ................................... 4 1. General Information ..............................5 Introduction ..................................5 Description ..................................5 USB Considerations ............................... 5 More information related to USB ..........................6 How to identify the type of USB port .......................... - Page 3 Models LB480A/LB680A USB PowerSensor+™ Product Manual PPA (Pulse Profiling Application) Response ................................. 24 Instrument Preset ..............................24 ID Sensor ................................. 24 Set Address ................................24 Exit .................................... 24 Markers Toolbar ................................25 Normal Markers ................................ 25 Set Position ................................26 Delta Markers ................................
-
Page 4: Notices
CDF ..................................53 CCDF ..................................53 PDF ..................................53 NOTICES © 2007-2011 LadyBug Technologies LLC This document contains information which is copyright protected. Do not duplicate without permission or as allowed by copyright laws. SAFETY A WARNING indicates a potential hazard that could completely damage the product. Do not continue until you fully understand the meaning. -
Page 5: General Information
Models LB480A/LB680A USB PowerSensor+™ Product Manual PPA (Pulse Profiling Application) 1. General Information Introduction This manual provides information about how to install and operate the LB480A/LB680A models for USB Pulse Profiling PowerSensor+™. Information about product features, specifications, and support is also included. Use the electronic bookmarks shown below (or the table of contents) to reference product features that include all of the toolbar functions. -
Page 6: More Information Related To Usb
Models LB480A/LB680A USB PowerSensor+™ Product Manual PPA (Pulse Profiling Application) More information related to USB o Supplied voltage by a host or a powered hub port is between 4.75 V and 5.25 V. o Maximum voltage drop for bus-powered hubs is 0.35 V from its host or hub to the hub output port. o Normal operational voltage for functions is 4.75 V (minimum). -
Page 7: Applications
Models LB480A/LB680A USB PowerSensor+™ Product Manual PPA (Pulse Profiling Application) Applications The PowerSensor+™ line of products is designed specifically for the following measurement applications: General Average and Pulse Power Measurements Power Measurements Requiring High Accuracy: CW and Pulsed Signals ... -
Page 8: Specifications
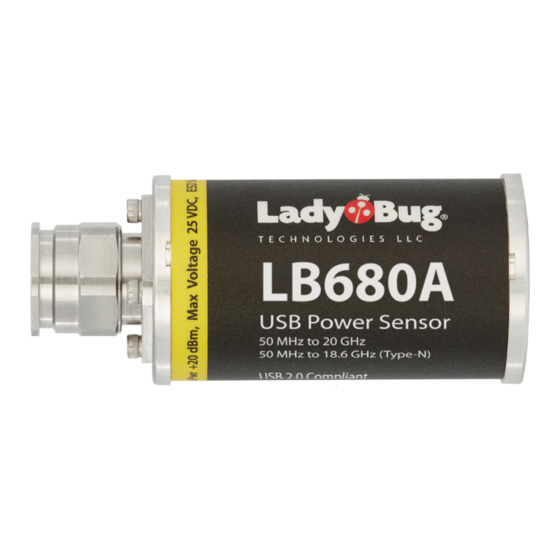
Models LB480A/LB680A USB PowerSensor+™ Product Manual PPA (Pulse Profiling Application) Specifications NOTE: Refer to the current data sheet for each model for specifications. Options Model No. and Options Description Pulse Profiling Wide Dynamic Range PowerSensor+™ (0.1 – 8 GHz) LB480A Pulse Profiling PowerSensor+™... -
Page 9: Warranty
The recommended calibration cycle for the PowerSensor+™ series of products is one year, return to factory. Extended warranty and calibration service options are available. Please see the product Order Guide for details. Contact Information LadyBug Technologies LLC 3317 Chanate Rd, Suite 2F Santa Rosa, CA 95404 Phone 707.546.1050... -
Page 10: Installing The Software And The Sensor
2. Installing the Software and the Sensor Initial Inspection Check the shipment for any damage to the shipping container or the components inside. Support Contact Information LadyBug Technologies LLC 3317 Chanate Rd. Suite 2F Santa Rosa, CA 95404 Phone 707.546.1050 Fax 707.237.6724... -
Page 11: Pulse Profiling Overview
Models LB480A/LB680A USB PowerSensor+™ Product Manual PPA (Pulse Profiling Application) 3. Pulse Profiling Overview Quick Start Guide and Additional Documentation It is highly recommended that you start with the Quick Start Guide for the Pulse Profiling Application to quickly learn the basics of instrument operation. -
Page 12: The Elements Of The Display Panel
Models LB480A/LB680A USB PowerSensor+™ Product Manual PPA (Pulse Profiling Application) 4. The Elements of the Display Panel Sensor Information Toolbars The main elements of the default display are shown below with no signal applied to the sensor. We will demonstrate the features and functionality of the user interface in the following section of this manual entitled “The Toolbar Functions”. -
Page 13: Dockable Windows
Models LB480A/LB680A USB PowerSensor+™ Product Manual PPA (Pulse Profiling Application) Dockable Windows You can position any of the five dockable windows (or panes) anywhere on the panel using the docking feature. You can also auto-hide a pane(s). We will demonstrate both in the following sequence. To activate the docking popup click and drag the cursor from one of the dockable window tabs. - Page 14 Models LB480A/LB680A USB PowerSensor+™ Product Manual PPA (Pulse Profiling Application) You will see the following two screens with the Auto Measure pane first on top. Now click the Panoramic Trace tab to put it on top and to see one way to expand the viewing area of the signal. Revision: 08/02/11...
- Page 15 Models LB480A/LB680A USB PowerSensor+™ Product Manual PPA (Pulse Profiling Application) Revision: 08/02/11...
- Page 16 Models LB480A/LB680A USB PowerSensor+™ Product Manual PPA (Pulse Profiling Application) Next, drag the Measurement Trace tab over the Panoramic Trace and drop it in the center of the docking popup like we just demonstrated. You will see the screen below with the Measurement Trace expanded even more with no stimulus applied to the sensor.
- Page 17 Models LB480A/LB680A USB PowerSensor+™ Product Manual PPA (Pulse Profiling Application) Lastly, we demonstrate the Auto-Hide feature of dockable windows from the previous screen. Drag the Measurement Trace tab down until the docking popup appears and drop it on the bottom Auto-Hide positioner as shown below. The Measurement Trace will move to the position indicated with Auto-Hide active as shown below.
-
Page 18: The Toolbar Functions
Models LB480A/LB680A USB PowerSensor+™ Product Manual PPA (Pulse Profiling Application) 5. The Toolbar Functions Display Control Toolbar (Pointer Control) Results Pane Zoom Reset Highlight (Mode) Markers (Mode) Gates (Mode) The Pulse Profile Application is designed to be highly interactive using the mouse. The mouse pointer has three modes of operation: Highlight, Markers and Gates . -
Page 19: Highlight Span
Models LB480A/LB680A USB PowerSensor+™ Product Manual PPA (Pulse Profiling Application) The screen shots in this document use the following input to the LB480A sensor for demonstration purposes: Carrier Frequency = 1 GHz Modulation = ~50 kHz Pulse Duty Cycle = ~10% Pulse Width = ~2 usec Power = ~-20 dBm Sweep Time = 1 msec... - Page 20 Models LB480A/LB680A USB PowerSensor+™ Product Manual PPA (Pulse Profiling Application) You can highlight or select a portion of the trace using the following techniques: 1. Click and drag the mouse over a portion of the Panoramic Trace – only the portion selected by the mouse movement will be viewed in the Measurement Trace.
-
Page 21: Auto Measure Pane
Models LB480A/LB680A USB PowerSensor+™ Product Manual PPA (Pulse Profiling Application) Auto Measure Pane Start Measurement Copy Data The Auto Measure feature requires at least two complete cycles of the pulse to be viewable in the Measurement Trace window in order to make an accurate measurement. Otherwise, you will see indeterminate numbers for the measured values. -
Page 22: Main Toolbar
Models LB480A/LB680A USB PowerSensor+™ Product Manual PPA (Pulse Profiling Application) Main Toolbar Frequency Sweep Time Reference Level Offset Response The Main toolbar shown below allows setting of the measurement Frequency; Sweep Time; Reference Level and Resolution; Offset and (frequency) Response. Again, the measurement frequency should correspond to the incoming signal frequency. - Page 23 Product Manual PPA (Pulse Profiling Application) Setting the Frequency is essential to making accurate measurements. As with all power sensors, LadyBug corrects the readings based on a known incoming frequency. In the past this has been referred to as calibration factors or simply cal factors.
-
Page 24: Response
Models LB480A/LB680A USB PowerSensor+™ Product Manual PPA (Pulse Profiling Application) Offset provides a single valued offset to all measured data. Offset shifts the actual values of the measured data (not the viewing area). Simple offsets can be useful but they are limited in that they are not sensitive to frequency. If there is a frequency sensitive device in the measurement path, offset becomes very cumbersome since every frequency change must be accompanied by a change in offset. -
Page 25: Markers Toolbar
Models LB480A/LB680A USB PowerSensor+™ Product Manual PPA (Pulse Profiling Application) Markers Toolbar Normal Markers Markers are used to make measurements at a particular point (Normal Markers) or measure the difference between two points (Delta Markers). Markers are only available in the Measurement view. The value of each marker is displayed in the Results pane. -
Page 26: Set Position
Models LB480A/LB680A USB PowerSensor+™ Product Manual PPA (Pulse Profiling Application) Now select the Markers tab on the toolbar and click the down arrow on marker 1 to enter the setup as shown below. There are five marker pairs (1-5) on the Markers toolbar. These same markers are available from the Results pane. Each pair consists of a Normal Marker and a Delta Marker. -
Page 27: Delta Markers
Models LB480A/LB680A USB PowerSensor+™ Product Manual PPA (Pulse Profiling Application) Delta Markers To use the delta function you position the Normal Marker at the desired point then select Delta Marker. You set the Delta Marker (using the mouse pointer) in a manner similar to positioning the Normal Marker. Zoom and Scroll can be used to more precisely locate the markers. - Page 28 Models LB480A/LB680A USB PowerSensor+™ Product Manual PPA (Pulse Profiling Application) Now select Delta Marker from the Markers 1 drop down shown below and click anywhere on the trace (the falling edge in this example) to position the second element of the marker pair. The annotation in the Results pane will now indicate the differential marker 1(Delta Relative) value in time and magnitude as well as its absolute value (Delta Absolute).
-
Page 29: Marker Search
Models LB480A/LB680A USB PowerSensor+™ Product Manual PPA (Pulse Profiling Application) Marker Search The marker search tool shown below allows the active Normal Marker to automatically jump to minimum or maximum peak value or directional peak value. Also, the center of the measurement display can move to the active marker position. -
Page 30: All Markers Off
Models LB480A/LB680A USB PowerSensor+™ Product Manual PPA (Pulse Profiling Application) Now click Center trace on marker on the toolbar and look at the screen below to see the result. Notice the time scale has shifted and the marker is at center graticule on the display. All Markers Off The All Mkrs Off button on the toolbar does just that and resets all the markers 1-5. -
Page 31: Pulse Criteria
Models LB480A/LB680A USB PowerSensor+™ Product Manual PPA (Pulse Profiling Application) EXAMPLE: Set Measurement Threshold to -20 dBm. Setup a normal marker on top of the pulse. Click Marker to next peak right and notice the active normal marker requires the threshold value to be met before it will search for the next peak. - Page 32 Models LB480A/LB680A USB PowerSensor+™ Product Manual PPA (Pulse Profiling Application) With these additional calculations we now have sufficient information to make proper pulse measurements. We can calculate the peak, droop, pulse power, and pulse width. These pulse measurements often represent a starting point for other measurements such as PRFand PRT.
-
Page 33: Gates Toolbar
Models LB480A/LB680A USB PowerSensor+™ Product Manual PPA (Pulse Profiling Application) Gates Toolbar Measurement Description Time gates allow the complete characterization of the incoming signal. Five time gate pairs (A-E) are available and each gate pair has its own toolbar. Just as the manipulation of markers required the pointer mode to be in Markers mode, the manipulation of gates requires that the pointer be in Gates mode. - Page 34 Models LB480A/LB680A USB PowerSensor+™ Product Manual PPA (Pulse Profiling Application) Rise Time Returns the time required for the signal to rise from the 10% level to 90% level. The left gate determines the start of data. The right gate marks the highest point to be considered. The resultant measurement is the time required to increase in amplitude from 10% to 90% of the amplitude defined by the right-most gate.
- Page 35 Models LB480A/LB680A USB PowerSensor+™ Product Manual PPA (Pulse Profiling Application) edge anywhere within the measurement window as defined by the gates. Crest Factor Crest factor is the difference between the peak power and the average power in any measurement window defined by gate edges.
- Page 36 Models LB480A/LB680A USB PowerSensor+™ Product Manual PPA (Pulse Profiling Application) Revision: 08/02/11...
-
Page 37: Making A Gated Measurement
Models LB480A/LB680A USB PowerSensor+™ Product Manual PPA (Pulse Profiling Application) Making a Gated Measurement The following sequence of instructions demonstrates how to setup the gate(s) based on the example input used for markers: First, Highlight a single pulse in the panorama as previously described. Zoom in and scroll left/right to get the pulse centered as shown below. - Page 38 Models LB480A/LB680A USB PowerSensor+™ Product Manual PPA (Pulse Profiling Application) Now click to the left and right of the gate pair to set the gate end points as shown below. The measured value will appear in the Results pane under the gate and above the grid in the Measurement view. Notice that if the gate is not expanded you will see a measurement summary next to the gate node.
- Page 39 Models LB480A/LB680A USB PowerSensor+™ Product Manual PPA (Pulse Profiling Application) Pictured below is an example of all gates on and each taking a measurement: Peak Power, Pulse Width, PRF, Droop, and Duty Cycle. Again, you activate a gate by clicking on it then setting its position as previously described. Finally, you can switch between these two modes of operation (gates and markers) to position markers within gates and gates within markers.
-
Page 40: Canned Measurement Example
Models LB480A/LB680A USB PowerSensor+™ Product Manual PPA (Pulse Profiling Application) Canned Measurement Example Shown below is Gate A measuring Pulse power, Peak power and Crest Factor by clicking on the Power Set from the choice of three canned or group measurements. Right-click on the gate to see the measurement list or click the down arrow on the toolbar. -
Page 41: Triggering & Delay Toolbar
Models LB480A/LB680A USB PowerSensor+™ Product Manual PPA (Pulse Profiling Application) Triggering & Delay Toolbar Internal Auto Level Trigger Various triggering methods are provided from this toolbar. The Internal Auto Level trigger is determined by sampling the incoming signal. The general algorithm is as follows: ... - Page 42 Models LB480A/LB680A USB PowerSensor+™ Product Manual PPA (Pulse Profiling Application) The Internal Auto Level trigger mode always returns a trace and triggers off the incoming signal. However, if a signal is not present it will return a noise trace. Shown below is an example of a complex waveform being measured using internal triggering (AM = 90%, 1 kHz).
-
Page 43: Internal Manual Level Trigger
Models LB480A/LB680A USB PowerSensor+™ Product Manual PPA (Pulse Profiling Application) Internal Manual Level Trigger The sensor is capable of triggering on the incoming signal from about -55dBm to +20dBm when Internal Manual Level is selected and a value is entered as shown below. This trigger mode requires that you set the trigger level manually. -
Page 44: External Ttl Trigger
Models LB480A/LB680A USB PowerSensor+™ Product Manual PPA (Pulse Profiling Application) External TTL Trigger The external TTL trigger mode requires the user to connect an external SMB cable with an incoming TTL signal. Use this capability to trigger on an input that is not level dependent or for very low signal levels approaching the noise floor of the sensor. -
Page 45: Edge Trigger
Models LB480A/LB680A USB PowerSensor+™ Product Manual PPA (Pulse Profiling Application) Edge Trigger Allows the user to trigger on the positive or negative edge as required for best viewing. Continuous Sweep Causes the sensor to continuously deliver new traces. Single Sweep Delivers one new sweep each time it is pressed with the exception of the first time. -
Page 46: Averaging & Filters Toolbar
Models LB480A/LB680A USB PowerSensor+™ Product Manual PPA (Pulse Profiling Application) Averaging & Filters Toolbar Auto Reset Manual Reset Averaging refers to trace averaging and this tool is used to set the number of traces that are averaged from 1 to 100. The default state is 10 averages with automatic reset enabled. -
Page 47: Filter
Models LB480A/LB680A USB PowerSensor+™ Product Manual PPA (Pulse Profiling Application) Filter The Filter drop down allows you to select an appropriate video bandwidth depending on your measurement needs. The default value is 10 MHz if you have option 004. If you do not have option 004 then the default (and only value) is 100 kHz. - Page 48 Models LB480A/LB680A USB PowerSensor+™ Product Manual PPA (Pulse Profiling Application) NOTE: The Filter and Poles selections are only active with LB480A Option 004. Otherwise the selections will be inactive and set to 100 kHz and one pole. Revision: 08/02/11...
-
Page 49: Poles
Models LB480A/LB680A USB PowerSensor+™ Product Manual PPA (Pulse Profiling Application) Poles The Poles drop down allows selection of one, two or four filter poles as shown below. The default value is four poles with option 004 and one pole without option 004. The number of Poles has the effect of determining the sharpness of the frequency roll off depending on the filter selection. -
Page 50: Display Options Toolbar
Models LB480A/LB680A USB PowerSensor+™ Product Manual PPA (Pulse Profiling Application) Display Options Toolbar Marker Color & Size Gate Color & Size Display Font Results Font Display Colors Themes Grid On/Off Meas Notation On/Off Exit Select the display preferences from this toolbar as shown below – color, size, opacity, theme, etc. You can adjust the visual presentation as well as turn the grid and measurement notation on and off. -
Page 51: Print Toolbar
Models LB480A/LB680A USB PowerSensor+™ Product Manual PPA (Pulse Profiling Application) Print Toolbar Panorama Display Measure Display CDF, CCDF and PDF Display Print Black & White The Print toolbar allows you to print either the Panorama Display, Measure Display or the statistical displays separately as shown below. -
Page 52: Store/Recall & Help Toolbar
Models LB480A/LB680A USB PowerSensor+™ Product Manual PPA (Pulse Profiling Application) Store/Recall & Help Toolbar Store Register Recall Register Store as Name Recall as Name Help About The Store/Recall & Help toolbar allows you to store and recall up to 10 measurement states as shown below. Additionally, you can store/recall to file by name. -
Page 53: Statistics
Models LB480A/LB680A USB PowerSensor+™ Product Manual PPA (Pulse Profiling Application) 6. Statistics Setup & Control CCDF The tab shown below provides a dockable window for the statisitical analysis of the signal trace. The tool allows for three presentations from the Setup & Control dialog box: The CDF (Cumulative Distribution Function) display shows the probability that a signal is below the average power level. - Page 54 Models LB480A/LB680A USB PowerSensor+™ Product Manual PPA (Pulse Profiling Application) 7. Errata and User Updates – by date Subsequent revisions to the user interface and other product changes are listed in this section by date. Periodically these changes will be incorporated into the body of the manual by revision date (MM/DD/YY). Meanwhile, you can check for any interim updates by downloading the product manual from the website.
Need help?
Do you have a question about the PowerSensor+ LB480A and is the answer not in the manual?
Questions and answers