Advertisement
Quick Links
Franklin Electric Co., Inc.
P. O. Box 12010
Oklahoma City, OK 73157-2010
405.947.2511 • Fax: 405.947.8720
www.LittleGiantPump.com
CustomerService-WTS@fele.com
INTRODUCTION
This instruction sheet provides you with the information required to safely own and
operate your product. Retain these instructions for future reference.
The product you have purchased is of the highest quality workmanship and
material, and has been engineered to give you long and reliable service. These
products are carefully tested, inspected, and packaged to ensure safe delivery
and operation. Please examine your item(s) carefully to ensure that no damage
occurred during shipment. If damage has occurred, please contact the place of
purchase. They will assist you in replacement or repair, if required.
READ THESE INSTRUCTIONS CAREFULLY BEFORE ATTEMPTING TO
INSTALL, OPERATE, OR SERVICE YOUR PRODUCT. KNOW THE PRODUCT'S
APPLICATION, LIMITATIONS, AND POTENTIAL HAZARDS. PROTECT
YOURSELF AND OTHERS BY OBSERVING ALL SAFETY INFORMATION.
FAILURE TO COMPLY WITH THESE INSTRUCTIONS COULD RESULT IN
PERSONAL INJURY AND/OR PROPERTY DAMAGE!
SAFETY GUIDELINES
WARNING: When attaching pump leads to battery terminals, be sure that the area is
adequately ventilated to prevent an explosion or fire from explosive or flammable
vapors that may be present. Consult the battery manufacturer for additional safety
information.
Disconnect the pump from the power source before servicing or removing any
component.
Do not use to pump flammable or explosive fluids such as gasoline, fuel oil,
kerosene, etc. Do not use in explosive atmospheres. Pump should only be used
with liquids compatible with pump component materials.
Do not handle pump with wet hands or when standing on a wet or damp surface
or in water.
Batteries emit explosive hydrogen gas. Avoid smoking, sparks, or open flame
anywhere near the battery.
An explosion from the battery can cause blindness. Shield your eyes when
working near the battery.
Batteries contain sulfuric acid. In case of contact with eyes, skin, or clothing, flush
immediately with large amounts of water and get medical attention.
Do not add acid or electrolyte to the battery.
Keep out of reach of children.
In any installation where property damage and/or personal injury might result
from an inoperative or leaking pump due to power outages, discharge line
blockage, or any other reason, use a backup system(s) and/or alarm.
Support the pump and its piping when assembling and when installed. Failure to
do so may cause piping to break, pump to fall, motor bearing failures, etc.
ELECTRICAL CONNECTIONS
1. Check the pump label for proper voltage required. Do not connect to voltage
other than that shown.
2. For proper motor protection, install a 2.0 amp fuse in the circuit.
3. When using a battery as the power source, attach the red positive (+) lead
wire to the positive (+) battery terminal, then attach the black negative (-)
lead wire to the ground (-) battery terminal. When disconnecting the pump,
first disconnect the black negative (-) lead wire from the ground (-) battery
terminal, then disconnect the red positive (+) lead wire from the positive (+)
battery terminal.
4. Refer to Table 1 for recommended minimum lead wire sizes.
DISTANCE FROM POWER SOURCE
TO PUMP
1 – 15 feet
15 – 50 feet
BPLA
UTILITY PUMP
(12-VOLT DC)
RECOMMENDED MINIMUM WIRE
SIZE
18 AWG
16 AWG
Table 1
CAUTION: This pump is designed for intermittent use only (15 minutes on – 45
minutes off) with liquid no hotter than 160°F.
CAUTION: The pump is cooled by pumping fluid. Do not let the pump operate
dry; this can damage the seal and cause motor failure.
NOTE: This pump is designed to operate submerged or in-line. It can be placed
in any position below the water level when primed.
1. For proper operation, connect the pump to a steady 12-volt DC power source
or a 12-volt battery in good condition. A low-voltage power source may cause
critical overheating and premature failures. To avoid this, maintain proper
voltage and use recommended wire size during installation (Table 1).
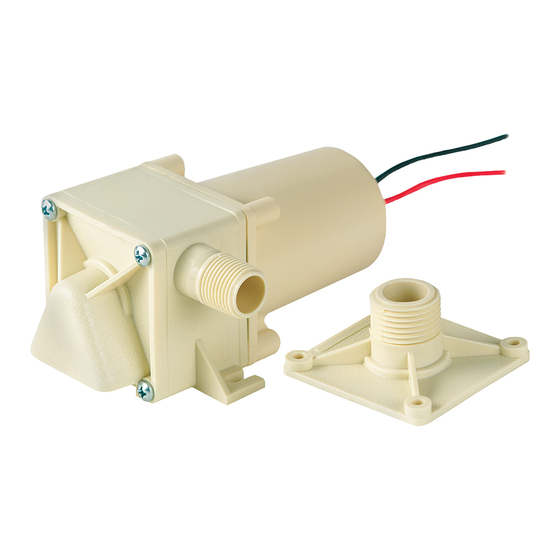
2. Use the hooded inlet plate for submersible operation. For in-line operation,
remove the inlet plate mounting screws and replace the hooded inlet plate with
the threaded inlet plate. Make certain that the inlet O-ring seal is installed in the
groove on the inlet plate before reassembly. Carefully reinsert the mounting
screws, taking care not to cut new threads or strip the screw holes.
3. When connected in-line, slope the hose or pipe connection upward from the
pump inlet to the water supply. A flooded suction is necessary for pump to
operate.
4. If the surface is dirt or sand, place the pump on a flat object (such as a piece of
wood or metal) to prevent it from being clogged.
5. Support the weight of the pump adequately. DO NOT support the pump by
the intake or discharge connections alone.
6. Do not restrict the intake side of the pump. This can damage the seal and starve
the pump. To reduce the flow, place a valve on the discharge side of the pump
or, if flexible vinyl tubing is used, a clamp on the tubing.
7. If the pump will be idle for an extended period, clean it according to the
MAINTENANCE section. Do not let the pump freeze in the wintertime. This
can cause cracking or distortion that will damage the pump.
MAINTENANCE
WARNING: DISCONNECT THE PUMP FROM THE POWER SOURCE BEFORE
SERVICING OR REMOVING ANY COMPONENT.
CAUTION: The pump is permanently lubricated. Oiling is not required. DO NOT
open the sealed portion of the pump or remove the housing screws.
NOTE: The power leads on this pump cannot be replaced; if they become
damaged the entire pump must be replaced.
Clean the pump periodically to prolong its life and efficiency:
1. Disconnect the black negative (–) lead wire, then disconnect the red positive
(+) lead wire.
2. Check the lead wires to ensure that they are in good condition with no nicks
or cuts.
3. Remove the volute mounting screws, then remove the volute from the pump.
DO NOT remove any other screws.
4. Lightly clean any corrosion or debris that may clog the impeller. Use a brush
and penetrating oil and lightly scrape to remove encrusted material.
5. Turn the impeller by hand to make sure it turns freely.
6. Place the pump on a solid surface, ensuring that the pump and impeller are
not touching anything. Connect the pump to 12VDC power source for 10
seconds. If the impeller rotates, disconnect the pump from the power source
and install the parts in reverse order. If the impeller does not rotate or the
pump does not operate properly, return the pump to Franklin Electric or an
authorized service center. DO NOT attempt repairs yourself.
Threaded inlet plate
O-ring groove
Hooded inlet plate
OPERATION
Mounting screws
Figure 1
A-L737
1
Advertisement

Subscribe to Our Youtube Channel
Related Manuals for Franklin Electric Little Giant BPLA Series


Summary of Contents for Franklin Electric Little Giant BPLA Series
- Page 1 ELECTRICAL CONNECTIONS and install the parts in reverse order. If the impeller does not rotate or the pump does not operate properly, return the pump to Franklin Electric or an authorized service center. DO NOT attempt repairs yourself. 1. Check the pump label for proper voltage required. Do not connect to voltage other than that shown.
- Page 2 Any product that should fail for either of the above two reasons and is still within the warranty period will be repaired or replaced at the option of Little Giant Pump Company, Inc. dba Franklin Electric Water Transfer Systems (hereafter “the manufacturer”) as the sole remedy of buyer. For our customers in the CONTINENTAL UNITED STATES: Please return the defective unit, postage paid, to the factory at 301 North MacArthur Blvd., Oklahoma City, OK 73127-6616.
Need help?
Do you have a question about the Little Giant BPLA Series and is the answer not in the manual?
Questions and answers