Table of Contents
Advertisement
Advertisement
Table of Contents

Subscribe to Our Youtube Channel
Related Manuals for Omega OCI64PP


Summary of Contents for Omega OCI64PP
- Page 1 INSTRUCTION MANUAL FOR OMEGA Induction Cooktop OCI64PP...
-
Page 3: Table Of Contents
The manufacturer will not be responsible for any damage to property or to persons caused by incorrect installation or improper use of the appliance. Due to continual product development, Omega reserves the right to alter specifications and appearances without notice. -
Page 4: Important Safety Instructions
IMPORTANT SAFETY INSTRUCTIONS IMPORTANT: Read the assembly instruction section and safety precautions of this booklet carefully before removing the contents of this carton. 1. This appliance is not intended for use by persons (including children) with reduced physical, sensory or mental capabilities, or lack of experience or knowledge, unless they have been given supervision or instruction concerning the use of the appliance by a person responsible for their safety. - Page 5 Cooking zones should not be switched on without cookware placed on it. Do not place empty cookware onto the cooking zones when in use. 20. If any cracking is noticed on the cooktop, turn the appliance off immediately and call your Omega Service Centre.
- Page 6 IMPORTANT SAFETY INSTRUCTIONS 22. Do not leave the cooktop while cooking with solid or liquid oils. There may be flaming up in conditions of extreme heating. Never pour water onto the flames occurring from oil. Immediately turn the cooktop off and cover the pan with a lid or fire blanket in order to smother the flame.
-
Page 7: Installation
INSTALLATION Cut out work the surface according to the sizes shown in the drawing. For the purpose of installation and use, a minimum of 5 cm space shall be preserved around the hole. Be sure the thickness of the surface is at least 30mm. Please select heat-resistant and insulated work surface material (Wood and similar fibrous or hygroscopic material shall not be used as surface material unless impregnated) to avoid the electrical shock and larger deformation caused by the heat radiation from the hotplate. - Page 8 INSTALLATION Ventilation Requirement All induction cooktops are fitted with cooling fans that draw fresh air in from the rear of the unit and expel the warm air through vents at the front. When installing your cooktop the following ventilation requirements are as follows: ...
- Page 9 INSTALLATION...
- Page 10 INSTALLATION Be aware that the glue that join the plastic or wooden material to the furniture, has to resist to temperature not below 150℃, to avoid the unstuck of the paneling. There are ventilation holes around outside of the hob. YOU MUST ensure these holes are not blocked by the worktop when you put the hob into position.
- Page 11 INSTALLATION Under any circumstances, the brackets cannot touch with the inner surfaces of the worktop after installation (see picture). Cautions 1. The induction hotplate must be installed by qualified personnel or technicians. We have professionals at your service. Please never conduct the operation by yourself. 2.
- Page 12 INSTALLATION Connecting the hob to the mains power supply This appliance is provided with a 10A power plug. Before connecting the hob to the mains power supply, check that: 1. The domestic wiring system is suitable for the power drawn by the hob. 2.
-
Page 13: Product Description
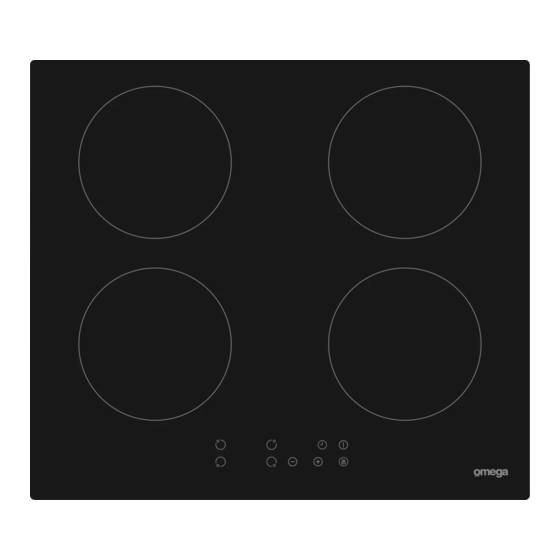
PRODUCT DESCRIPTION About this cooktop: This cooktop has been designed with a power limiter to ensure the cooktop does not exceed 2200W, allowing it to be plugged in to a standard 10amp power socket. Note: if hardwiring, the power limitations will remain. Using the cooktop: Maximum of one or two zones used in conjunction will provide optimal results. - Page 14 PRODUCT DESCRIPTION Top View 1. Max. 1500 W zone 2. Max. 2000 W zone 3. Max. 1500 W zone 4. Max. 2000 W zone 5. Glass plate 6. Control panel 7. ON/OFF control Control Panel 1. Heating zone selection controls 2.
-
Page 15: Operation Instructions
OPERATION INSTRUCTIONS Touch Controls The controls respond to touch, so you don’t need to apply any pressure. Use the ball of your finger, not its tip. You will hear a beep each time a touch is registered. ... - Page 16 OPERATION INSTRUCTIONS Make sure that the base of your pan is smooth, sits flat against the glass, and is the same size as the cooking zone. Use pans whose diameter is as large as the graphic of the zone selected. Using a pot a slightly wider energy will be used at its maximum efficiency.
- Page 17 OPERATION INSTRUCTIONS Start cooking Touch the ON/OFF control for three seconds. After power on, the buzzer beeps once, all displays show “–” or “– –”, indicating that the induction hob has entered the state of standby mode. Place a suitable pan on the cooking zone that you wish to use.
- Page 18 OPERATION INSTRUCTIONS Finish cooking Touching the heating zone selection control that you wish to switch off Turn the cooking zone off by scrolling down to “0” or touching “-” and “+” control together. Make sure the display shows “0”. Turn the whole cooktop off by touching the ON/OFF control.
- Page 19 OPERATION INSTRUCTIONS Timer control You can use the timer in two different ways: You can use it as a minute minder. In this case, the timer will not turn any cooking zone off when the set time is up. b) You can set it to turn one or more cooking zones off after the set time is up. The timer of maximum is 99 min.
- Page 20 OPERATION INSTRUCTIONS b) Setting the timer to turn one cooking zone off Set one zone Touching the heating zone selection control that you want to set the timer for. (e.g. zone 3#) Touch timer control, the minder indicator will start flashing and “10”...
- Page 21 OPERATION INSTRUCTIONS Default working times Auto shut down is a safety protection function for your induction hob. It will shut down automatically if ever you forget to turn off your cooking. The default working times for various power levels are shown in the below table: Power level Default working timer (hour)
-
Page 22: Cooking Guidelines
COOKING GUIDELINES Take care when frying as the oil and fat heat up very quickly. At extremely high temperatures oil and fat will ignite spontaneously and this presents a serious fire risk. Cooking Tips When food comes to the boil, reduce the temperature setting. ... - Page 23 COOKING GUIDELINES Detection of Small Articles When an unsuitable size or non-magnetic pan (e.g. aluminium), or some other small item (e.g. knife, fork, key) has been left on the hob, the hob automatically go on to standby in 1 minute. The fan will keep cooking down the induction hob for a further 1 minute.
-
Page 24: Cleaning And Maintanence
CLEANING AND MAINTANENCE What? How? Important! Everyday soiling 1. Switch the power to the cooktop • When the power to the cooktop is switched off, there will be no ‘hot on glass off. (fingerprints, surface’ indication but the cooking 2. Apply a cooktop cleaner while the marks, stains left zone may still be hot! Take extreme glass is still warm (but not hot!) - Page 25 CLEANING AND MAINTANENCE Spillovers on the 1. Switch the power to the cooktop • The cooktop may beep and turn off. touch controls itself off, and the touch controls 2. Soak up the spill may not function while there is 3.
-
Page 26: Hints And Tips
HINTS AND TIPS Problem Possible causes What to do The induction hob No power. Make sure the induction hob is cannot be turned on. connected to the power supply and that it is switched on. Check whether there is a power outage in your home or area. - Page 27 HINTS AND TIPS The induction hob This is caused by the technology This is normal, but the noise should makes a low humming quieten down or disappear completely of induction cooking. noise when used on when you decrease the heat setting. a high heat setting.
-
Page 28: Failure And Display And Inspection
FAILURE AND DISPLAY AND INSPECTION The induction hob is equipped with a self diagnostic function. With this test the technician is able to check the function of several components without disassembling or dismounting the hob from the working surface. Troubleshooting 1) Failure code occur during customer using &... - Page 29 FAILURE AND DISPLAY AND INSPECTION 2) Specific Failure & Solution Failure Problem Solution A Solution B The LED does not No power supplied. Check to see if plug is secured tightly in outlet come on when unit is and that outlet is plugged in.
- Page 30 FAILURE AND DISPLAY AND INSPECTION Heating zones of the The power board and Check the connection. same side ( Such as the the display board first and the second connected failure; zone ) would display “u” . The display board of Replace the display communicate part is board.
-
Page 31: Disposal
DISPOSAL The symbol on the product indicates that it may not be treated as normal household waste. It should be taken to a collection point for the recycling of electrical and electronic goods. This appliance requires specialist waste disposal. For further information regarding the treatment, recover and recycling of this product please contact your local council, your household waste disposal service, or the shop where you purchased it. -
Page 32: Warranty Conditions
WARRANTY...
Need help?
Do you have a question about the OCI64PP and is the answer not in the manual?
Questions and answers