Advertisement
Quick Links
Advertisement

Related Manuals for Omega OCI64Z


Summary of Contents for Omega OCI64Z
- Page 1 Instruction Manual for Cooktop OCI64Z...
- Page 2 What's more, they're made to fit perfectly into your home life and your wallet. You are welcoming an Omega appliance into your place and you can be sure it'll always serve you well.
-
Page 3: Table Of Contents
TABLE OF CONTENTS PAGE NO. SECTION Important Safety Instructions..………… 1-2 Cooktop Details .........2 Installation ..........3-4 Operating Instructions ......5-10 Cleaning …………………………………..11 Electrical Connections ......12 Trouble Shooting and Error Codes..13-14 Warranty …………………………………..15... -
Page 4: Important Safety Instructions
IMPORTANT SAFETY INSTRUCTIONS IMPORTANT: Read the assembly instruction section and safety precautions of this booklet carefully before removing the contents of this carton. 1. This Cooktop is not intended for use by persons (including children) with reduced physical, sensory or mental capabilities, or lack of experience or knowledge, unless they have been given supervision or instruction concerning the use of the Cooktop by a person responsible for their safety. -
Page 5: Cooktop Details
Cooktop from exceeding the rated total power. COOKTOP – Directly wired to mains supply. SIZES: Relevant Sizes: LENGTH (mm) WIDTH (mm) HEIGHT (mm) Cooktop Size (OCI64Z) Cut-out Size (OCI64Z) -
Page 6: Installation
INSTALLATION The adjacent furniture must be able to withstand a minimum temperature rise of 100°C above the ambient temperature of the room it is located in, during periods of use. The power supply to the Cooktop must be cut off before any adjustments or maintenance work is done on it. - Page 7 INSTALLATION OF BUILT IN COOKTOP In order to prevent leakage of any liquids on the work bench and fix the Cooktop to the bench, a special sealing tape is supplied together with your oven. Place the cooktop glass down on a clean cloth on a stable flat surface & apply this seal around the bottom edge of the cooktop (see below).
-
Page 8: Operating Instructions
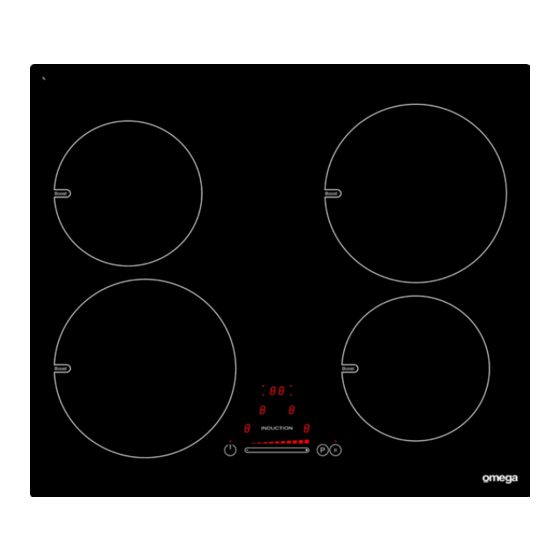
OPERATING INSTRUCTIONS The basic layout of the induction cooktop is shown in the diagrams below. DESCRIPTION DESCRIPTION On/off Power touch control Cooking Zone Select touch control & Power LED display (LHR) Stop N Go/Recall Function touch control Cooking Zone Select touch control & Power LED display (LHF) Keep Warm Function touch control Cooking Zone Select touch control &... - Page 9 Turning On and Turning Off the Cooktop NOTE: Do not operate the Cooktop without first placing a suitably sized cookware on the appropriate cooking zone. If the correct sized cookware is not placed on the cooking zone, the Cooking Zone Select touch control & Power LED display will indicate pan not detected. Settings can be changed, but the zone will not work until the pot is replaced.
- Page 10 Activating The Key Lock The key lock is used to set the Cooktop up so that it cannot be operated without disabling the lock. This is a useful feature when cleaning down the glass, or to stop children playing with the controls. 1.
- Page 11 Timer Function The timer function differs from the Minute Minder function in that it will turn off a cooking zone at the end of the time. It can be set for one or more cooking zones (each working independently). The Cooking Zone Select touch control & Power LED display always shows the shortest timer when in operation.
- Page 12 Keep Warm Function The Keep Warm Function can be used to keep food warm for long periods of time (up to 2 hours). The cookware can be removed from the element for up to 10 minutes without disabling the function. 1.
- Page 13 EXAMPLES OF COOKING ZONE POWER SETTINGS (The values below are indicative) 1 to 2 Melting Sauces, butter, chocolate, gelatine. Dishes prepared beforehand. Reheating Rice, pudding, sugar syrup. 2 to 3 Simmering Dried vegetables, fish, frozen products. Defrosting 3 to 4 Steam Vegetables, fish, meat.
-
Page 14: Cleaning
CLEANING NOTE: Cleaning and maintenance operations must only be carried out when the cooktop is cool (all residual heat indicators are off). The Cooktop should be disconnected from the power outlet or turned off at your isolation switch before commencing any cleaning process. Do not use plastic, plastic coated or aluminium cooking equipment on this Cooktop. -
Page 15: Electrical Connections
ELECTRICAL CONNECTIONS LOCAL AUTHORITY REQUIREMENTS Installation is only permitted by a licensed electrician, and carried out according to instructions provided by the manufacturer. Incorrect installation might cause harm and damage, for which the manufacturer accepts no responsibility. ELECTRICAL INSTALLATION Before carrying out the connection to the power supply, the voltage rating of the Cooktop (stamped on the Cooktop identification plate) must be checked for correspondence to the available mains supply voltage, and the mains electric wiring should be capable of handling the oven’s power rating (also indicated on the identification plate). -
Page 16: Troubleshooting And Error Codes
The control panel LED displays show “EC” or “E4”: • There is a problem with the internal software – reset software (see next page). If the problem persists, please contact Omega using the contact details at the end of the manual. - Page 17 Once all the Cooking Zone Select touch control & Power LED displays are showing “-“, the process is finished. f) The Cooktop should now turn off and on again correctly. If the error codes persist, please contact the Omega Service Department.
- Page 20 Head office: 104 Vanessa Street, Kingsgrove NSW 2208. Address: 231 Bush road, Albany, North Shore City, Phone: (02) 9415 5000. Auckland, New Zealand 0632. Customer care: 1300 739 033. Phone: (09) 415 6000. customercare@shriro.com.au...
Need help?
Do you have a question about the OCI64Z and is the answer not in the manual?
Questions and answers