
Summary of Contents for Intec ColorCut BC480
- Page 1 BC480 Business Card Cutting User Manual 250 CARDS SENSOR FEEDER 180-350gsm PRE-SET D U A L M O D E S 9 6 S E C S M E D I A R A N G E A U T O S H E E T S SIZES &...
- Page 2 Version 1 - January 2019 - TW Version 3 - September 2020 - TW Page 1...
-
Page 3: Table Of Contents
Contents 3. Card length compensation ............35 Chapter One 4. Groove width compensation ............35 2-5-4 System settings ..............36 Important Safety Instructions ......... 4 1. System speed ................37 1 Safety Precautions ................ 4 2. System accuracy compensation ..........37 1-1 Security matters ................. -
Page 4: Chapter One
Chapter One 2-1-2 Locking lid - stationary lid 1. Top cover 2. Locked-cover-switch Important Safety Instructions 3. Operate side cover (left cover) 4. Right side cover Before installing and using the BC480 please read the following safety insructions. This will help 5. -
Page 5: Chapter Two
Chapter Two 1-3 Accessories Machine specifications and contents The below accessories are included in the box with the BC480 card cutter. Please check that you have received all items listed. If anything is missing please inform your supplier immediately. This chapter covers details about the BC480 card cutter and the standard items delivered with it. No. -
Page 6: Description Of Machine Parts
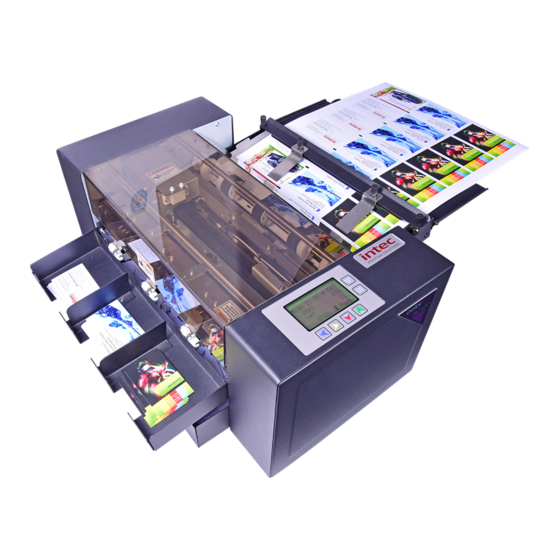
1-4 Description of machine parts 1. Rear side cover 2. Front side cover 3. Operating panel 4. Safety cover 5. Paper feed tray 6. Double paper feed ring 7. Start button 8. Power cord 9. Paper thickness adjustable indicator 10. Waste paper collection tray 11. -
Page 7: Chapter Three
Chapter Three Set up - Operating, maintenance and troubleshooting This chapter details operating methods and any required maintenance of the BC480. 1. Set up 1-1 Setting up methods and procedures Attention The BC480 is 15kgs in weight. This can be lifted from its box by one person however, it is advised that it should be lifted from its box by 2 people. -
Page 8: Paper Feed Tray
1-4 Card Collection Tray Once in place and on a stable surface check contents. Install the card collection tray onto the holders for this: After the card collection tray has been secured in place, add the card dividers - these are magnetic and adjustable. -
Page 9: Operation
2-2 Operation panel description • Close to heating and cooling sources • Vibration of work surface LCD display description Attention Initial understanding of the LCD panel is important. Please take a little time to navigate yourself • Don’t put any other electrical plug, other than what has been provided, into electrical outlet through the buttons and display before completing any work. • Prone to static - you should use static shield and humidifier • Don’t put the machine on a table that is smaller than its footprint 2. Operation 2-1 Cutting workflow This flowchart shows you the process for machine usage. -
Page 10: Card Option
the sub menus associated with the main menus (card option, System option, Manual operate, DO NOT make any changes here yet - this will be explained later in the chapter. MODE Language). To come out of the sub menus and back to this main window press the button When in this menu these are the options available: MODE... -
Page 11: Datum Selection
The ‘MARK’ on the templates provided are designed to work with the set ups as described in the manual and those available for download from the Intec website. If you are creating your own templates be sure to note where the ‘MARK’ falls in relation to the sensor arrow marks for your chosen cutting cassette on the feed table and in relation to how you have the paper feed guides set. -
Page 12: Cutting Modes
Mode 1: 89x50mm; select 89mm cassette - 3 columns and 7 rows - total 21 cards Cutting templates for A3+, SRA3, A3 and CUSTOM sheet sizes can be found on the Intec website Mode 2: 89x54mm; select 89mm cassette - 3 columns and 7 rows - total 21 cards in our support and downloads section: https://intecprinters.com/support-downloads/drivers-... - Page 13 • A3+ MODE 0 • A3+ MODE 2 • A3+ MODE 3 • A3+ MODE 1 Page 22 Page 23...
- Page 14 • A3+ MODE 4 • A3+ MODE 6 • SRA3 MODE 0 • A3+ MODE 5 • SRA3 MODE 1 Page 24 Page 25...
- Page 15 • SRA3 MODE 2 • SRA3 MODE 4 • SRA3 MODE 3 Page 26 Page 27...
- Page 16 • A3 MODE 1 • SRA3 MODE 5 • A3 MODE 0 • A3 MODE 2 Page 28 Page 29...
- Page 17 • A3 MODE 3 • A3 MODE 5 • A3 MODE 4 Page 30 Page 31...
-
Page 18: Selecting The Cutting Mode
2-4-4 Selecting the cutting mode This option enables you to access the correct card cutting templates for the sheet / paper size you are cutting and the number of cards to be cut as detailed in section 2-4-2. MODE To change the preset card cutting options press the MODE/SET button this will scroll you through the cutting options available for the selected paper/ sheet size you have chosen. - Page 19 Press button to move the arrow selection cursor to the CARD OPTION menu and MODE press the button to enter the sub menus as listed. To adjust this value press button, until the LCD displays your required measurement. MODE To navigate through the sub menus for card option press the button.
-
Page 20: System Settings
2-5-4 System settings START change, press the STOP and this will add a small arrow above the measurement values as shown Under normal circumstances the BC480 will have been set up prior to shipping and you will not have below. Keep pressing until the arrow falls above the measurement you want to change and use the to make any changes under the system settings. -
Page 21: Five Column Blade Width
5. First cutting compensation This is where the first cut is placed on your card. When Edge Datum selection is chosen our templates will have this set to 10mm as a default. LCD display: Press buttons for compensation setting -3.0 to +3.0mm. If you are using different templates please set this to the measurement of where you would like your 3. -
Page 22: Last Card Compensation
Press button for Compensation setting -1.0 — +1.0mm MODE Press button and return to previous menu. 10. Third from last compensation Continue to press button, until the LCD display: Press button for Compensation setting -3.0 — +3.0mm MODE Press button and return to previous menu 8. Last card compensation Should you need to adjust the cut position of the last card cutting use this option. Continue to press button, until the LCD displays: Press... -
Page 23: Firmware Version
• Groove width - this is the space between each card edge • First cutting compensation • Mark position compensation • Card length compensation • Groove width compensation When setting compensation values the display will show an option of 0.00. The first 0. is a whole mm value i.e. -
Page 24: Card Width
Press button to change the value from 1 to 99. MODE Press button to return to the previous menu and press again for 3 seconds to come out of the CARD OPTION menu and back to standby mode. The new measurement will show on the LCD panel. -
Page 25: Mark Position Length
6. Mark position length The ‘MARK’ position length is the length of your printed ‘MARK’. If you are using different templates please set this to the measurement of where you would like your first cut to be. Measure from the edge of the sheet to the top of the first card. Press button to change the measurement. -
Page 26: Groove Width Compensation
b. Do not put too much paper in the paper feed table - maximum of 3mm depth c. The front of the paper is curled up, causing poor feed - please correct and replace d. Please only feed the same type of paper at any one time. Mixed paper thickness and types can cause a miss feed. -
Page 27: Installing The Longitudinal Cutter (Cutting Cassette)
3. Troubleshooting The BC480 will provide you with an audible beep if there is an error with cutting, a paper jam or if one of the safety switches has been interrupted. The LCD screen will also provide an indication of the error and the machine will stop working and continue to beep until the error or jam has been cleared. -
Page 28: Crosscutting Knife Cutting Failure
If this does not resolve your issue it is possible that paper is caught in the cutter cassette. Please The LCD display will show this message: follow this procedure to remove the paper: • Turn off power • Remove the top cover • Remove cutter cassette - refer to Section 2-7 • Replace the top cover • Turn on the power, press start button... -
Page 29: Poor Feed
Support contact information Press button , feeding or ejecting paper to troubleshoot the problem. Intec Printing Solutions Limited Unit 11 Dawkins Road Industrial Estate MODE Hamworthy Press the button to exit and return to standby. Poole Dorset Solution : Check that you are using the correct paper size as selected on the LCD display.