
Subscribe to Our Youtube Channel
Related Manuals for Malloca MST-35CP


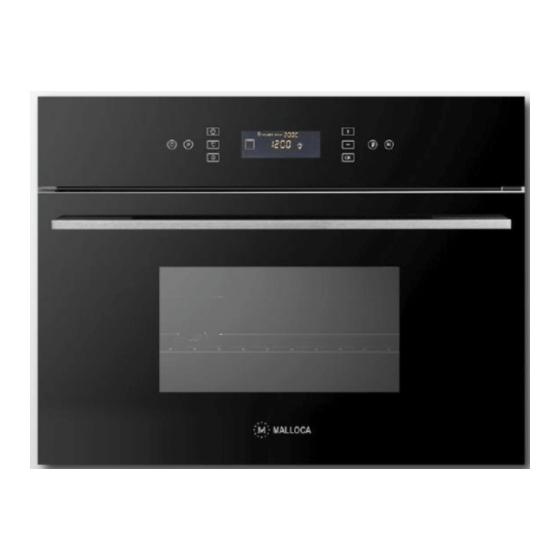
Summary of Contents for Malloca MST-35CP
- Page 1 INSTRUCTION MANUAL HƯỚNG DẪN SỬ DỤNG BUILT-IN STEAM OVEN LÒ HẤP ÂM TỦ MODEL: MST-35CP...
- Page 2 Please read these instructions carefully before attempting to install or use this appliance. It is advisable to keep these instructions in a safe place for future reference. Introduction Thank you for choosing this appliance. It has been designed to give years of trouble-free use provided it is installed and maintained correctly.
-
Page 3: Table Of Contents
Content Content……………………………………………………………………………………………………1 General warnings …………………………………………………………………………………..…...2 Replacing oven lamp…………………………………………………………………………….………3 Fitting Oven Shelves ………………………………………………………………......……4 Environmental effect report ………………………………………………………………………….…5 Safety precautions………………………………………………………………..…………….……..…5 Accessories…………………………………………………………………………………………….…6 Product overview ……………………………………………………………………………………..…7 Product Dimension ……………………………………………………………………………….…..…7 10. Product specification ………………………………………………………………………………..…..8 11. Installation precaution………………………………………………………………………………..….8 12. Fitting the appliance ……………………………………………………………………………..….9 13. Important notes ………………………………………………………………………….………...9 14. -
Page 4: General Warnings
General warnings 1. This appliance shall not be used by children aged from 8 years and above and persons with reduced physical, sensory or mental capabilities, or lack of experience and knowledge, unless they have been given supervision or instruction on how to use the appliance in a safe way and understand the hazards involved. -
Page 5: Replacing Oven Lamp
Replacing of oven lamp • Disconnect with power supply • Unscrew the glass cover attached to the lamp holder • Unscrew the lamp and replace it with another high-temperature lamp (300°C) with the following characteristics: Voltage: AC220V-240V Wattage: 15W Socket: E14 •... -
Page 6: Fitting Oven Shelves
Fitting Oven Shelves The deep pan and wired shelf have a side edge, there edges can match with the sliding rack on the sides of the cavity. It can prevent the rack or tray from slipping out from the oven. Deep pan and wired shelf in the position 1-4 marked... -
Page 7: Environmental Effect Report
Environmental effect report Please protect the environment, avoid pollution. Please dispose the product as below: Packing box, plastic material and other recyclable material should be disposed to recycle center. Battery or other dangerous material may lead to pollution and need to be disposed in environmental friendly and healthy way. Safety precautions 1. -
Page 8: Accessories
Accessories Main Unit 1 unit Steam tray 1 piece Grill rack 1 piece Water absorbing accessory 1 piece Cleaning foam 1 piece Detergents 2 packs Instruction manual 1 piece... -
Page 9: Product Overview
Product overview 1. Control panel 2. Sliding rack 3. Grill rack 4. Steam tray 5. Oil collecting plate 6. Door hinge 7. Water collection tray 8. Oven door 9. Water tank Product Dimension... -
Page 10: Product Specification
Product Specification Model BSS455X Voltage 220V-240V~50HZ Rated power 2060W Product dimension (W X H X D) 595 X 455 X 435 mm Aperture dimension (W X H X D) 564 X 450 X 550 mm Packing dimension (W X H X D) 660 X 572 X 558 mm Installation precaution 1. -
Page 11: Fitting The Appliance
Fitting the appliance 1. For the most efficient air circulation, the oven should be fitted according to the dimension as below: Aperture dimension (W X H X D) 560 X 450 X 550 mm 2. After fitting the steam oven in the cabinet, it must be fixed with screw. Important notes 1. -
Page 12: Control Panel
Control panel 1 ON/OFF 2 Descaling 3 Oven lamp 4 Temperature 5 Timer 6 Display 7 “+”increase 8 “-”decrease 9 OK 10 Children Lock 11 Start/stop... -
Page 13: Quick Start
Quick start 1. Activate the steam function Step 1 :Press “ON/OFF” button, the control panel will lights up, the oven is in standby mode Step 2 :Press the Timer key twice to enter the cooking time, cooking time will blink at the left bottom of the panel. Step 3:Press “+”... -
Page 14: How To Use
Step 4:Lastly, press “Start/stop” to start cooking How to use 1. Date/Cooking time/finish time setting. The sequence of cooking tie modes will be displayed in the screen as below: 2.1 Clock: Press “ Timer” for 2 seconds, then press “+” or “-“ key to adjust the time, press OK to confirm 2.2 Cooking time: Press “Timer”... - Page 15 When “ “ sign appear, take out the water tank again, pour in water until it is half full, put it back. Close the door and press “ “ again to start the second part of cleaning. Do the same as the above for third time cleaning. When it finish, the descaling is completed.
-
Page 16: Selection Of Food Container
Select the right food container: Please select the correct container for different kind of food. All the tray and rack included in the oven are heat resistant. Below you can find our suggestion: 1. For food such as sweet potatoes, corn, tomato and egg, please place on the steam tray, do not put it directly on the metal rack. -
Page 17: Daily Maintenance
Daily maintenance Note: It has been designed to give years of trouble-free use provided it is installed and maintained correctly. Please disconnect with power supply before maintenance. 1. Do not pull the cable to disconnect power. 2. When cleaning the cavity, please remove everything in the cavity include the shelves and use clean cloth to clean it. -
Page 18: Troubleshooting
Troubleshooting If you found the unit operating abnormally, please stop using it. Unplug the power and follow the following instruction. Please contact our service center for checking. Status Possible reasons Solution Lack of water “ “ sign No water in water tank Fill water into the tank Bad pumps Replacement of pump, please... - Page 19 Vui lòng đọc kỹ hướng dẫn này trước khi cài đặt hoặc sử dụng thiết bị này. Bạn nên giữ hướng dẫn này ở nơi an toàn để tham khảo trong tương lai. Giới thiệu Cám ơn bạn đã chọn thiết bị này. Thiết bị...
-
Page 20: Mục Lục
Mục lục Mục lục………………………………………………………………………………………………..……18 Cảnh báo chung …………………………………………………………………………………....19 Thay thế đèn lò…………………………………………………………………………….…....…... 20 Lắp đặt phụ kiện........…………………………………………………………………… 21 Báo cáo hiệu quả môi trường…………………………………………………..……………………….… 22 Cảnh báo an toàn …………………………………………………………………………………..……..… 22 Phụ kiện…………………………………………………………………………………………....….… 23 Tổng quan sản phẩm ……………………………………………………………………………………...… 24 Kích thước sản phẩm……………………………………………………………………………….…..…... -
Page 21: Cảnh Báo Chung
Cảnh báo chung 1. Thiết bị này không được sử dụng bởi trẻ em dưới 8 tuổi và những người bị giảm khả năng về thể chất, tinh thần, cảm giác hoặc thiếu kinh nghiệm và kiến thức, nếu không họ phải được giám sát hoặc được hướng dẫn sử dụng thiết bị... -
Page 22: Thay Thế Đèn Lò
Thay thế đèn lò • Ngắt kết nối nguồn điện • Tháo nắp kính gắn vào giá đỡ đèn. • Tháo đèn và thay thế bằng một đèn mới (300° C) có các đặc điểm như sau: Điện áp: AC220V-240V Công suất: 15W Nguồn điện: E14 •... -
Page 23: Lắp Đặt Phụ Kiện
Lắp đặt phụ kiện Khay và các thanh trượt giữ khay cho phép điều chỉnh thấp cao và ngăn không cho thức ăn bị rơi rớt. Khay và các thanh trượt giữ khay được đặt ở các vị trí 1-4. -
Page 24: Báo Cáo Hiệu Quả Môi Trường
Báo cáo hiệu quả môi trường Hãy bảo vệ môi trường, tránh bị ô nhiễm. Vui lòng vứt bỏ các sản phẩm như sau: Vật liệu thùng, bao gói và các vật liệu tái chế khác nên được xử lý tại các trung tâm. -
Page 25: Phụ Kiện
Phụ kiện Thiết bị 1 cái Khay hấp 1 cái Khay nướng 1 cái Khay hứng nước 1 cái Làm sạch bọt 1 cái Chất tẩy rửa 2 gói Hướng dẫn sử dụng 1 cuốn... -
Page 26: Tổng Quan Sản Phẩm
Tổng quan sản phẩm 1. Bảng điều khiển 2. Khay trượt 3. Khay nướng 4. Khay hấp 5. Khay hứng dầu 6. Bản lề cửa 7. Khay hứng nước 8. Cửa lò 9. Bình chứa nước Kích thước sản phẩm... -
Page 27: Đặc Điểm Sản Phẩm
Đặc điểm sản phẩm Mã số MST-35CP Điện áp 220V-240V~50HZ Công suất 2060W Kích thước sản phẩm (W X H X D) 595 X 455 X 435 mm Kích thước âm tủ (W X H X D) 564 X 450 X 550 mm Kích thước bao gói (W X H X D)... -
Page 28: Lắp Đặt Thiết Bị
Lắp đặt thiết bị 1. Để lưu thông không khí một cách tốt nhất, lò phải được lắp theo kích thước như sau: Kích thước âm tủ (W X H X D) 560 X 450 X 550 mm 2. Sau khi lắp lò hấp trong tủ, nó phải được cố định bằng vít. Ghi chú... -
Page 29: Bảng Điều Khiển
Bảng điều khiển 2 Tẩy cặn 3 Đèn lò 1 ON/OFF 4 Nhiệt độ 5 Hẹn giờ 6 Màn hình 7 “+” tăng 8 “-” giảm 9 OK 10 Khóa phím 11 Bắt đầu/Dừng... -
Page 30: Khởi Động Nhanh
Khởi động nhanh 1. Kích hoạt chức năng hấp Bước 1: Nhấn phím “ON/OFF”, bảng điều khiển sáng đèn, lò ở chế độ chờ. Bước 2: Nhấn phím hẹn giờ một lần để vào thời gian hấp, thời gian hấp sẽ nhấp nháy bên trái của bảng điều khiển. -
Page 31: Cách Sử Dụng
Bước 4: Cuối cùng, nhấn "Bắt đầu/Dừng" để bắt đầu hấp. Cách sử dụng 1. Cài đặt thời gian địa phương/Thời gian hấp/Thời gian kết thúc. Trình tự của thời gian hấp sẽ được hiển thị trong màn hình như sau: 2.1 Thời gian địa phương: Nhấn "Hẹn giờ"... - Page 32 Khi ký hiệu " " xuất hiện, lấy bình nước ra một lần nữa, đổ nước cho đến khi đầy một nửa, đặt nó trở lại. Đóng cửa và nhấn " " lần nữa để bắt đầu phần thứ hai của chu trình vệ sinh. Thực hiện các bước tương tự...
-
Page 33: Lựa Chọn Vật Chứa Thức Ăn
Lựa chọn vật chứa thức ăn Vui lòng chọn đúng vật chứa cho các loại thực phẩm khác nhau. Tất cả các khay và giá đỡ trong lò đều có khả năng chịu nhiệt. Dưới đây bạn có thể tìm thấy gợi ý của chúng tôi: 1. -
Page 34: Bảo Trì Hằng Ngày
Bảo trì hằng ngày Ghi chú: Nó đã được thiết kế để sử dụng được trong vòng nhiều năm. Vui lòng ngắt kết nối nguồn điện trước khi bảo trì. 1. Không kéo dây cáp để ngắt kết nối nguồn. 2. -
Page 35: Xử Lý Sự Cố
Xử lý sự cố Nếu bạn thấy thiết bị hoạt động bất thường, hãy ngưng sử dụng. Rút phích cắm và làm theo hướng dẫn sau. Vui lòng liên hệ trung tâm dịch vụ của chúng tôi để kiểm tra. Trạng thái Nguyên nhân Giải pháp... - Page 36 Customer Care: Hotline: 1800 12 12 Email: chamsockh@malloca.com CÔNG TY TNHH MALLOCA VIỆT NAM Showroom: 279 Đường Nguyễn Văn Trỗi, Phường 10, Quận Phú Nhuận, TP.HCM Điện Thoại: (84) 28 39975 893 / 94 Fax: (84) 28 38447 102 - (84) 28 38633 882 Email: info@malloca.com...
Need help?
Do you have a question about the MST-35CP and is the answer not in the manual?
Questions and answers