ATEN VS481A User Manual
Hide thumbs
Also See for VS481A:
- User manual (20 pages) ,
- User manual (18 pages) ,
- Quick start manual (2 pages)
Table of Contents
Advertisement
Quick Links
Advertisement
Table of Contents

Subscribe to Our Youtube Channel
Related Manuals for ATEN VS481A


Summary of Contents for ATEN VS481A
- Page 1 HDMI Switch USER MANUAL VS481A...
-
Page 2: Fcc Information
FCC Information FEDERAL COMMUNICATIONS COMMISSION INTERFERENCE STATEMENT: This equipment has been tested and found to comply with the limits for a Class A digital device, pursuant to Part 15 of the FCC Rules. These limits are designed to provide reasonable protection against harmful interference when the equipment is operated in a commercial environment. - Page 3 VS481A User Manual Online Registration International http://support.aten.com Telephone Support International 886-2-8692-6959 China 86-400-810-0-810 Japan 81-3-5615-5811 Korea 82-2-467-6789 North America 1-888-999-ATEN ext 4988 1-949-428-1111 Technical Support For international online technical support – including troubleshooting, documentation, and software updates: http://support.aten.com ...
- Page 4 Copyright © 2008 – 2020 ATEN International Co., Ltd. Manual Part No. PAPE-1286-AT3G Printing Date: 2020-06-19 ATEN and the ATEN logo are trademarks of ATEN International Co., Ltd. All rights reserved. All other trademarks are the property of their respective owners. - 4 -...
- Page 5 HDMI A/V sources that are connected to your HDMI display. With four HDMI A/V input ports, the VS481A HDMI Switch allows you to connect four HDMI devices (such as an HD camcorder or satellite box, HD-DVD player, hi-def Blu-ray player, home theater PC, stand-alone streaming media player, or gaming console) to your HDMI monitor, display, projector or TV at the same time.
- Page 6 LED indication of A/V source devices Power On Detection – if one of the HDMI source devices is powered off, the VS481A will automatically switch to the next powered on device Easy and affordable way to add four HDMI inputs to your...
-
Page 7: System Requirements
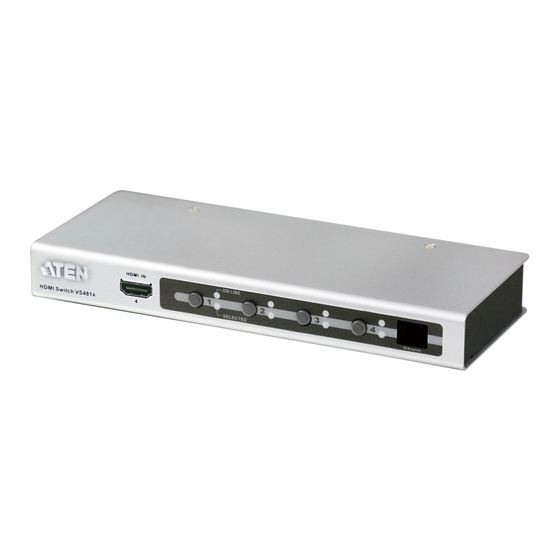
Contact your dealer to purchase the correct cable sets. 2. If you wish to utilize the VS481A’s high-end serial controller function, you will also need to purchase an appropriate RS-232 cable. See Installing the RS-232 Controller, page 11. - Page 8 Components VS481A Front View Component Function HDMI In Plug the cable from an HDMI source device into this port (number 4). Port Selection Pressing a port selection pushbutton Pushbuttons routes the A/V source from the corresponding input port to the output port for display.
- Page 9 VS481A Rear View HDMI OUT HDMI IN HDMI IN HDMI IN Component Function Power Jack The power adapter cable plugs in here. HDMI Out The cable from the HDMI display device plugs in here. HDMI In The cables from the HDMI source devices can plug into any of three available ports.
-
Page 10: Ir Remote Control
IR Remote Control Component Function Port Up / Port Press the Port Up button to cycle forward Down Buttons through the source devices (1 to 2; 2 to 3; 3 to 4; 4 to 1). Press the Port Down button to cycle backward through the source devices (4 to 3;... -
Page 11: Installation
The end connecting to the VS481A should have a 9-pin male connector. Connect this to the serial interface on the rear of the VS481A. Refer to number 4 on the diagram on page 12. Note: To configure the controller serial port, see page 14. -
Page 12: Installation Diagram
Installation Diagram Hardware / Software HDMI Output Device Controller HDMI OUT HDMI IN HDMI IN HDMI IN HDMI A/V Source Devices - 12 -... -
Page 13: Manual Selection
Source Device Selection The VS481A HDMI Switch offers easy and flexible source device selection with either the front panel pushbuttons, with the remote control, or through the RS-232 serial interface. Note: Whenever the VS481A is powered on, it automatically selects Port 1 if there is no video input source connected. -
Page 14: Power On Detection
Note: The switch does not use the next active port if the current port is not the active port and two active ports are turned RS-232 Serial Interface The VS481A’s built-in bi-directional RS-232 serial interface allows system control through a high-end controller, PC, and/or home automation / home theater software package. - Page 15 For example, to switch to the next port, input the following: sw + [Enter] The following tables show the possible values and formats for the Input / Output port, Port Number and the Port Sequence: Command Description Switch command I/O Port Description Input Port Output Port...
-
Page 16: Power On Detection Commands
Power On Detection Commands The Power On Detection feature is turned on by default. The formula for Power On Detection commands is as follows: Power On Detection + Control command [Enter] For example, to turn off the Power On Detection feature, input the following: pod off [Enter] The following tables show the possible values for the Control... -
Page 17: Powering Off And Restarting
Powering Off and Restarting If you power off the VS481A, follows these steps before powering it on again: 1. Power off the attached devices. 2. Unplug the power adapter cable from the VS481A. 3. Wait 10 seconds, and then plug the power adapter cable back 4. -
Page 18: Specifications
Specifications Function VS481A Display Connections Connectors Device HDMI In 4 x HDMI Type A Female (Black) Display HDMI Out 1 x HDMI Type A Female (Black) RS-232 Port 1 x DB-9 Female (Black) Power 1 x DC Jack LEDs On Line... -
Page 19: Limited Warranty
What is covered by the Limited Hardware Warranty ATEN will provide a repair service, without charge, during the Warranty Period. If a product is detective, ATEN will, at its discretion, have the option to (1) repair said product with new or... - Page 20 MEMO - 20 -...
Need help?
Do you have a question about the VS481A and is the answer not in the manual?
Questions and answers