ILUMEN PIDBOX LIGHT Installation Manual
Hide thumbs
Also See for PIDBOX LIGHT:
- Installation manual (17 pages) ,
- User & installation manual (18 pages)

Related Manuals for ILUMEN PIDBOX LIGHT


Summary of Contents for ILUMEN PIDBOX LIGHT
- Page 1 ILUMEN PID SOLUTION ILUMEN PIDBOX LIGHT INSTALLATION MANUAL INDOOR OUTDOOR Ilumen PIDbox Light– Version 1.1...
-
Page 2: Table Of Contents
Scope of delivery ............................... 5 Product description ..............................5 Mounting ..................................6 Mounting location requirements ......................6 Mounting the Ilumen PIDbox Light using the wall brackets ............6 Electrical connections ............................. 8 Earth connection ............................. 8 Solar array and inverter (MPPT) connections ..................8 Connecting the solar modules ........................ - Page 3 Ilumen 10.1 Faults................................. 18 10.2 No good PID regeneration ........................18 10.3 Resetting the PIDbox Light ........................18 10.4 Repairing the PIDbox Light........................18 Contact .................................. 19 Technical data ..............................20 Installation Manual Ilumen PIDbox Light v1.2...
-
Page 4: Information On This Manual
2.1 A PPROPRIATE USAGE The Ilumen PIDbox Light applies a voltage to PV modules in reference to earth. The device may only be switched on when the installation is done as described in this manual. Before installing the Ilumen PIDbox Light, ensure that the permitted operating range of each component is maintained at all times. -
Page 5: Qualifications Of Skilled Persons
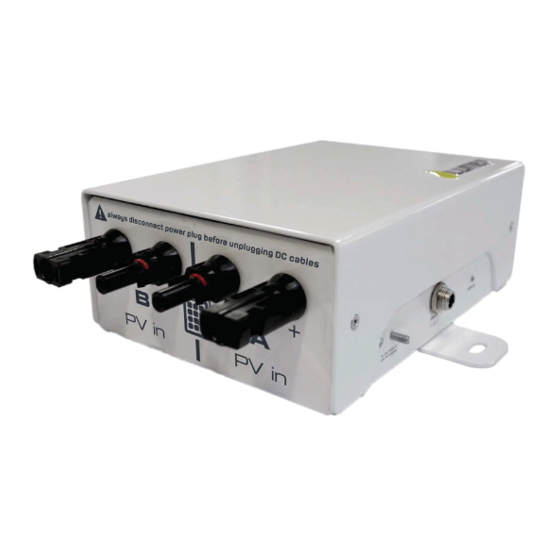
PIDbox. You can use one Ilumen PIDbox Light per 2 MPP trackers. From each tracker, 2 wires will need to be connected to the PIDbox Light. In section 6 of this manual a detailed description will be given to properly connect the PIDbox Light. -
Page 6: Mounting
✓ Normally the PIDbox Light is installed right below the inverter. ✓ The ideal placement of the PIDbox Light is on a flat surface. Special rubber feet can be placed under the PIDbox Light to prevent scratching of any surface. Usage of the wall brackets of the Ilumen PIDbox Light is needed when no flat surface is available. - Page 7 Ilumen 2. Drill the holes 3. Insert the wall plugs (if necessary) 4. Screw the Ilumen PIDbox Light to the mounting surface and make sure adequate washers are installed. Make sure the DC power plug is pointing to the ground 5.
-
Page 8: Electrical Connections
Ilumen LECTRICAL CONNECTIONS When installing the Ilumen PIDbox Light, the AC side of the PV plant must be switched off. Also the DC switch of the inverter must be switched off. After the installation is done, you can switch the DC switch back on followed by the AC side of the PV plant. - Page 9 If you work with inverters with multiple MPPT’s you cannot mix the PV arrays from multiple MPPT’s. The maximum amount of PV-power that can be attached to 1 PIDbox Light is 100kWp. This is the total of panels attached to input A and B. Make sure this is not exceeded to insure a good result.
-
Page 10: Connecting The Solar Modules
6.3.1 U SING SPLITTER CABLES With the use of a splitter (1 to 2) you can simply hook up your PIDbox Light. Simply detach a string from the 1 MPPT. Insert the splitter (the end with 1 connector) into the input from the 1 MPPT of the inverter. - Page 11 Ilumen If you have an inverter with only 1 MPPT, you can use following hook up scheme. This way, you will have 1 open input free for another inverter. Installation Manual Ilumen PIDbox Light v1.2...
-
Page 12: Using The Open Inputs On The Inverter
If your inverter has open inputs on the MPPT that you want to hook up, installation is quite easy. You use these open inputs to connect the PIDbox Light. Plug in the “PV in A +” side of the PIDbox Light to the positive open input of the 1 MPPT of the inverter. -
Page 13: Protection Fuses
ROTECTION FUSES It is obliged to place protection fuses in front of the PIDbox Light. There are 2 ways of doing this. The first is placing an electrical cabinet with din-rail fuse holders in it. The fuses must be rated 1000V DC and have a breaking current of 2Amps. -
Page 14: Power Supply
It is important that you only use the included DC power supply. When different power supply is used, this will void warranty. First connect its DC side to the Ilumen PIDbox Light power input. Next connect the AC side of the DC power supply to the unplugged power cord. You may connect the DC side to the Ilumen PIDbox Light during installation. -
Page 15: The Use Of A Rcd (Residual Current Device)
Do a final check whether everything is properly mounted and connected (see chapter 5 and 6 for details): ✓ The PV frames are all connected to the same earth as the earth pin of the Ilumen PIDbox Light ✓ The PV and inverter DC cables are correctly connected ✓... -
Page 16: Installation Summary
1) Take the necessary safety precautions (AC side of the PV plant off and DC switch of the inverter off). 2) Mount the Ilumen PIDbox Light on a flat surface or if not available mount it correctly to a wall using the wall bracket. -
Page 17: Decommissioning The Ilumen Pid Solution
PIDbox Light (see Section 12 "Technical Data"). 9.3 D ISPOSING OF THE IGHT Dispose of the PIDbox Light at the end of its service life in accordance with the disposal regulations for electronic waste currently applicable at the installation site. Installation Manual Ilumen PIDbox Light v1.2... -
Page 18: Troubleshooting
ESETTING THE IGHT The PIDbox Light can simply be reset by unplugging the DC-power cable. Wait 10 seconds and connect the DC-power cable back to the PIDbox Light. If resetting does not help fixing your problem, please consult chapter 10.1 of this manual. -
Page 19: Contact
Ilumen Always contact iLumen technical service if your PIDbox Light is broken. 11 C ONTACT Ilumen bvba Ambachtsstraat 19 3980 Tessenderlo Belgium Tel: +32 13 30 61 77 info@ilumen.be www.ilumen.be Installation Manual Ilumen PIDbox Light v1.2... -
Page 20: Technical Data
The inverter manufacturer’s approval is needed to place the PIDbox LIGHT The client is responsible for getting the approval This product will function with p-type solar cells. If you want to apply this product to another technology, please contact iLumen Various Warranty...
Need help?
Do you have a question about the PIDBOX LIGHT and is the answer not in the manual?
Questions and answers