Table of Contents
Advertisement
Quick Links
Waldorf 31" Basin Console Set
US-WF80X81 / US-WF0813
Waldorf 39" Basin Console Set
US-WF100X81 / US-WF1003
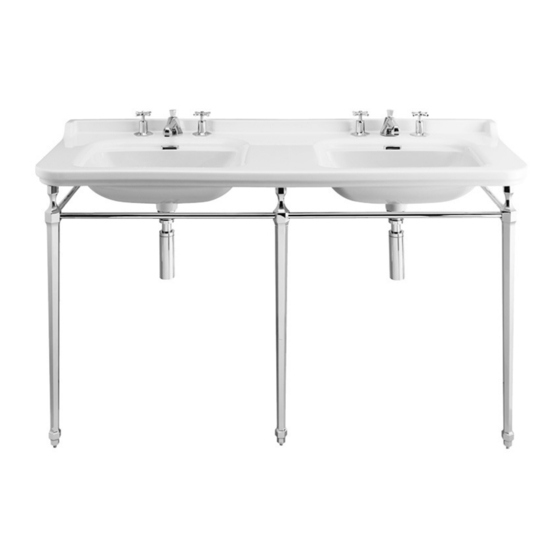
Waldorf 59" Basin Console Set
US-WF150X81 / US-WF1503
Installation Instructions
Introduction
All parts have been fully inspected throughout the production
process and only leave our factory after a 15-step QC process.
Carefully remove the items from the box and check that all parts have
been supplied. Before beginning installation, please check for any
damage that may have occurred during transport. Note: Damage
claims cannot be made during or after installation.
Installation should be completed by at least two suitably competent
installers.
Improper installation shall result in loss of warranty in case of damage.
Wall fixings are not supplied. Source fixings which are suitable to the
site wall.
IMPORTANT: Please read these instructions carefully before
beginning and retain for future reference.
We do not accept responsibility for any problems that may occur
through incorrect installation.
Installation notes
The installation must comply with all plumbing codes including local
codes and be installed by a licensed plumbing contractor.
Store the products in a safe place until you begin installation to avoid
any damage.
Assemble the parts on a mat to protect against scratching the surface.
Avoid getting cement, grit, sand or masonry products on to the
surface.
Protect and cover the products during the installation period to
prevent damage from occurring.
IMPORTANT: Turn off the main water supply before connecting
to any existing pipework or doing any maintenance.
WARNING! Please check for any hidden pipes and cables, electric
or otherwise, before drilling holes in a wall or floor.
Tools required
Tape
Safety
measure
glasses
1
/
"
Hammer
4
drill
Parts supplied - Console frame
31" frame
39" frame
59" frame
(x2) 31", 39" frame
(x3) 59" frame
(x8) 31", 39" frame
(x12) 59" frame
(x2) 31", 39" frame
(x3) 59" frame
Flat head
screwdriver
RH leg
Center leg
59" frame
LH leg
ONLY
Pencil
Spirit
level
Advertisement
Table of Contents

Related Manuals for Crosswater Waldorf 31 US-WF80X81


Summary of Contents for Crosswater Waldorf 31 US-WF80X81
- Page 1 Waldorf 31" Basin Console Set US-WF80X81 / US-WF0813 Waldorf 39" Basin Console Set US-WF100X81 / US-WF1003 Waldorf 59" Basin Console Set US-WF150X81 / US-WF1503 Installation Instructions Introduction Parts supplied - Console frame All parts have been fully inspected throughout the production process and only leave our factory after a 15-step QC process.
- Page 2 Dimensions 31” Basin 39” Basin 31-1/2" 39-3/8" 21-5/8" 21-5/8" 11” 11” 26” 33-7/8" 18-7/8" 18-7/8" 59” Basin 59" 29-1/2" 21-5/8" 11” 11” 53-1/2" 18-7/8"...
- Page 3 Installation - Console frame Please make sure you have the correct basin suitable for the basin frame. Center leg, 59” Frame ONLY. Right hand leg. Fit both front rails to the center leg, screw side rail into front Fit front rail to side of right hand leg, screw side rail into front rails through rear of center leg ensuring threaded front rail is rail through rear of right hand leg.
- Page 4 Determine the final installation position and mark the wall Using a ” drill bit drill the required holes on the marked fixing hole positions in pencil. Please make sure the frame is positions. level, if required adjust the leg pins. ”...
- Page 5 Move the basin aside. Drill 1/4” holes at the marked locations. nstall hanger bolts so they extend 1-1/2” beyond the finished wall. ” Position the basin on the frame so the hanger bolts extend Apply sealant. through the fixing holes. Secure the basin using cap nuts and washers, DO NOT OVERTIGHTEN! Underside...
- Page 6 Fit overflow cap. Installation - Basin wall 31” basin and 39” basin. Mark the horizontal center line on the wall Mark the basin fixing holes on the finished wall. 11” 33” +/-2”...
- Page 7 59” basin. Drill 1/4” holes at the marked locations. Mark the basin fixing holes on the finished wall. 11” ” 11” Install hanger bolts so they extend 1-1/2” beyond Position the basin on the hanger bolts through the the finished wall. fixing holes.
- Page 8 Prolonged contact can alter surface finishes and void the warranty. Warranty - This Crosswater London product is covered by a limited lifetime warranty. For full details, terms and conditions please visit our website. For further information contact: Crosswater London, 393 Fortune Blvd., Milford, MA 01757 www.crosswaterlondon.com...
Need help?
Do you have a question about the Waldorf 31 US-WF80X81 and is the answer not in the manual?
Questions and answers