Table of Contents
Advertisement
Advertisement
Table of Contents

Related Manuals for Lowenstein Medical prisma SOFT


Summary of Contents for Lowenstein Medical prisma SOFT
- Page 1 Patient Compass Your companion for the therapy devices prisma SOFT, prisma SMART...
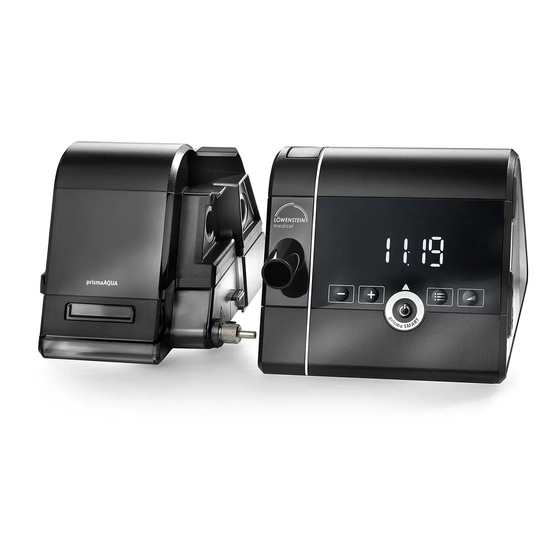
- Page 2 Filter compartment Control panel with display Handle Release catch Device outlet port Connection for power supply cable Device name On/Off key SD card slot...
- Page 3 JOURNAL, a software program that assists you in managing your therapy with prisma SOFT and prisma SMART. We wish you all the best! This document does not replace the instructions for use.
-
Page 4: Table Of Contents
Table of contents Preparing the therapy device ...............5 Mask test ................... 13 Connecting the therapy device to the power supply ....5 Info menu ..................15 Connecting the breathing tube and mask ........5 Cleaning the therapy device ............. 16 Making therapy device settings ............6 Humidifier prismaAQUA.............. -
Page 5: Preparing The Therapy Device
Preparing the therapy device The therapy device has to be connected to the electrical power supply. The breathing tube and mask have to be connected to the device. Connecting the therapy device to the power supply Connecting the breathing tube and mask a. -
Page 6: Making Therapy Device Settings
Making therapy device settings Your therapy device has to be configured before you can use it. The authorized dealer often makes the configuration settings for you. If that is not the case, you can easily do it yourself. Making device settings with SD card With the help of an SD card prepared by your dealer, making the settings is child’s play. -
Page 7: Using The Sd Card
Using the SD card (optional) If an SD card is available, the device saves the therapy data on the card. You can easily send the card with the data to your physician or authorized dealer. An SD card is not required for operation of the therapy device. With the SD card and the patient software prisma JOURNAL you can create your own therapy diary. -
Page 8: Explanation Of Keys And Symbols
Explanation of keys and symbols The device keys can have more than one function. When there is a symbol over the key (e.g., above the softSTART key) in the display, the key takes on the function of the symbol. When there is no symbol over the key (e.g., key), the key retains its original function. -
Page 9: Making Settings In The Menu
Making settings in the menu You can make the following settings in the settings menu if your doctor has activated them for you: Key functions With the device in standby mode, press the menu key. Press the menu key Call up the settings menu: Forward to next screen press Back to previous screen... -
Page 10: Softstart
softSTART The softSTART function is suitable for patients who find high pressure unpleasant while they are awake and consequently have trouble falling asleep. With softSTART the pressure slowly increases from a low starting pressure to the therapy pressure during a selected time period. You can set the time with keys in five-minute steps from five to 45 minutes or deactivate softSTART with OFF. -
Page 11: Autostart-Stop
autoSTART-STOP Your therapy device is equipped with the autoSTART-STOP function to make its operation even more convenient. When it is activated, you can switch on the device simply by breathing into the mask. After your therapy when you remove the mask from your face, the device switches off automatically after a few seconds. Please note that the use of nasal pillow masks or incompatible mask systems can restrict the autoSTART-STOP function. -
Page 12: Softpap
softPAP Setting the time The exhalation relief softPAP is intended for patients who find Here you can set the time with the keys. With the it unpleasant to exhale against high pressure. With softPAP arrow to the right you can switch from hours to minutes and to the pressure is temporarily reduced during the transition from the format for the time display (0 –... -
Page 13: Mask Test
Mask test After the start of your therapy, you can check the mask for airtightness. The therapy device has to be switched on for the test. Press the menu key Remaining time Pressure Start the mask test by confirming the checkmark on the right of the screen. - Page 14 If the mask position is not A good mask correct, the leak fit is indicated indicator is orange. by a green checkmark. End the mask test with the If the mask position is poor, try adjusting the headgear to improve the mask fit. If the adjustments do not bring lasting improvements, please contact your dealer.
-
Page 15: Info Menu
Info menu The total operating hours of your therapy device and the usage time for varied time periods between one day and the past year are displayed for you in the information menu. Press the menu key Call up the Info menu: press You can call up additional time periods with the The total operating hours are displayed on the screen. -
Page 16: Cleaning The Therapy Device
Cleaning the therapy device Weekly Monthly a. Disconnect the therapy device from electric power. Cleaning the air filter (gray filter): b. If applicable, remove the humidifier. a. Remove the air filter. c. Wipe the device housing with a damp cloth. b. - Page 17 Monthly Daily Replace optional pollen filter (white filter): Clean the breathing tube: a. Remove the air filter. a. Remove the breathing tube from the therapy device. b. Remove and dispose of pollen filter. b. Clean the tube with warm water and dishwashing c.
-
Page 18: Humidifier Prismaaqua
prismaAQUA humidifier The prismaAQUA humidifier is available as an accessory. It is used with the therapy device by patients who have dry upper airways or who find the respiratory air uncomfortably cool. prismaAQUA may be used only when recommended by a doctor. Preparation prior to first use Remove the protective transport paper and clean the humidifier as described in ”Cleaning the humidifier“... -
Page 19: Alternative Filling
Alternative filling In the following we show you an alternative way to refill the humidifier quickly. a. Press the release catch on the therapy device. c. Tilt the humidifier carefully to the left and place it on its side. b. Remove the humidifier from the side of the device. d. -
Page 20: Connecting To Therapy Device
Connecting to therapy device a. Press the release catch on the therapy device. Then remove the cover from the device. b. Push the humidifier onto the therapy device from the side until you hear the release catch click into place. Make sure that both devices are on a solid surface, e.g., a table. -
Page 21: Making Settings For Humidifier
Making settings for humidifier When the humidifier is connected to the therapy device and is filled with water, the humidifier symbol appears in the display. As soon as you start your therapy, the humidifier automatically switches on and the symbol turns green. Humidifier Increase the humidification level if your airways feel symbol... -
Page 22: Cleaning The Humidifier
Cleaning the humidifier We recommend that you clean your humidifier weekly. a. Remove the humidifier from the therapy device c. Pour out any water in the humidifier. (see page 19). d. Remove the humidifier insert from the top of the humidifier. -
Page 23: Accessories
Accessories The following accessories which increase comfort are available from your dealer: g. Insert the humidifier insert in the top of the humidifier again. prismaAQUA humidifier h. Before the next use, fill the humidifier with water and To treat dry upper airways or connect it to the therapy device. - Page 24 Löwenstein Medical Technology Kronsaalsweg 40, 22525 Hamburg Germany T: +49 40 54702-0 F: +49 40 54702-461 info@loewensteinmedical.de www.loewensteinmedical.de...
Need help?
Do you have a question about the prisma SOFT and is the answer not in the manual?
Questions and answers
How to set time