Lowenstein Medical prisma20C Instructions For Use Manual
Sleep therapy devices
Hide thumbs
Also See for prisma20C:
- Manual (24 pages) ,
- Service and repair manual (76 pages) ,
- Instructions for use for patients (60 pages)

Related Manuals for Lowenstein Medical prisma20C


Summary of Contents for Lowenstein Medical prisma20C
- Page 1 EN Instructions for use for devices of type WM 100 TD prisma20C prisma25S-C prisma20A prisma25ST prismaCR prismaLAB prisma25S prisma30ST Sleep therapy devices...
-
Page 2: Table Of Contents
Contents Contents Introduction 1.1 Intended use ..................... 4 1.2 Function ....................4 1.3 User qualifications ..................5 1.4 Indications ....................5 1.5 Contraindications ..................6 1.6 Side effects ....................6 Safety 2.1 Safety information ..................7 2.2 General information ................10 2.3 Warnings in this document .............. - Page 3 Contents Settings in the menu 6.1 Setting comfort parameters ..............38 6.2 Setting accessories parameters ..............39 6.3 Setting time parameters ................40 6.4 Setting device parameters ............... 40 Hygienic preparation 7.1 General information ................42 7.2 Cleaning intervals ................... 42 7.3 Hygienic preparation of the therapy device ..........
-
Page 4: Introduction
1 Introduction 1 Introduction 1.1 Intended use The WM 100 TD devices are pressure-controlled, non-invasive, non-life-sustaining therapy devices for the treatment of sleep disordered breathing (SDB) or intermittent treatment of respiratory insufficiency by means of a mask. The devices can be used on persons weighing above 30 kg. The CPAP mode can be used on persons above the age of 3 years. -
Page 5: User Qualifications
"user". In contrast, a "patient" is the person receiving the therapy. Always perform all the operating steps in accordance with these instructions for use. 1.4 Indications prisma20C CPAP therapy device for the treatment of patients with obstructive sleep apnea with a constant pressure requirement. -
Page 6: Contraindications
1 Introduction prisma30ST BiLevel therapy device for the treatment of patients with obstructive, mixed, or complex sleep apnea and/or chronically reduced respiratory drive (e.g., sleep-related or position-dependent hypoventilation or chronically stable OHS), respiratory insufficiency, e.g., COPD. 1.5 Contraindications The following contraindications are known – the physician in charge is responsible for deciding whether to use the therapy device in each individual case. -
Page 7: Safety
2 Safety 2 Safety Please read these instructions for use carefully. They form part of the devices described, and must be available at all times. Use the unit for the designated purpose only (see "1.1 Intended use", page For your own safety and that of your patients, and in accordance with the requirements of Directive 93/42/EEC, please observe the following safety instructions. - Page 8 2 Safety Treatment prevented due to increased resistance when bacteria filters are used! Misting or moistening can increase the resistance of the bacteria filters, thereby modifying the output of the therapy pressure. ⇒ Check bacteria filters regularly for increased resistance and blockages and rectify these.
- Page 9 2 Safety 2.1.4 Therapy The use of oxygen in combination with flammable substances poses a fire hazard! Oxygen in combination with flammable substances can result in spontaneous explosions. In cases of insufficient ventilation, oxygen in the surrounding area (e.g., clothes, hair, bedclothes) can become enriched and cause fires and thus injuries to the patient, user, and others in the immediate vicinity.
-
Page 10: General Information
2 Safety 2.2 General information • Use of third-party products may lead to functional failures and restricted usability. Biocompatibility may also be compromised. Please note that in these cases, any claim under warranty and liability will be void if neither the accessories nor original spare parts recommended in the instructions for use are used. -
Page 11: Warnings In This Document
2 Safety • The operator is responsible for ensuring that the therapy pressure setting is specified individually for each patient according to the device configuration, including accessories, that is to be used. • The operator is required to regularly assess the effectiveness of the therapy settings. •... -
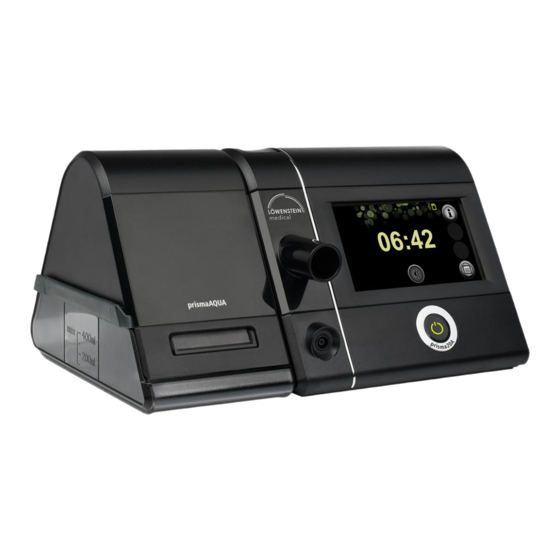
Page 12: Product Description
3 Product description 3 Product description 3.1 Therapy device overview NO. DESIGNATION DESCRIPTION Covers the humidifier connection when no respiratory air Cover humidifier is connected. Unlocking button Allows the cover to be removed for connecting the therapy device humidifier. Allows operation of the therapy device and the respiratory Display air humidifier. -
Page 13: Display
3 Product description NO. DESIGNATION DESCRIPTION For attaching and securing a module to the therapy Mounting holes device. Power supply cable Connects the power supply unit to the power socket. For inserting an SD card. The symbol on the display indi- SD card slot cates the communication between the SD card and the therapy device. - Page 14 3 Product description 3.2.1 Display in Standby mode (Start screen) DESIGNATION DESCRIPTION Info menu button Provides access to the info menu. Alarm clock with Alarm clock is set. wake-up time Displays the set wake-up time. Menu button Provides access to the settings menus. Dimmer button Dims the display.
- Page 15 3 Product description 3.2.2 Display in Therapy mode DESIGNATION DESCRIPTION Time Displays the current time. SD card symbol The SD card is in the therapy device. Provides access to the info screen with detailed Info button information on the therapy currently in progress. Alarm clock with wake-up Alarm clock is set.
- Page 16 3 Product description 3.2.3 Symbols on the display SYMBOL DESCRIPTION Bacteria filter is connected and active. If this symbol is displayed even though you are not using a bacteria filter, contact your authorized dealer. Air filter replacement required. (Symbol only appears if the authorized dealer has activated the reminder to change the air filter) Maintenance required (symbol only appears when maintenance function is active).
- Page 17 3 Product description SYMBOL DESCRIPTION Alarm clock is set. If no alarm clock symbol is shown: The alarm clock is off. Displays the respiration status: • Arrow pointing upward: inhalation • Arrow pointing downward: exhalation • Green arrow, spontaneous respiration •...
-
Page 18: Accessories
3 Product description 3.3 Accessories NO. DESIGNATION DESCRIPTION Respiratory air humidifier Humidifies the respiratory air Filters the suctioned respiratory air and prevents the Pollen filter ingress of fine dust particles, pollen and fungal spores. Enables operation of the device via a DC power socket Inverter (12 V/24 V) Respiratory hose with... -
Page 19: Preparation
4 Preparation 4 Preparation 4.1 Setting up the therapy device Material damage due to overheating! Temperatures which are too high can cause the therapy device to overheat and damage the device. ⇒ The therapy device and power supply unit must not be covered with textiles (e.g., bedclothes). - Page 20 4 Preparation 1. Connect the power supply cable with the power supply unit. 2. Insert the free connector of the power supply unit's connection cable into the power supply port on the therapy device. When doing so, pay attention to the alignment of the connector.
- Page 21 4 Preparation If you want to operate the therapy device at 12 V or 24 V, connect the optionally available inverter WM 24616 (12 V) or WM 24617 (24 V) to the device. 3. Plug the free end of the power supply cable in the power socket. The power supply unit adjusts to the line voltage (110 V or 240 V) automatically.
- Page 22 4 Preparation Risk of asphyxia when using full face masks without exhalation system! When using full face masks without an integrated exhalation system, the CO concentration can increase to critical values and endanger the patient. ⇒ Use full face masks with an external exhalation system if there is no exhalation system integrated.
-
Page 23: Operation
5 Operation 5 Operation 5.1 Navigating the menu You configure all the settings in the menu via the display. Press the required field directly on the display. BUTTON FUNCTION Go back a screen Go forward a screen Select values: • If the parameter can have exactly 2 possible values (e.g., on/off): Press the button. - Page 24 5 Operation 1. Connect up the power supply (see "4.2 Connecting up the power supply", page 19). 2. Select your preferred language. 3. Select your time zone with the arrow keys 4. Set the time: • Select daylight saving time or standard time .
-
Page 25: Switching Off The Therapy Device
5 Operation 5.2.2 Switching the therapy device on each time The therapy device can assume 3 different modes: • Standby mode (no therapy in progress) • Therapy mode (therapy in progress) • Energy saving mode (display is off to save energy during the day) 1. -
Page 26: Ending The Therapy
5 Operation If you want to view detailed information on your therapy: Press the info button To allow you to sleep undisturbed, the display automatically turns dark after 30 seconds. The therapy continues normally. As soon as you press the display, the start screen is shown in the Therapy mode again. -
Page 27: Performing A Mask Test
5 Operation The more green checks are shown (max. 3), the better the result. If you want to end the therapy prematurely during the night, you can use the dimmer button on the start screen to turn the display dark and sleep undisturbed. The therapy device is still supplied with power and the alarm function remains activated. -
Page 28: Switching Softstart On/Off
5 Operation 5. Wait until the therapy device automatically ends the mask test after 30 seconds. To end the mask test prematurely, press the mask test button If you switch the softSTART on during the mask test, the mask test is automatically switched off. -
Page 29: Setting The Respiratory Air Humidifier
5 Operation 5.8 Setting the respiratory air humidifier 5.8.1 Switching on the respiratory air humidifier The respiratory air humidifier switches on automatically when you start the therapy (see "5.4 Starting the therapy", page 25). You can also preheat the humidifier to ensure that the water in the respiratory air humidifier has already reached the required temperature by the start of the therapy. - Page 30 5 Operation 1. Press the humidifier button If there is no more water left in the respiratory air humidifier, the respiratory air humidifier switches off automatically. The humidifier button is orange 5.8.3 Setting the humidifier level Requirement • The therapy device is in the Standby or Therapy mode. •...
-
Page 31: Setting The Alarm
5 Operation There are seven humidifier levels available (1-7). The level which is suitable for you depends on the room temperature and the humidity. The standard setting is level 4. If you wake up with dry airways, the heating is set too low. If there is condensation in the respiration hose in the morning, the heating is too high. -
Page 32: Viewing Therapy Data And Device Information
5 Operation 5.9.2 Switching off the alarm Requirement The alarm is ringing. 1. To snooze the alarm for 5 minutes, press the Pause field. 2. To turn the alarm off for today, press the Off field. The alarm will go off the following day again at the set wake-up time. 5.9.3 Deactivating the alarm Requirement •... - Page 33 5 Operation 2. If necessary: To view therapy data from a night other than the previous night, select the desired date in the list 3. If necessary: To view a longer period of time, navigate to the second screen...
- Page 34 5 Operation 4. Select the required period. 5. To go back a screen, press the arrow key 6. If required, save all the data to the SD card (see " Saving the therapy data manually", page 36). 7. To view the device information, navigate to the next screen using the arrow keys 8.
-
Page 35: Using The Sd Card
5 Operation 5.11 Using the SD card An SD card is not necessarily required for the operation of the therapy device. The therapy data and settings are stored internally in the device. Loss of data due to incorrect SD card! SD cards not purchased from the manufacturer may have reduced functionality or result in the loss of data. - Page 36 5 Operation 5.11.2 Saving therapy data to the SD card Data loss in case of power loss! Data may be lost if the therapy device is disconnected from the power supply during the saving process. ⇒ Keep the therapy device connected to the power supply during the saving process (SD card symbol flashes).
- Page 37 5 Operation 3. Remove the SD card. 4. Close the cover of the SD card slot. 5.11.4 Setting the device with the SD card You can set the device with the help of an SD card provided by your physician or authorized dealer.
-
Page 38: Settings In The Menu
6 Settings in the menu 6 Settings in the menu You can configure settings for the comfort, accessories, and time parameters in the settings menu when the therapy device is in Standby mode. 6.1 Setting comfort parameters Comfort parameters facilitate handling of the therapy device and components for the patient and ensure a comfortable therapy. -
Page 39: Setting Accessories Parameters
6 Settings in the menu POSSIBLE PARAMETER DESCRIPTION VALUES Settings 1 and 2 of the softPAP breathing relief function are intended for patients who find exhaling against high pressure uncomfortable. The breathing relief function reduces the pressure early during the transition to expiration, allowing you to breathe out more easily. -
Page 40: Setting Time Parameters
6 Settings in the menu 6.3 Setting time parameters In the time parameters you set the minutes of the current time, the time zone, and the desired wake-up time. Requirement The therapy device is in Standby mode. 1. Press the menu button 2. - Page 41 6 Settings in the menu POSSIBLE PARAMETER DESCRIPTION VALUES Here you can set the brightness of the display. • Level 1: Dark Display brightness • Level 2: Normal • Level 3: Bright Here you can set whether an alarm should be triggered in case of a leak.
-
Page 42: Hygienic Preparation
7 Hygienic preparation 7 Hygienic preparation 7.1 General information • This product may contain disposable items. Disposable items are intended to be used only once. Use these items only once and do not reprocess them. Reprocessing disposable items may impair the functionality and safety of the product and lead to unforeseeable reactions as a result of aging, embrittlement, wear, thermal load, the effects of chemical processes, etc. -
Page 43: Hygienic Preparation Of The Therapy Device
7 Hygienic preparation 7.3 Hygienic preparation of the therapy device Risk of injury from electric shock! Any liquids entering the device can cause a short circuit, injure the user, and damage the therapy device. ⇒ Disconnect the therapy device from the power supply before starting the hygienic preparation. - Page 44 7 Hygienic preparation 7.3.1 Cleaning the air filter (gray filter) 1. Remove the air filter. 2. Clean the air filter under running water. 3. Leave the air filter to dry. 4. Replace the air filter in the holding bracket. 7.3.2 Replacing the optional pollen filter (white filter) 1.
-
Page 45: Hygienic Preparation Of The Respiration Hose
7 Hygienic preparation 7.4 Hygienic preparation of the respiration hose Damage to the device caused by ingress of liquids! Ingress of liquids may damage the device. ⇒ Only use the respiration hose when it is completely dry. 1. Remove the respiration hose from the therapy device. 2. -
Page 46: Function Check
8 Function check 8 Function check 8.1 Intervals Carry out a functional check after every hygienic preparation, after every repair, and at least every 6 months. 8.2 Checking the therapy device Requirement • The therapy device is disconnected from the patient. •... -
Page 47: Alarms And Error Messages
9 Alarms and error messages 9 Alarms and error messages If you are not able to clear an error message with the aid of the table below, or in the event of unexpected operation or an incident, you should have the device repaired by the manufacturer or your authorized dealer. - Page 48 9 Alarms and error messages ALARM MESSAGE CAUSE REMEDY Check that the respiration hose is neither blocked nor kinked. Low minute volume! The respiratory volume Reposition the mask and Please check the output by the device is lower breathe through it. ventilation settings and the than the target value.
-
Page 49: Faults In The Therapy Device
9 Alarms and error messages 9.2 Faults in the therapy device FAULT CAUSE REMEDY Check that the power supply cable is connected properly. No power supply. Check the function of the socket-outlet. Remove the SD card (see 5.11.3, No running noise, no p. 36), disconnect the device information on the from the power supply,... -
Page 50: Display Messages
9 Alarms and error messages 9.3 Display messages If the message Error (xxx): Please follow the instructions in the Instructions for use appears on the display, locate the displayed error code in the table. Rectify the error as described. ERROR CAUSE REMEDY CODE... -
Page 51: Maintenance
10 Maintenance 10 Maintenance The therapy device is designed to have a useful service life of 6 years. If the therapy device is used as intended in accordance with the instructions for use, it does not require any maintenance within this period. If the therapy device is used beyond this period, we recommend having it checked by an authorized dealer. -
Page 52: Appendix
13 Appendix 13 Appendix 13.1 Technical Data 13.1.1 Technical data of therapy device SPECIFICATION THERAPY DEVICE Product class according to 93/42/EEC Dimensions W x H x D in cm 17 x 13.5 x 18 Weight 1.4 kg Temperature range - Operation +5°C to +40°C - Transport and storage -25°C to +70°C... - Page 53 13 Appendix SPECIFICATION THERAPY DEVICE Applied part Respiratory mask Average sound pressure level in Approx. 26.5 dB(A) at 10 cmH O (corresponds to operation as per ISO 80601-2-70 a sound power level of 34.5 dB(A) Average sound pressure level in Approx.
- Page 54 13 Appendix SPECIFICATION THERAPY DEVICE prisma25S - Inspiratory positive airway pressure (IPAP) 4 cmH O to 25 cmH - Expiratory positive airway pressure (EPAP) 4 cmH O to 25 cmH - Relative inspiration duration Ti/Tset 20% to 67% - Trigger Auto, can be set to 3 levels - Pressure rise rate Can be set to 3 levels...
- Page 55 13 Appendix SPECIFICATION THERAPY DEVICE Peak flow as per Pressure measured at Average flow at the patient ISO 80601-2-70 the patient connection opening connection opening at a flow of 40 l/min CPAP and APAP modes Test pressures: 4 cmH 4.0 cmH 235 l/min 8 cmH 8.0 cmH...
- Page 56 13 Appendix SPECIFICATION THERAPY DEVICE Stability of the dynamic pressure (short-term accuracy) at 10 breaths/ min as per ISO 17510-1:2007 when using the 19 mm hose. 7 cmH p < 0.24 cmH Δ 10 cmH p < 0.28 cmH Δ 13.5 cmH p <...
- Page 57 13 Appendix SPECIFICATION THERAPY DEVICE Stability of the dynamic pressure (short-term accuracy) as per ISO 80601-2-70 in CPAP and APAP modes - when using the 19 mm hose 4 cmH p < 0.68 cmH Δ 8 cmH p < 0.58 cmH Δ...
- Page 58 13 Appendix SPECIFICATION THERAPY DEVICE • Target volume that can be set: In the "slow" level, the device checks after every 8 breaths if the target volume has been reached and changes the pressure by 0.5 O. If the pressure reaches a corridor around the target volume, the device switches to exact regulation.
- Page 59 13 Appendix SPECIFICATION THERAPY DEVICE Memory sizes of 256 MB to 8 GB can be used, SD card interface compatible with SD physical layer version 2.0 TOLERANCES FOR MEASUREMENTS Pressure: ± 0.75% of measurement or ± 0.1 cmH Flow: ± 4 l/min Temperature: ±...
- Page 60 13 Appendix 13.1.3 Pressure volume curve pV curve at RV=0.5 l and f=20/min 0.00 5.00 10.00 15.00 20.00 Pressure [cmH 13.1.4 Pneumatic system diagram pressure Flow regulator source Patient mask Nasal or full face mask Inlet for Respiration ambient air Optional Optional O Optional...
-
Page 61: Emission Of Electromagnetic Interference
13 Appendix 13.2 Emission of electromagnetic interference GUIDELINES AND MANUFACTURER DECLARATION - EMISSION OF ELECTROMAGNETIC INTERFERENCE The device can be used in both static and mobile operation, in both domestic and appropriate hospital environments. In a domestic environment, the device may cause radio interference, possibly making it necessary to take suitable remedial measures, such as realigning the device, for example. - Page 62 13 Appendix GUIDELINES AND MANUFACTURER DECLARATION - ELECTROMAGNETIC INTERFERENCE IMMUNITY The device can be used in both static and mobile operation, in both domestic and appropriate hospital environments. In a domestic environment, the device may cause radio interference, possibly making it necessary to take suitable remedial measures, such as realigning the device, for example.
-
Page 63: Electromagnetic Interference Immunity For Me Equipment And Me Systems
13 Appendix 13.4 Electromagnetic interference immunity for ME equipment and ME systems GUIDELINES AND MANUFACTURER DECLARATION - ELECTROMAGNETIC INTERFERENCE IMMUNITY The device can be used in both static and mobile operation, in both domestic and appropriate hospital environments. In a domestic environment, the device may cause radio interference, possibly making it necessary to take suitable remedial measures, such as realigning the device, for example. -
Page 64: Labels And Symbols
13 Appendix 13.5 Labels and symbols 13.5.1 Labels on the therapy device SYMBOL DESCRIPTION TYPE PLATE ON THE RIGHT SIDE OF THE THERAPY DEVICE Serial number of the therapy device Year of manufacture LABELS AND SYMBOLS ON THE THERAPY DEVICE 2 , 8 Consult instructions for use Device inlet: inlet for room air at ambient temperature... - Page 65 13 Appendix SYMBOL DESCRIPTION Device output: outlet for room air at 4 cmH O to 30 cmH (depending on type of device) TYPE PLATE ON THE UNDERSIDE OF THE THERAPY DEVICE TYPE: Type designation of the therapy device 37 V DC Degree of protection against solid foreign bodies.
-
Page 66: Scope Of Supply
13 Appendix SYMBOL DESCRIPTION Degree of protection against electric shock: protection class II device. Do not dispose of device in household waste. CE mark (confirms that the product complies with the applicable European directives). IP protection class: Degree of protection against solid foreign bodies. IP21 The device is protected against dripping water. -
Page 67: Warranty
13 Appendix PART ARTICLE NUMBER Power supply cable WM 24133 Set, 2 air filters WM 29928 Varies according to Transport bag version of device Domed sticker with logo WM 29899 SD card WM 29794 Instructions for use WM 67841 13.6.2 Accessories Accessories can be ordered separately, if required. - Page 68 Löwenstein Medical Technology GmbH + Co. KG Kronsaalsweg 40 22525 Hamburg, Germany T: +49 40 54702-0 F: +49 40 54702-461 www.loewensteinmedical.de...
Need help?
Do you have a question about the prisma20C and is the answer not in the manual?
Questions and answers
Where can I get the charger if my charger is damaged?
You can find a replacement charger for the Lowenstein Medical prisma20C from the retailer that provides Lowenstein CPAP power adapters.
This answer is automatically generated
lost therapy results screen .went from 3 boxes to one ,and cant open box that displayed AHI. [CRAcSV]
To restore the therapy results screen on the Lowenstein Medical prisma20C to display AHI, press the AHI field.
This answer is automatically generated