Advertisement
Available languages
Available languages
Quick Links
27035936044
HUSQVARNA MOTORCYCLES ACCESSORIES
INFORMATION
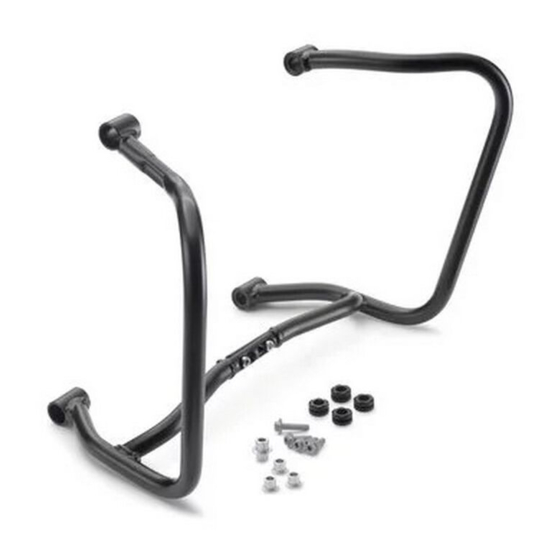
RADIATOR PROTECTION
11.2017
3.402.225
*3402225*
Husqvarna Motorcycles GmbH
Stallhofnerstraße 3
5230 Mattighofen, Austria
T: + 43 / 7742 / 60 00-0
W: www.husqvarna-motorcycles.com
Advertisement

Related Manuals for Husqvarna 27035936044


Summary of Contents for Husqvarna 27035936044
- Page 1 27035936044 HUSQVARNA MOTORCYCLES ACCESSORIES INFORMATION RADIATOR PROTECTION 11.2017 3.402.225 *3402225* Husqvarna Motorcycles GmbH Stallhofnerstraße 3 T: + 43 / 7742 / 60 00-0 5230 Mattighofen, Austria W: www.husqvarna-motorcycles.com...
- Page 2 3 DEUTSCH Wir freuen uns, dass Sie sich für dieses Produkt entschieden haben. Unser hochwertiges Qualitätsprodukt ist rennerprobt und wurde speziell für sportliche Herausforderungen entwickelt. Eine korrekte Montage des Produktes ist unerlässlich, um ein Maximum an Sicherheit und Funktionalität gewährleisten zu können. Bitte befolgen Sie daher die Montageanleitung oder wenden Sie sich an Ihren autorisierten Fachhändler.
- Page 3 Lieferumfang 1x Kühlerschutz links 1x Kühlerschutz rechts 4x Dämpfungsgummi 1x Distanzbuchse 3x Buchse 1x Bundschraube M6x25 3x Bundschraube M6x20 2x Zylinderschraube M6x12 2x Sechskantmutter Vorarbeit - Sitzbank abnehmen (s. Bedienungsanleitung). - Seitenverkleidung abnehmen (s. Bedienungsanleitung). Vormontage ...
- Page 4 - Kühlerschutz rechts positionieren. HINWEIS Auf die richtige Positionierung der Verbindungsstücke unten achten. - Schraube (Lieferumfang) montieren, aber noch nicht festziehen. - Schraube (Lieferumfang) montieren und beide mit 12 Nm fest- ziehen. - Schrauben mit Muttern (alles Lieferumfang) montieren und mit 12 Nm festziehen.
- Page 5 Scope of supply 1x radiator protection, left 1x radiator protection, right 4x damping rubbers 1x spacer 3x bushing 1x collar screw M6x25 3x collar screw M6x20 2x cap head screw M6x12 2x hexagon nut Preparatory work - Take off the seat (see the Owner’s Manual).
- Page 6 - Position right radiator protection NOTE Ensure that the connecting pieces are positioned correctly at the bottom. - Mount screw (included), but do not tighten yet. - Mount screw (included) and tighten both to 12 Nm. ...
- Page 7 Materiale fornito 1 protezione del radiatore sinistra 1 protezione del radiatore destra 4 gommini del parastrappi 1 bussola distanziale 3 boccole 1 vite fl angiata M6x25 3 viti fl angiate M6x20 2 viti a testa cilindrica M6x12 ...
- Page 8 - Posizionare la protezione del radiatore destra AVVERTENZA Prestare attenzione al corretto posizionamento degli elementi di giunzione inferiori. - Montare la vite (in dotazione), ma non serrarla ancora. - Montare la vite (in dotazione) e serrare entrambe a 12 Nm. ...
- Page 9 Contenu de la livraison 1x protection de radiateur gauche 1x protection de radiateur droite 4x caoutchoucs d’amortissement 1x douille-entretoise 3x bagues 1x vis à épaulement M6x25 3x vis à épaulement M6x20 2x vis à tête cylindrique M6x12 ...
- Page 10 - Positionner la protection de radiateur droite REMARQUE Veiller à positionner correctement les pièces de connexion en bas. - Mettre en place la vis (fournie) sans la serrer. - Poser la vis (fournie) et serrer les deux vis à 12 Nm. ...
- Page 11 Volumen de suministro 1x protección izquierda del radiador 1x protección derecha del radiador 4x gomas de amortiguación 1x casquillo distanciador 3x casquillos 1x tornillo de collarín M6x25 3x tornillos de collarín M6x20 2x tornillos cilíndricos M6x12 ...
- Page 12 - Posicionar la protección derecha del radiador ADVERTENCIA Prestar atención a que las piezas de conexión inferiores estén bien colocadas. - Montar el tornillo (volumen de suministro), pero no apretarlo todavía. - Montar el tornillo (volumen de suministro) y apretar ambos a 12 Nm.
Need help?
Do you have a question about the 27035936044 and is the answer not in the manual?
Questions and answers