Advertisement
Quick Links
466527
###
jl.avfgroup.com
rev01
JAK101
13.6kg
30lbs
Read through ALL instructions before commencing installation.
STOP
If you have any questions about this product or issues with installation, contact
the customer services help line before returning this product to the store.
0333 320 0463
CUSTOMER SERVICES HELP LINE NUMBER:
AVF Group Ltd. Hortonwood 30, Telford, Shropshire, TF1 7YE, England
Advertisement

Related Manuals for AVF JAK101


Summary of Contents for AVF JAK101
- Page 1 If you have any questions about this product or issues with installation, contact the customer services help line before returning this product to the store. 0333 320 0463 CUSTOMER SERVICES HELP LINE NUMBER: AVF Group Ltd. Hortonwood 30, Telford, Shropshire, TF1 7YE, England...
-
Page 2: Tools Recommended
It is the responsibility of the installer to ensure that the mounting wall is of a suitable standard and void of any services (eg gas, electricity, water etc). AVF accept no responsibility for any damage or loss caused by installing this product in a sub standard wall. - Page 3 TV Screws, Reducers and Spacers Measure the TV fixing holes Width and Height TV Fixing Holes X 50 - 800mm Y 50 - 400mm If width X is greater than mm or height Y greater than STOP installation now and contact the customer help line You are provided with diameters of TV M4 =...
- Page 4 Mounting Your Soundbar Please use the illustration below to decide which steps you will need to use to Mount your Soundbar. For example, if you are mounting your Soundbar on a TV Bracket below your TV you would use steps 9, 10, 11, 12 and 13. Soundbar SONOS Playbar Soundbar...
- Page 5 Mounting Above Preparing the TV Brackets...
- Page 6 Mounting Above Fitting the TV Brackets No Spacers Spacers For TVs with flat / unobstructed back For TVs with irregular / obstructed back WARNING After completing step you will have fittings left over, please keep for future reference...
- Page 7 Screw diameter dependant If required Example shown is 400 x 400 fixings x4/8/12 x4/8/12 x4/8/12 x4/8/12 and / or and / or and / or and / or Attach the bracket to the back of your TV using suitable screw, reducer and spacer combinations...
- Page 8 Mounting Above Attaching TV Mount Attach your TV Bracket to the 4 fixing points you created in step MUST be M6 fixings Fixing Point The brackets and screws etc shown in grey are only an example. These are supplied by the TV wall bracket manufacturer.
- Page 9 Mounting Above Attaching Soundbar Adjust part to the depth of your Soundbar 47mm 175mm Attach part and then remove backing paper...
- Page 10 Mounting Above Attaching SONOS playbar adaptor Attaching SONOS playbar Mounting Above You must use locking screw Px2...
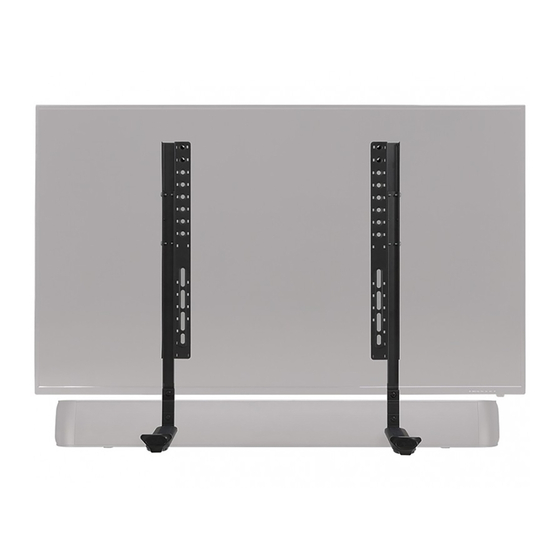
- Page 11 Mounting Below Preparing the TV Brackets...
- Page 12 Mounting Below Fitting the TV Brackets No Spacers Spacers For TVs with flat / unobstructed back For TVs with irregular / obstructed back WARNING After completing step you will have fittings left over, please keep for future reference...
- Page 13 Screw diameter dependant If required Example shown is 400 x 400 fixings x4/8/12 x4/8/12 x4/8/12 x4/8/12 and / or and / or and / or and / or Attach the bracket to the back of your TV using suitable screw, reducer and spacer combinations...
- Page 14 Mounting Below Attaching TV Mount Attach your TV Bracket to the 4 fixing points you created in step10 MUST be M6 fixings Fixing Point The brackets and screws etc shown in grey are only an example. These are supplied by the TV wall bracket manufacturer.
- Page 15 Mounting Below Attaching Soundbar Adjust part to the depth of your Soundbar 47mm 175mm Attach part and then remove backing paper...
- Page 16 Mounting Below Attaching SONOS playbar adaptor...
- Page 17 Mounting Below Attaching SONOS playbar You must use locking screw Px2...
- Page 22 Attaching Soundbar Mounting Above or Below Adjust part to the depth of your Soundbar 47mm 175mm Attach part and then remove backing paper...
- Page 23 Attaching SONOS playbar Mounting Above or Below...
Need help?
Do you have a question about the JAK101 and is the answer not in the manual?
Questions and answers