Hatco GLO-RAY Holiday Inn Express GRCMW-1DH Installation & Operating Manual & Replacement Parts List
Merchandising warmer
Hide thumbs
Also See for GLO-RAY Holiday Inn Express GRCMW-1DH:
- Installation and operating manual (76 pages) ,
- Installation and operating manual (16 pages)
Table of Contents
Advertisement
Quick Links
Merchandising Warmer
Installation & Operating Manual &
Replacement Parts List
This manual contains important safety information
concerning the maintenance, use and operation of this
product. Failure to follow the instructions contained in this
manual may result in serious injury. If you're unable to
understand the contents of this manual, please bring it to
the attention of your supervisor. Do not operate this
equipment unless you have read and understood the
contents of this manual.
GLO-RAY
GRCMW-1DH
I&W #07.05.184.00
Este manual contiene importante información sobre
seguridad concerniente al mantenimiento, uso y
operación de este producto. Cualquier falla en el
seguimiento de las instrucciones contenidas en este
manual puede resultar en un serio daño. Si usted no
puede entender el contenido de este manual por
favor pregunte a su supervisor. No opere este
equipo al menos que haya leído y comprendido el
contenido de este manual.
®
Advertisement
Table of Contents

Related Manuals for Hatco GLO-RAY Holiday Inn Express GRCMW-1DH


Summary of Contents for Hatco GLO-RAY Holiday Inn Express GRCMW-1DH
- Page 1 GLO-RAY ® Merchandising Warmer GRCMW-1DH Installation & Operating Manual & Replacement Parts List I&W #07.05.184.00 Este manual contiene importante información sobre This manual contains important safety information seguridad concerniente al mantenimiento, uso y concerning the maintenance, use and operation of this operación de este producto.
-
Page 2: Table Of Contents
® (Summer Hours: June to September – Merchandising Warmer in the spaces below. Please 8:00 a.m. to 5:00 p.m. C.S.T. have this information available when calling Hatco Monday through Thursday for service assistance. 8:00 a.m. to 2:30 p.m. C.S.T. Friday) GRCMW-1DH Model No. -
Page 3: Important Safety Information
OFF on the unit and unplug the unit from the not have the characteristics that will allow power source and allow to cool completely them to operate safely in Hatco equipment. It before performing any maintenance or is essential to use Hatco Replacement Parts cleaning. -
Page 4: Model Description
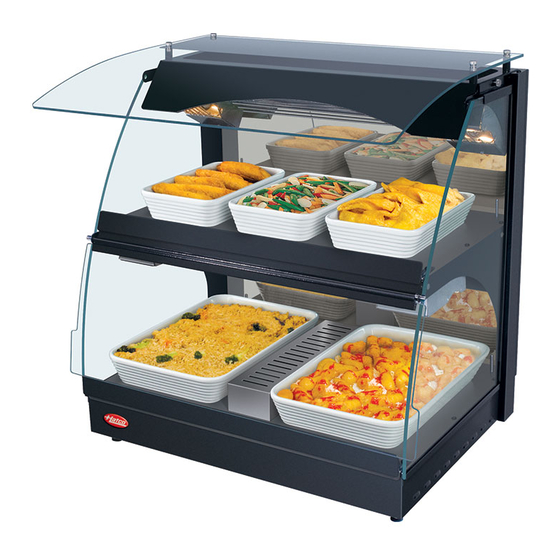
Wipe off breath protector using a soft, clean and damp cloth. MODEL DESCRIPTION GRCMW-1DH The Hatco GRCMW-1DH Merchandising Warmer is ideal for holding breakfast food at customer serving points. This model features prefocused upper infrared metal sheath heating elements, along with a... -
Page 5: Specifications
For safe and proper operation plug unit into a NEMA 5-20P properly grounded electrical outlet of the correct Receptacle not supplied by Hatco. voltage, size and plug configuration. If the plug and receptacle do not match, contact a qualified Figure 3. Plug Configuration electrician to determine the proper voltage and size and install the proper electrical outlet. -
Page 6: Installation
INSTALLATION UNPACKING WARNING For safe and proper operation, the unit must be The Glo-Ray ® Merchandiser is shipped with most located at least 1" (25 mm) from combustible components pre-assembled. Care should be taken walls and materials. If safe distances are not when unpacking shipping carton to avoid damage to maintained, discoloration or combustion could unit and components enclosed. -
Page 7: Assembly
04.12.326.00, is required before operating the unit. NOTE: Decorative Corian ® pieces are not supplied or installed by Hatco. Standoffs Installation for Breath Protectors (On One Door Units Only) (See Figure 5) 1. Remove protective paper from polycarbonate surfaces. - Page 8 INSTALLATION Installation of Upper Door (Optional) Top Panel (See Figure 7) NOTE: Before installing door on upper section, remove breath protector and install polycarbonate top panel. NOTE: Only breath protector or upper door can be installed on the top section, not both accessories at the same time.
-
Page 9: Operation
When no cleaning and deliming. (See MAINTENANCE for water is being used, Hatco recommends adjusting removing lime and mineral deposits.) the water temperature to lowest setting. - Page 10 OPERATION 3. Place the On/Off rocker switch, located on the left side of the unit, in the ON position. (See Figure 9.) The halogen lights will glow at this time and the electronic temperature controller will display “Stby.” When programmed temperature setpoints have been reached, the control panel will display “rEdy”...
-
Page 11: Setting The Thermostat Temperature Control
Overhead Heat Control, Overhead Heat Control, LED Display Top Section Bottom Section MERCHANDISING WARMER HATCO CORPORATION MILWAUKEE, WI U.S.A. Temperature Temperature Enter Increase Decrease Figure 11. Thermostat Temperature Control Form No. GRCMWDHHIM-0907... -
Page 12: Maintenance
MAINTENANCE CLEANING Removing and Installing Side Glass Panels The Hatco Glo-Ray ® Merchandising Warmer is designed for maximum durability and performance, Side glass panels are removable for cleaning. with minimum maintenance. 1. Loosen thumbscrew above panel and tilt glass WARNING forward, then carefully lift panel out of bottom rail. -
Page 13: Removing Lime & Mineral Deposits
MAINTENANCE REMOVING LIME & MINERAL DEPOSITS If the water used on the GRCMW-1DH model has 6. Allow the unit to run for 30 minutes. an excessive amount of lime or mineral content, use 7. After the deliming period, remove the solution the following instructions for periodic cleaning and from the water reservoir. -
Page 14: Light Bulb Replacement
Breakage of light safely in Hatco equipment. It is essential to use bulbs not specially coated could result in Hatco Replacement Parts when repairing Hatco personal injury and/or food contamination. -
Page 15: Replacement Parts List
H = Humidity CAUTION - Use of replacement parts other 24 Hour 7 Day Parts & Service Assistance available than those supplied by Hatco Corporation United States Canada may result in damage to the unit or injury to by calling (800) 558-0607. - Page 16 REPLACEMENT PARTS LIST PARTS COMMON TO ALL GRCMW-1DH MODELS - 120 Volt ITEM DESCRIPTION PART NO. QTY. Door Assembly with Hinge Pins R04.12.327.00 Thermostat Probe - Bottom Shelf 02.01.056.00 Thermostat Probe, Water and Upper Shelf 02.01.085.00 Electronic Controller 02.01.208.00 Blanket Heating Element, 120 Volt, 150 Watts, (2 per shelf) 02.05.632.00 Blanket Heating Element, 120 Volt, 120 Watts, (Water) 02.05.633.00...
-
Page 17: Troubleshooting Guide
Overhead infinite heat control Contact Authorized Service Agent or switch is defective. Hatco for assistance. Overhead heat is NOT hot Overhead infinite heat control Adjust overhead infinite heat control to a enough. set too low. - Page 18 Unit turned OFF. Turn unit ON. Circuit breaker tripped. Reset circuit breaker. If circuit breaker continues to trip contact Authorized Service Agent or Hatco for assistance. Biscuits are drying out. Overhead heat control is set Recommended setting for overhead heat too high.
-
Page 19: Hatco Limited Warranty
One (1) Year Parts and Labor PLUS Four accept or reject any such claim in whole or in part. (4) Years Parts-Only Warranty on Hatco will not accept the return of any Product pro-rated terms that Hatco will explain without prior written approval from Hatco, and all at Buyer’s request:... -
Page 20: Authorized Parts Distributors
HATCO AUTHORIZED PARTS DISTRIBUTORS NEW YORK TEXAS ALABAMA IOWA Acme American Repairs, Inc. GCS Service Jones McLeod Appl. Svc. Electric Motor Service Co. Fort Worth 817-831-0381 Birmingham 205-251-0159 Davenport 319-323-1823 Brooklyn 718-456-6544 Armstrong Repair Service Goodwin Tucker Group Alpro Service Co.
Need help?
Do you have a question about the GLO-RAY Holiday Inn Express GRCMW-1DH and is the answer not in the manual?
Questions and answers