Advertisement
Quick Links
Advertisement

Related Manuals for Planet WSG-500


Summary of Contents for Planet WSG-500
- Page 1 300Mbps Hotspot Wireless Subscriber Gateway WSG-500 Quick Installation Guide...
-
Page 2: Table Of Contents
Table of Contents 1. Requirements ....................3 2. Package Contents ..................4 3. WSG-500 ....................5 4. Installation ....................7 5. Hardware Connection and Installation ............8 6. Configuration of Your WSG-500 ..............10... -
Page 3: Requirements
1. Requirements Cable modem or DSL/ADSL modem. Network cables. Use standard 10/100Base-TX network (UTP) cables with RJ45 connectors. Subscriber PC installed with Wireless adapter that complied with 802.11b, 802.11g or 802.11n. Workstations of subscribers running Windows 2000/XP, MAC OS9 or later. Linux, UNIX or other platform compatible with TCP/IP protocols. -
Page 4: Package Contents
2. Package Contents 1 x WSG-500 unit 1 x Power Adaptor 1 x User’s Manual CD 1 x Quick Installation Guide 1 x RJ-45 Cable 1 x RS-232 2 x Antenna 1 x Ground Wire 1 x Screw Package... -
Page 5: Wsg-500
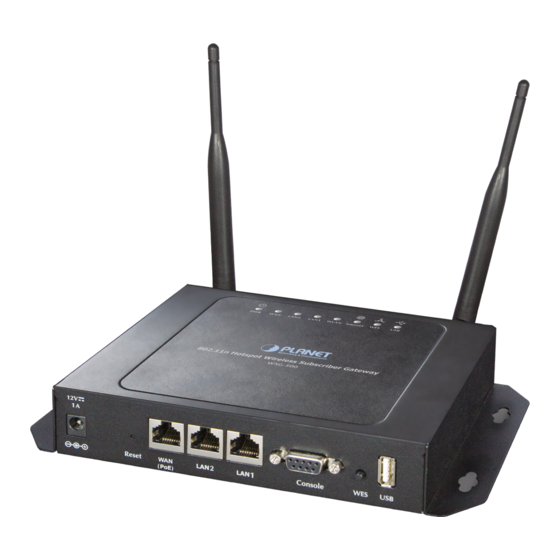
3. WSG-500 Overview Top Panel The top panel of PLANET WSG-500 is shown below. Front Panel The Front panel of PLANET WSG-500 is shown below. LED Definition Color Status LED Description The device is turned off Blue The device is turned on The WAN is not connected. - Page 6 The WAN is not connected to the internet. Blue The WAN is connected to the internet. INTERNET For indicating WES status during WES setup: Master Slave LED flashing WES Start LED flashing quickly slowly LED flashing WES Negotiate LED flashing quickly slowly Blue WES Fail...
-
Page 7: Installation
Wireless Subscriber Gateway. Connecting the Antennas PLANET WSG-500 provides two antenna connectors on the rear of the unit for wireless subscribers. Installation Requirement Before installing PLANET WSG-500, make sure your network meets the following requirements. -
Page 8: Hardware Connection And Installation
Physical Installation Public Zone Laptop Laptop ADSL/Cable Smart Phone Smart Pad Internet Mobile Guests Modem WSG-500 Private Zone Administrator Ticket Printer Generator 100Base-TX UTP 100Base-TX UTP with PoE Telephone wire PoE Switch 2.4GHz 802.11n Clerk Administration Physical connection of WSG-500... - Page 9 3. Account Generator WSG-ACG5 is an optional device. Hint 4. It is recommended that you leave IP settings on subscriber PC as automatically assigned. By machine default configurations, WSG-500 will act as a DHCP server, and it will assign PC the necessary IP settings.
-
Page 10: Configuration Of Your Wsg-500
To access the web management interface, connect the PC and WSG-500 in advance via the Private Port of WSG-500. Then, launch the web browser and enter the IP address of the gateway for that port in the address field then press Enter. Default IP address of the default gateway of the Private Port is https://192.168.1.254... - Page 11 Select a proper time zone in the drop-down menu, and enter the URL of a NTP server to set up the system time. The clients will be redirected after logging into the system successfully. Enable portal URL and configure a desired website here. Click “Next”...
- Page 12 Select desired wireless Band, Channel, and ESSID for public zone. Click “Next” to continue. Step 3: Authentication Settings for Public Zone The clients in public zone shall log in the system before using network service if Auth Required is enabled. When Auth Required is enabled, a default authentication server shall be config- ured.
- Page 13 Enter the Username (e.g. “testuser”) and Password (e.g. testuser), then click Create button. Click “Close” and “Next” to continue.
- Page 14 Step 4: Confirm and Restart Click Finish to save current settings and restart the system. A Confirm and Restart message will appear on the screen during the restarting process. Please do not interrupt the system until the Administrator Login Page appears.
- Page 15 WSG-500. 2. The client device will obtain an IP address automatically via DHCP from WSG-500. Open a web browser on a client device, access any URL, and then the default User Login Page will appear. 3. Enter the Username and Password of an on-demand account previously gener- ated via Setup Wizard (e.g.
- Page 16 The Login Success Page will appear after a client has successfully logged into WSG- 500 and has been authenticated by the system. The appearance of Login Success Page means that WSG-500 has been installed and configured properly. After these steps, your WSG-500 is able to establish Internet connection. More machine configurations and information can be found in the user’s manual CD,...
Need help?
Do you have a question about the WSG-500 and is the answer not in the manual?
Questions and answers