Table of Contents
Advertisement
Quick Links
Advertisement
Table of Contents

Related Manuals for Samoa LARIUS MIRO


Summary of Contents for Samoa LARIUS MIRO
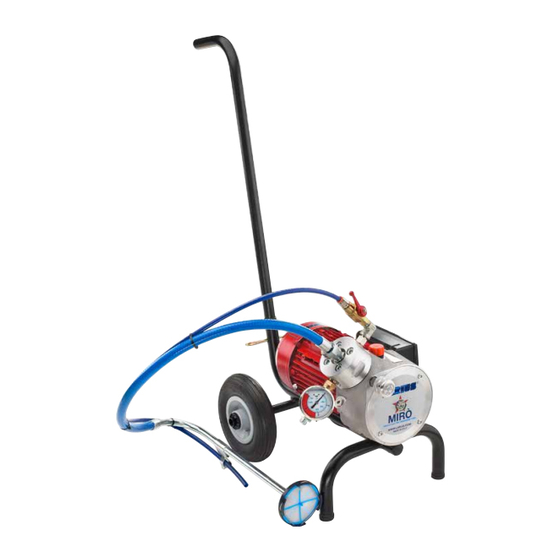
- Page 1 w w w . l a r i u s . c o m Miro' Electric diaphragm pump...
- Page 2 This manual is to be considered as an English language translation of the original manual in Italian. The manufacturer shall bear no responsibility for any damages or inconveniences that may arise due to the incorrect translation of the instructions contained within the original manual in Italian. Due to a constant product improvement programme, the factory reserves the right to modify technical details mentioned in this manual without prior notice.
-
Page 3: Table Of Contents
Miro' Miro' Electric diaphragm pump INDEX WARNING ................................p. 2 WORKING PRINCIPLE ............................p. 3 TECHNICAL DATA ..............................p. 4 DESCRIPTION OF THE EQUIPMENT ........................p. 5 TRANSPORT AND UNPACKING ..........................p. 7 CONDITIONS OF GUARANTEE ..........................p. 7 SAFETY RULES ..............................p. 7 SETTING-UP ................................ -
Page 4: Awarning
Miro' WARNINGS The table below provides the meaning of the symbols used in this manual in relation to using, earthing, operating, maintaining, and repairing of this equipment. • Read this operator’s manual carefully before using the equipment. • An improper use of this machine can cause injuries to people or things. •... -
Page 5: Bworking Principle
Miro' WORKING PRINCIPLE The LARIUS MIRÒ unit is defined as an “electric diaphragm The product is sucked up, pushed towards the pump outlet and pump”. An electric diaphragm pump is used for high pressure sent to the guns through the flexible hose. A hydraulic valve on paint spraying without air (known as “airless”). -
Page 6: Ctechnical Data
Miro' TECHNICAL DATA MIRÒ on trolley MIRÒ on frame SUPPLY* 230V 50Hz 230V 50Hz MOTOR POWER 0,75 kW 0,75 kW 115 VAC (60Hz) 115 VAC (60Hz) VOLTAgES AVAILAbLE 400 VAC (50Hz) 400 VAC (50Hz) MAX. WORKINg PRESSURE 220 bar 220 bar MAX. -
Page 7: Ddescription Of The Equipment
Miro' DESCRIPTION OF THE EQUIPMENT MIRO' HORIZONTAL SUCTION Fig. 1D Pos. Description Pos. Description Carriage Colour body Electric / combustion motor Suction tube High pressure manometer Recirculation tube Setting valve LARIUS AT 250 gun Hydraulic oil filling cap High pressure feed tube Hydraulic body Circulation tap www.larius.com... - Page 8 Miro' MIRO' VERTICAL SUCTION Fig. 2D Pos. Description Pos. Description Electric / combustion motor Tank High pressure manometer Circulation tap Setting valve Recirculation tube Hydraulic oil filling cap Feed tube connection Hydraulic body Feed tube Colour body LARIUS AT 250 gun www.larius.com REV.
-
Page 9: Etransport And Unpacking
Miro' TRANSPORT AND UNPACKING SAFETY RULES • The packed parts should be handled as indicated in the • THE EMPLOYER SHALL TRAIN ITS EMPLOYEES ABOUT symbols and markings on the outside of the packing. ALL THOSE RISKS STEMMING FROM ACCIDENTS, ABOUT THE USE OF SAFETY DEVICES FOR THEIR OWN SAFE- •... -
Page 10: Hsetting-Up
Miro' TION BETWEEN PUMP, FLEXIBLE HOSE AND SPRAY GUN • Do not carry the equipment neither unplug it by pulling the BEFORE USING THE EQUIPMENT. electric cable. Protect the cable from heat, oil and sharp edges. • ALWAYS USE THE FLExIBLE HOSE SUPPLIED WITH KIT. •... - Page 11 Miro' Place the pressure control knob (H4) on the “MIN” position • The supply cable (H2) is provided without plug. • Use a plug which guarantees the plant earthing. (turn counterclockwise). Only a technician or a skilled person should perform the connection of the plug to the electric cable.
- Page 12 Miro' • Open the re-circulation tap (H7). • Point the gun at a container (H8) keeping the trigger pressed (so as to drain the oil inside) till a clean solvent comes out. Now, release the trigger. Aperto Fig. 7H • Turn the unit ON-OFF switch (H3) on the "ON"...
-
Page 13: Iworking
Miro' • Now the machine is ready. Should you use water paints, • Open the re-circulation tap (I2). besides the solvent wash, a wash with soapy and then clean water is suggested. • Press the ON/OFF switch of the equipment and turn a little the pressure control knob (I3) clockwise, so as the machine •... -
Page 14: Jcleaning At The End Work
Miro' CLEANING AT THE END WORK • Reduce pressure to the minimum (turn counterclockwise the pressure control knob (J1) ). Fig. 1J • Press the ON/OFF switch (J2) placed on the box of the electric motor, to stop the equipment. Fig. - Page 15 Miro' • Point the gun (J5) at the product tank (J6) and, keeping the trigger pressed, release the remaining product till a clean solvent comes out. Now, release the trigger. Open Fig. 3J For the horizontal version, lift the suction hose and replace the bucket containing the product with a bucket of solvent (make sure it is compatible with the product you are using).
-
Page 16: Kroutine Maintenance
Miro' CLEANING THE COMPRESSION VALVE ROUTINE MAINTENANCE If the machine has problems with sucking up the liquid, disas- RIPRISTINO OLIO IDRAULICO semble the compression valve (K3), and clean it with solvents With each start up, check the hydraulic oil level by looking through that are specifically for the type of paint being used. - Page 17 Miro' Check that the ball seals in its seating as follows: • Turn the valve (K3) upside down; Fig.8K Fig. 6K • If the solvent flows out the holes at the bottom within a few minutes, replace this valve with a new one; •...
- Page 18 Miro' REPLACING HYDRAULIC OIL After operating for 100 hours, replace the oil in the pump; Filter • Discharge the waste oil through the plug (K4) fitted at the bottom of the pump casing. • Clean the seals on the cap and replace it if worn. •...
-
Page 19: Lwarning Plate
Miro' CLEANING THE MOTOR COOLING FAN GUARD Clean the motor cooling fan protection guard (K6) and the finned motor casing periodically to ensure the maximum cooling. Fig.15K WARNING PLATE ® ® Apparecchi per verniciatura Paint spraying units ATTENZIONE WARNING UTILIZZARE GRUPPI ELETTROGENI USE POWER UNITS WITH CON ALTERNATORE ASINCRONO ASYNCHRONOUS ALTERNATOR... -
Page 20: Mproblems And Solutions
Miro' PROBLEMS AND SOLUTIONS Problem Cause Solution The equipment does not start Lack of voltage; Check the correct connection to the power supply; Considerable drops in mains voltage; Check the extension cable; ON-OFF switch disconnected; Ensure the ON-OFF switch is on the “ON”... -
Page 21: Ncorrect Procedure Of Decompression
Miro' CORRECT PROCEDURE OF • Disconnect the power supply cable (N4). DECOMPRESSION • Insert the gun clamp (N1). Clamp inserted Fig.4N • Release the gun clamp (N1). Point the gun at the tank of the Clamp released product and press the trigger to release pressure. At the end of the operation, insert the gun clamp. -
Page 23: Ocomplete Hydraulic Body
Miro' SPARE PARTS Trolley assembly pages 30-31 Complete hydraulic body pages 22 Complete colour body pages 24 Complete petrol engine casing pages 32 Horizontal suction system pages 27 Vertical suction system pages 26 Complete colour body pages 24 Complete hydraulic body pages 22 www.larius.com REV. - Page 24 Miro' COMPLETE HYDRAULIC BODY Rif. 21515 WARNING: Always indicate code and quantity for each part required. www.larius.com REV. 2 - 09/2020 - Cod. 150138...
- Page 25 Miro' Pos. Code Description Q. ty Pos. Code Description Q. ty 21520 Electric motor 240V-50Hz 20F 32015/2 Elastic ring 21521 Electric motor 120V-60Hz 20g 32015/3 51006 Switch 32016 Setting catch 21522 Condenser 440V - 16µf 32017/2 Spring 21523 Condenser 440V - 32µf 20L 32017/1 Knob 34020...
-
Page 26: Pcomplete Colour Body
Miro' COMPLETE COLOUR BODY WARNING: Always indicate code and quantity for each part required. www.larius.com REV. 2 - 09/2020 - Cod. 150138... - Page 27 Miro' Pos. Code Description Q. ty Pos. Code Description Q. ty 33010 Washer 21620 gravity model assembly 53006 Spring 21625 Suction model assembly 33029 Spring housing 21635 Colour body 33028 ball 95284 Union 21637 Valve casing 53001 Membrane spacer 33027 Sphere seat 33011 Union...
-
Page 28: Qvertical Suction System
Miro' VERTICAL SUCTION SYSTEM WARNING: Always indicate code and quantity for each part required. Pos. Code Description Q. ty Pos. Code Description Q. ty 18569 Recirculation tube 35007 Large filter 35103 Tank 55000 Cover 35006 Close filter 35101 Tank assembly www.larius.com REV. -
Page 29: Rhorizontal Suction System
Miro' HORIZONTAL SUCTION SYSTEM WARNING: Always indicate code and quantity for each part required. Pos. Code Description Q. ty 21645 Suction systems 21646 Suction tube 18170 Recirculation tube 18095 Spring 21647 Filter of suction 16066 Nut with spring www.larius.com REV. 2 - 09/2020 - Cod. 150138... -
Page 30: Strolley Assembly
Miro' TROLLEY ASSEMBLY WARNING: Always indicate code and quantity for each part required. WHEELED CARRIAGE ASSEMBLY Pos. Code Description Q. ty 21680 Complete assembly 12454 Vibration damper 21652 Threaded cap 69014 Screw 21681 Carriage 91047 Stop washer 21682 Pneumatic wheel 21683 Split pin 21688... - Page 31 Miro' PETROL ENGINE CARRIAGE Pos. Code Description Q. ty Pos. Code Description Q. ty 18911 Complete carriage 18902 Split pin 12454 Vibration damper foot 18914 bushing 12473 Threaded cap 95159 Pipe cap 18913 Trolley frame 18912 Handle 37218 Pneumatic wheel 8043 91047 Wheel stop washer...
-
Page 32: Tcomplete Petrol Engine Casing
Miro' COMPLETE PETROL ENGINE CASING WARNING: Always indicate code and quantity for each part required. www.larius.com REV. 2 - 09/2020 - Cod. 150138... - Page 33 Miro' Pos. Code Description Pos. Code Description 21693 4319 Motor 21690 Coupling extension 4237M Motor flange 31125 bearing 4244M Machined tang 21691 Connection flange 18935 Screw 81107 Shock absorber 34009 Washer 95156 Screw 4238M Spacer 81033 Washer 4233 95158 4239M Toothed pinion 21692 Fixing plate...
-
Page 34: Uaccessories
Miro' ACCESSORIES PISTON GUNSTOCK FILTERS Code 11039: Green (30M) - Code 11038: White (60M) Art. 11250: AT 250 1/4" Code 11037: Yellow (100M) - Code 11019: Red (200M) Art. 11200: AT 250 M16x1,5 MX 750 MX 1000 E MX 1100 E Code 217550: MX 750 - Code 217560: MX 1000 E - Code 217570: MX 1100 E DROP TANK SUCTION BELL KIT... - Page 35 Miro' HIGH PRESSURE HOSE 3/8" - M16x1,5 max pressure 425 bar ANTISTATIC HOSE 3/16" - M16x1,5 max pressure 210 bar Code 18063: 7,5 mt Code 6164: 5 mt Code 18064: 10 mt Code 55050: 7,5 mt Code 18065: 15 mt Code 35018: 10 mt ANTIPULSATIONS 1/4"...
- Page 36 Miro' GUN EXTENSION Art. 153: cm 30 -Art. 153: cm 40 Art. 155: cm 60 - Art. 158: cm 80 - Art. 156: cm 100 PLA 1/4” + BASE SUPER FAST-CLEAN Art. K11420-K11425-K11430: cm 130-180-240 PLA M16x1,5 + BASE SUPER FAST-CLEAN Art.
- Page 37 Miro' Art. 21590: COMPLETE SUCTION VALVE KIT Art. 21613: COMPLETE PRESSURE VALVE Art. 40130: COMPLETE MEMBRANE KIT www.larius.com REV. 2 - 09/2020 - Cod. 150138...
-
Page 38: Vversions
Miro' VERSIONS Ref. 21500: MIRO' TROLLEY MOUNTED WITHOUT SPRAYING Ref. 21501: MIRO' TROLLEY MOUNTED WITH SPRAYING ACCESSORIES ACCESSORIES Ref. 21564: MIRO' FRAME MOUNTED WITHOUT Ref.21565:MIRO' FRAME MOUNTED WITH SPRAYING SPRAYING ACCESSORIES ACCESSORIES www.larius.com REV. 2 - 09/2020 - Cod. 150138... - Page 39 Miro' AIRLESS DIAPHRAGM PUMPS VIKING Rif. 18741 DALI' Rif. 18900 GIOTTO Rif. 12450 www.larius.com REV. 2 - 09/2020 - Cod. 150138...
-
Page 41: Ce Declaration Of Conformity
Miro' CE DECLARATION OF CONFORMITY Company LARIUS srl Via Antonio Stoppani 21 - 23801 Calolziocorte (LC) ITALY Tel: +39 0341 621152 Fax: +39 0341 621243 E-mail: larius@larius.com Declares under his owns resonsibility that the product: MIRO' Electric diaphragm pump complies with the directives: - EC Directive 2006/42 Machinery Directive - EU Directive 2014/30 Electromagnetic Compatibility (EMC) - EU Directive 2014/35 Low Voltage (LVD) - Page 42 LARIUS srl Via Antonio Stoppani 21 - 23801 Calolziocorte (LC) ITALY TEL. +39 0341 621152 - Fax +39 0341 621243 - larius@larius.com www.larius.com...
Need help?
Do you have a question about the LARIUS MIRO and is the answer not in the manual?
Questions and answers