
Related Manuals for MasterCraft 054-6988-6


Summary of Contents for MasterCraft 054-6988-6
- Page 1 054-6988-6 PLUNGE ROUTER WITH 5-PIECE ROUTER BIT SET INSTRUCTION IMPORTANT: Read and understand this instruction manual thoroughly MANUAL before using the product.
- Page 2 headline bars continuation tabs notes warnings...
-
Page 3: Table Of Contents
TABLE OF CONTENTS Technical Specifications Safety Guidelines Key Parts Diagram Assembly Instructions Operating Instructions Maintenance Troubleshooting Parts List Warranty NOTE: If any parts are missing or damaged, or if you have any questions, please call our toll-free helpline at 1-800-689-9928. SAVE THESE INSTRUCTIONS •... -
Page 4: Technical Specifications
054-6988-6 | contact us 1-800-689-9928 TECHNICAL SPECIFICATIONS Rated voltage 120 V~, 60 Hz Rated power input Horsepower 1 3/4 HP No-load speed 0–28,000 RPM Collet capacity 1/4" (6.4 mm) continuation tabs Plunge stroke 2 1/8" (55 mm) Base dimension 6 1/2"... -
Page 5: Safety Guidelines
SAFETY GUIDELINES WARNING! Safety symbols in this instruction manual are used to flag possible dangers. The safety symbols and their explanations require your full understanding. The safety warnings do not, by themselves, eliminate any danger, nor are they substitutes for proper accident prevention measures. - Page 6 054-6988-6 | contact us 1-800-689-9928 ELECTRICAL SAFETY • Power tool plugs must match the outlet. Never modify the plug in any way. Do not use any adapter plugs with earthed (grounded) power tools. Unmodified plugs and matching outlets will reduce risk of electric shock.
- Page 7 • Do not use the power tool if the switch does not turn it on and off. Any power tool that cannot be controlled with the switch is dangerous and must be repaired. • Disconnect the plug from the power source and/or the battery pack from the power tool before making any adjustments, changing accessories, or storing power tools.
- Page 8 054-6988-6 | contact us 1-800-689-9928 BPM ....Beats per minute ....WARNING – To reduce the risk of injury, user must read instruction manual....WARNING – To reduce the risk of injury always wear eye protection.
-
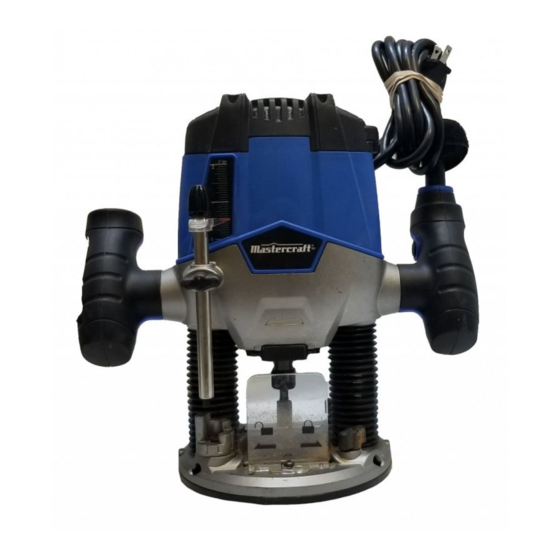
Page 9: Key Parts Diagram
PACKAGE CONTENTS: Router, collet wrench, chip guard, straight-edge guide, collet/nut, vacuum adaptor (with two screws), bushing adaptor (with two nuts), 5-piece router bit set, instruction manual. 5-Piece Router Bit Set: 1/4" (6 mm) diameter straight cutting bit, 1/4" (6 mm) radius cove bit, 1/4" (6 mm) radius roundover bit, 3/8"... - Page 10 054-6988-6 | contact us 1-800-689-9928 Description No. Description Trigger switch Depth-of-cut scale Lock-on button Dust-extraction adaptor Speed adjuster Chip shield Plunge-lock lever Locking screw Spindle lock Lock bolt continuation tabs continuation tabs Collet nut...
-
Page 11: Assembly Instructions
ASSEMBLY INSTRUCTIONS ELECTRONIC SPEED ADJUSTMENT The speed of your router is variable. At position “0”, there is no action; position “5” results in the highest speed. Use the electronic speed adjuster (3) to produce uniform results in wood, plastics and other materials. - Page 12 054-6988-6 | contact us 1-800-689-9928 INSTALLING/REMOVING fig 2 THE ROUTER BIT (fig 2) To install the bit 1. Unplug the router. 2. Remove the detachable chip shield (11). 3. Keep the spindle lock (5) depressed and rotate the spindle until the spindle lock fully engages.
- Page 13 ADJUSTING THE DEPTH OF CUT USING THE SCALE 1. Unplug the router. 2. Loosen the locking screw (12). 3. Pull the plunge-lock lever (4) up. 4. Lower the router until the router bit touches the workpiece. 5. Push the plunge-lock lever (4) down. 6.
- Page 14 054-6988-6 | contact us 1-800-689-9928 ADJUSTING THE DEPTH-STOP TURRET Use the depth-stop turret to change among different depths without changing the depth stop settings. The most common use of this feature is making successively deeper cuts to achieve a final depth of cut that is too deep to accomplish in a single pass.
- Page 15 TO INSTALL ROUTER BUSHINGS fig 6 (NOT INCLUDED) 1. Unplug the router. 2. Remove two screws from router base (fig 6). 3. Put the bushing into the centre hole of the adaptor, and screw in the bushing ring (not included) secure it.
-
Page 16: Operating Instructions
054-6988-6 | contact us 1-800-689-9928 OPERATING INSTRUCTIONS TURNING THE ROUTER ON AND OFF (fig 10) fig 10 Turning the router on Lock-on Press the trigger switch (1). button Turning the router off continuation tabs... - Page 17 EDGE ROUTING (fig 11) fig 11 1. Set the cutting depth and, place the router on the edge of workpiece, making sure that the cutter does not contact the workpiece. 2. Clamp an edge guide (board or metal straightedge) in place to help guide the router base.
- Page 18 054-6988-6 | contact us 1-800-689-9928 INTERNAL ROUTING (figs 12 and 12a) fig 12 Plunge up: 1. Set the cutting depth and lock the plunge action set up in the raised (Up) position. Turn the motor “On” and allow the motor build up to its full speed (fig 12).
- Page 19 EDGING WITH A PILOT BIT fig 13 Motor housing (figs 13 and 13a) Spindle Spindle Arbor-type bits with pilots are excellent for edge Collet/nut lock shaping any workpiece edge that is either straight, or Fixed base has a curve equal to or greater than the radius of the Workpiece bit to be used.
- Page 20 054-6988-6 | contact us 1-800-689-9928 FEEDING THE ROUTER (fig 14) fig 14 Router feed direction Router end grains first continuation tabs rotation Router feed notes direction Router feed direction The secrets to professional-looking routing are careful set-up for the cut, proper depth-of-cut selection, knowing how the cutting bit reacts in the workpiece, and the rate and direction of feed of the router.
- Page 21 KICKBACK Because of the high speed of the cutting bit during a proper feeding operation (left to right), there is very little kickback under normal conditions. However, if the cutting bit strikes a knot, an area of hard grain in the workpiece, or a foreign object, the normal cutting action could be affected and cause kickback.
- Page 22 054-6988-6 | contact us 1-800-689-9928 RATE OF FEED (figs 16a and 16b) fig 16a Bit shank The proper rate of feed depends on several factors: the hardness and moisture content of the workpiece, the depth of cut, and the cutting diameter of the bit.
-
Page 23: Maintenance
MAINTENANCE Before cleaning or performing any maintenance, make sure the router has been disconnected from its power supply. Keep all ventilation openings clean. Avoid using solvents to clean plastic parts. Most plastics are vulnerable to damage from commercial solvents. Use a clean cloth to remove dirt, oil and grease. -
Page 24: Troubleshooting
054-6988-6 | contact us 1-800-689-9928 TROUBLESHOOTING Problem Possible Causes Solution Plug is not connected to a Connect the plug to a functioning electrical outlet functioning electrical outlet The router does not work Switch is in “OFF” position Pull the switch to “ON”... -
Page 25: Parts List
EXPLODED VIEW... - Page 26 054-6988-6 | contact us 1-800-689-9928 Part No. Description Part No. Description 5610106000 Tapping screw 3122997000 Plunge lock lever 3320386000 Cover 5620346000 Slotted set screw 3123273000 Cover 3700074000 Spring 4900252000 Speed adjuster 5630037000 5610017000 Tapping screw 3320387000...
- Page 27 Part No. Description Part No. Description 3550759000 Plunge rod 3420482000 Bottom support 3123306000 Upper cover 5620112000 Slotted set screw 5630003000 Hexagon nut 3550588000 Guiding rod 3123305000 Lower cover 3122909000 Base plate 3121632000 Bellows seal 5620220000 Screw 5620103000 Slotted shoulder screw 3700872000 Guide bush 3700078000...
-
Page 28: Warranty
This Mastercraft product is guaranteed for a period of 3 years from the date of original retail purchase against defects in workmanship and materials, except for the following components: a) Component A: Batteries, chargers and carrying case, which are guaranteed for a period of 2 years from... - Page 29 The provisions contained in this warranty are not intended to limit, modify, take away from, disclaim or exclude any statutory warranties set forth in any applicable provincial or federal legislation. Made in China Imported by Mastercraft Canada Toronto, Canada M4S 2B8...
Need help?
Do you have a question about the 054-6988-6 and is the answer not in the manual?
Questions and answers