
Related Manuals for MasterCraft 054-6962-6


Summary of Contents for MasterCraft 054-6962-6
- Page 1 054-6962-6 CORDED METAL SHEAR IMPORTANT: INSTRUCTION Please read this manual carefully before running these metal MANUAL shear and save it for reference.
- Page 2 headline bars continuation tabs notes continuation tab warnings notes warnings...
-
Page 3: Table Of Contents
TABLE OF CONTENTS Technical specifications General power tool safety warnings Symbols Key parts diagram Accessories Parts list Operating instructions Maintain tools with care Troubleshooting Warranty NOTE: If any parts are missing or damaged, or if you have any questions, please call our toll-free helpline at 1-800-689-9928. -
Page 4: Technical Specifications
054-6962-6 | contact us 1-800-689-9928 TECHNICAL SPECIFICATIONS Voltage: 120 V 60 Hz AC Amps: No-load speed: 0-2500 SPM Minimum cutting radius: 7 7/8˝ (20 cm) continuation tabs Maximum cutting capacity: Sheet metal: 18 gauge (1.2 mm) Stainless steel: 20 gauge ( 0.9 mm) Head swivel: 360º... -
Page 5: General Power Tool Safety Warnings
WORK AREA SAFETY Keep work area clean and well lit. Cluttered or dark areas invite accidents. • • Do not operate power tools in explosive atmospheres, such as in the presence of flammable liquids, gases or dust. Power tools create sparks which may ignite the dust or fumes. Keep children and bystanders away while operating a power tool. -
Page 6: Personal Safety
054-6962-6 | contact us 1-800-689-9928 • If operating a power tool in a damp location is unavoidable, use a residual current device (RCD) protected supply. Use of an RCD reduces the risk of electric shock. PERSONAL SAFETY •... - Page 7 SERVICE Have your power tool serviced by a qualified repair person using only identical replacement parts. • This will ensure that the safety of the power tool is maintained.
-
Page 8: Symbols
054-6962-6 | contact us 1-800-689-9928 SYMBOLS To reduce the risk of injury, user must read instruction manual Double insulation continuation tabs Warning Wear ear protection notes Wear eye protection Wear dust mask Don’t use in the rain warnings... -
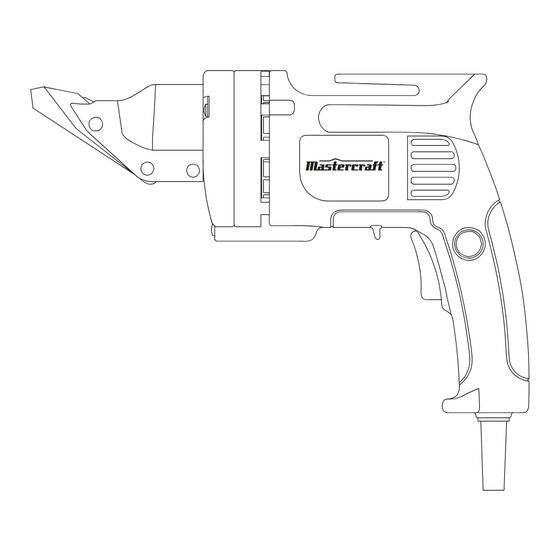
Page 9: Key Parts Diagram
KEY PARTS DIAGRAM Description Description Cutting blade Handle 360° swivel head Power cable Variable speed trigger switch Blade cover Lock-on button Not all the accessories illustrated or described are included in standard delivery. -
Page 10: Accessories
054-6962-6 | contact us 1-800-689-9928 ACCESSORIES Hex key continuation tabs notes warnings We recommend that you purchase your accessories from the same store that sold you the tool. Use good quality accessories marked with a well-known brand name. Choose the type according to the work you intend to undertake. -
Page 11: Parts List
PARTS LIST No. Description Qty. No. Description Qty. Middle blade Brand Label Bearing sleeve Switch Right blade Screw Left blade Press wire board Screw Blade base Housing Screw Cord sleeve Aberrancy nut Power cord Bearing Screw Bearing sleeve Housing cover Washer Washer Bearing... - Page 12 054-6962-6 | contact us 1-800-689-9928 continuation tabs continuation tabs notes notes warnings warnings...
-
Page 13: Operating Instructions
VARIABLE SPEED TRIGGER SWITCH AND LOCK-ON BUTTON (See Fig. A) Depress trigger switch (3) to start and release it to stop your metal shear. It is also a variable speed switch that delivers higher speed with increased trigger pressure. Speed is controlled by the amount of switch trigger depression. - Page 14 054-6962-6 | contact us 1-800-689-9928 Fig. B ADJUSTING THE 360° SWIVEL HEAD (See Fig. C1, C2) When shearing large workpieces or curves, you may wish to rotate the swivel head to reduce the interference with the handle. The cutting head can be rotated by 360...
- Page 15 Fig. C2 REPLACING THE CUTTING BLADE (See Fig. D) After considerable use, the cutting blade will become worn and will have to be replaced. The following instructions detail how to remove and replace cutting blade. 1. Remove the screw (a3) with the hex key ensuring you do not lose the two short spacers (d1, d2).
-
Page 16: Maintain Tools With Care
054-6962-6 | contact us 1-800-689-9928 MAINTAIN TOOLS WITH CARE Remove the plug from the socket before carrying out any adjustment, servicing or maintenance. Your power tool requires no additional lubrication or maintenance. There are no user-serviceable parts in your power tool. -
Page 17: Troubleshooting
TROUBLESHOOTING Symptom Possible Causes Possible Solution 1. Wire is broken 1. Repair broken wire 2. Unproper fit of the switch Motor don’t run 2. Replace switch 3. Carbon brush didn’t contact with 3. Adjust spring direction 1. Some parts are choked 1. -
Page 18: Warranty
054-6962-6 | contact us 1-800-689-9928 This Mastercraft product is guaranteed for a period of 3 years from the date of original retail purchase against defects in workmanship and materials, except for the following components: a) Component A: Batteries, chargers and carrying case, which are guaranteed for a period of 2 years from the date of original retail purchase against defects in workmanship and materials;...
Need help?
Do you have a question about the 054-6962-6 and is the answer not in the manual?
Questions and answers