Table of Contents
Advertisement
Quick Links
Advertisement
Table of Contents

Related Manuals for VTech CL6527A


Summary of Contents for VTech CL6527A
- Page 1 User's manual Model: hkphones.vtech.com CL6527A...
-
Page 2: Table Of Contents
TABLE OF CONTENT Important safety instructions What’s in the box Getting started Location Handset Overview Base Overview Display Icons Overview Main Menu Structure Connect Install the Handset Battery Charge the Batteries Keystroke Table Navigating the Handset Menu Telephone operation Make a Call Call from the Phonebook Speakerphone Volume Boost... - Page 3 Call from the Redial List Answer a Call Adjust Earpiece and Speakerphone Volume Temporary Ringer Silencing End a Call Call Timer Redial Chain Dialing Find the Handset (Paging) Internal Calls Power Fail Back-up Telephone settings Date and Time Settings Handset Settings Base Settings Call log View the Call Log...
- Page 4 Entering Names Writing Tips Review an Entry Dial an Entry Search a Phonebook Entry Alphabetically Edit a Phonebook Entry Delete a Phonebook Entry Delete All Phonebook Entries Check phonebook capacity Speed dial Assign a Speed Dial Number from the Directory VIP list Call Guard Call Guard Announce...
- Page 5 Answering system Answer On/Off Message Playback Delete All Messages Record, Play, or Delete Memos Announcement Number of Rings Recording Time Remote Access Setting Change Remote Access PIN Code Call Screening Call Intercept Remote Access Direct Memory Keys Base photo Speed Dial Keys SOS Emergency Calls Reminder Alarm Talking Digits...
- Page 6 Sensor operations Sensor mode Arm/Disarm the sensor alert system Sensor Arm/Disarm PIN protection Specific device operations Doorbell Extension Ringer Device Monitoring General product care Frequently asked questions Technical specifications...
-
Page 7: Important Safety Instructions
IMPORTANT SAFETY INSTRUCTIONS When using your telephone equipment, basic safety precautions should always be followed to reduce the risk of fire, electric shock and injury, including the following: 1. Read and understand all instructions. 2. Follow all warnings and instructions marked on the product. - Page 8 are not sure of the type of power supply in your home or office, consult your dealer or local power company. 9. Do not allow anything to rest on the power cord. Do not install this product where the cord may be walked 10.
- Page 9 • If the product has been dropped and the telephone base and/or handset has been damaged. • If the product exhibits a distinct change in performance. 14. Avoid using a telephone (other than cordless) during an electrical storm. There is a remote risk of electric shock from lightning.
- Page 10 18. The power adapter is intended to be correctly oriented in a vertical or floor mount position. The prongs are not designed to hold the plug in place if it is plugged into a ceiling, under-the-table or cabinet outlet. 19. For pluggable equipment, the socket-outlet shall be installed near the equipment and shall be easily accessible.
-
Page 11: What's In The Box
WHAT’S IN THE BOX The package contains the following items: • Handset • Telephone base • Power adaptor • Telephone line cord • Battery compartment cover • 3 x AAA rechargeable batteries • User guide • Quick start guide • Warranty card... -
Page 12: Getting Started
GETTING STARTED LOCATION Place your CL6527A within 2 metres of the mains power socket and telephone socket so that the cables will reach. Make sure it is at least 1 metre away from other electrical appliances to avoid interference. Your CL6527A works by sending radio signals between the base and handset. -
Page 13: Handset Overview
HANDSET OVERVIEW 1 – CHARGE light • On when the handset is charging. 2 – Handset earpiece 3 – LCD display 4 – Direct memory keys (M1/M2/M3/M4) - Page 14 • When idle, press to dial a preset memory number stored on the respective key. 5 – MENUOK • Show the menu. • While in a menu, press to select an item, or save an entry or setting. 6 – TALK/SPEAKER •...
- Page 15 • Press to enter when dialing or inputing numbers. 9 – SPEAKERPHONE 10 – / SOS • Press to enhance the clarity and loudness of the caller’s voice during a call. • When idle, press and hold to start calling the SOS numbers according to Emergency calling sequence set.
-
Page 16: Base Overview
BASE OVERVIEW 1 – ANS ON/OFF LIGHT • On when the answering system is turned on. 2 – CHARGING CRADLE 3 – PHOTO SPEED DIAL KEYS (1/2/3/4) • When idle, press to dial a preset memory number stored on the respective key. 4 –... - Page 17 6 – PLAY/STOP • Press to play messages. • Press to stop message playback. DELETE • Press to delete the playing message. • When the phone is not in use, press twice to delete all old messages. SLOW • Press to slow down the answering system message. ANS ON •...
- Page 18 7 – VISUAL RINGER INDICATOR • Steadily on during registration, when the base speakerphone mode is on, or when the handset is on a call. • Flashes according to the incoming ring pattern during an incoming call. • Flashes at a rate of half-second on half-second off for 2 minutes during handset paging.
-
Page 19: Display Icons Overview
DISPLAY ICONS OVERVIEW Handset display icons displays when there the signal strength is strong. displays when there the signal strength is moderate. displays when there the signal strength is weak. On when the home line is in use or there is an incoming home call. - Page 20 There are new Call log entries. The answering system is turned on. There are new voicemail received from your telephone service provider. On when a reminder is set. Flashes when a reminder set is reached. Only applicable when you registered sensor(s) to the telephone base: On when armed in local mode.
-
Page 21: Main Menu Structure
MAIN MENU STRUCTURE When the handset is switched on and in idle mode: 1. Press when the handset is not in use. 2. Press until the screen displays the desired feature menu. 3. Press to enter that menu. • To return to the previous menu, press •... - Page 22 CALL BLOCK INTERCOM (for BS SETTING multi-handset packs only) BLACK LIST [Handset list] BS RINGER SETTINGS BASE RING VOL CALL GUARD VOICE LANG BLOCK MODE DIAL MODE NO NUMBER FLASH TIME HS SETTING ANS. SYSTEM DIRECT MEM RING SETUP PLAYBACK TONE SETUP DELETE OLD LANGUAGE...
-
Page 23: Connect
CONNECT NOTES • Use only the adaptors provided. • Make sure the electrical outlets are not controlled by wall switches. • The adaptors are intended to be correctly oriented in a vertical or floor mount position. The prongs are not designed to hold the plug in place if it is plugged into a ceiling, under- the-table or cabinet outlet. - Page 24 Connect the handset charger (for multi-handset packs only)
-
Page 25: Install The Handset Battery
INSTALL THE HANDSET BATTERY 1. Slide open the battery compartment cover. 2. One by one, insert 3 AAA batteries into the battery compartment, according to the polarity. 3. Slide the battery compartment cover back into place, until you hear a click sound. NOTES •... -
Page 26: Charge The Batteries
CHARGE THE BATTERIES Place the handset in the telephone base to charge. KEYSTROKE TABLE 1 . - ‘ ( ) * # & / A B C 2 a b c D E F 3 d e f G H I 4 g h i J K L 5 j k l M N O 6 m n o P Q R S 7 p q r s... -
Page 27: Telephone Operation
TELEPHONE OPERATION MAKE A CALL Preparatory dialing Enter the phone number. If you make a mistake, press to delete the last digit. Press to dial the number. Direct dialing Press to take the line. Enter the phone number to dial. CALL FROM THE PHONEBOOK Press then... -
Page 28: Speakerphone
SPEAKERPHONE During a call, press to switch between speakerphone and normal handset use. When the speakerphone is active, the handset displays SPEAKER ON and . VOLUME BOOST Use the volume boost feature to enhance the loudness of the voice on handset earpiece. To turn on volume boost on the handset: •... -
Page 29: Call From The Call Log
CALL FROM THE CALL LOG twice to select CALL LOG. Press NOTE • The first entry in the call log will be displayed. If there is no entry in the call log, it will show “EMPTY”. Press then to select desired call log. Press to dial the number. -
Page 30: Temporary Ringer Silencing
TEMPORARY RINGER SILENCING When the telephone is ringing, you can temporarily silence the ringer of the handset or the telephone base without disconnecting the call. The next call rings normally at the preset volume. To silence the ringer temporary on a handset: Press To silence the ringer temporary at the base: Each handset and the base ring when there is an incoming... -
Page 31: Redial
REDIAL You can redial up to 5 of the last numbers called. The most recent last number will display at the top of the redial list. Redial a Number from the Redial List When idle mode, press to access the redial list. Press to browse the redial list. -
Page 32: Chain Dialing
Delete the Entire Redial List Follow Steps 1 and 2 in the section of Redial a Number from the Redial List. to select DELETE ALL. Press Press , and then press again to confirm. CHAIN DIALING Use this feature on the cordless handsets to initiate a dialing sequence from numbers stored in the phonebook, call log or redial list while you are on a call. -
Page 33: Find The Handset (Paging)
To access a number on the redial list: Press while on a call. Press to select REDIAL. Press to scroll to desired entry. 4. Press to dial the displayed number. FIND THE HANDSET (PAGING) Paging is a useful way for finding lost handset(s). Press on the base station. -
Page 34: Internal Calls
INTERNAL CALLS This feature is only applicable when there are at least two registered handsets. It allows you to make internal calls, transfer external calls from one handset to another handset and make conference calls. If the called handset is not answered within 60 seconds, the called handset will stop ringing and the calling handset will return to standby mode. - Page 35 Transfer an External Call to Another Handset During an external call: Press to select INTERCOM. Press to select the desired handset to intercom with. The external call is put on hold automatically and the called handset rings. 4. Press on the called handset to establish an internal call.
-
Page 36: Power Fail Back-Up
POWER FAIL BACK-UP The Power Fail back-up system lets you make calls during a mains power interruption with your cordless phone. During a mains power interruption, you can supply the power stored in your handset battery to the base unit, so you can make calls even when the power is out. - Page 37 To answer a call using Power Fail Back-Up mode If there is only one handset registered to the base: When the phone rings, keep the handset on the main base unit and press to answer the call. The speakerphone will be turned on automatically and call is made.
-
Page 38: Telephone Settings
TELEPHONE SETTINGS Your phone comes with a selection of settings that you can change to personalize your phone the way you like it to work. DATE AND TIME SETTINGS You will need to set the correct time and date so that you know when you received answering machine (applicable to model with answering machine) or call log entries. -
Page 39: Handset Settings
Set the Date and time Press to select HS SETTING. Press to select DATE & TIME. Press to select SET DATE. 4. Press then enter the date according to DD- MM-YY or MM-DD-YY format. The date will be in the format you set. - Page 40 Set the Ringer Melody for Internal Calls You can set the melody to personalize your external ringer. A total of 10 melodies are provided for your selection. Press to select HS SETTING. to select RING SETUP. Press Press to select INT. RING. 4.
- Page 41 Set Alert Tones A single beep is emitted when you press a key. You can turn on or off the key tone. You can also turn on the alert tones when low battery and out of range are detected. Low battery tone will be emitted while you are talking with the phone to alert you that you need to charge your battery.
-
Page 42: Base Settings
Set Auto Answer You can turn this feature on or off. If you turn the auto answer feature on, the handset automatically answers an incoming call whenever you pick up the handset from the telephone base or a charger. to select HS SETTING. Press then Press... - Page 43 Set the Voice Language You can select Cantonese, Mandarin, or English to be used for the voice prompts in your answering system and sensor alert sytem. to select BS SETTING. Press Press to select VOICE LANG. to select CANTONESE, Press MANDARIN, or PULSE.
- Page 44 Reset Your Phone You can reset your phone to the default settings. After reset, all your personal settings, call log entries and redial list entries will be deleted, but your phonebook remains unchanged. to select HS SETTING. Press Press to select DEFAULT. Press , and then press again to...
-
Page 45: Call Log
CALL LOG This feature is available if you have subscribed to the Calling Number Display service from your telephone company. Your phone can store up to 30 received calls with date/time information in the Call Log. The number will be shown on the LCD when the phone is ringing. -
Page 46: Store A Call Log Number Into The Phonebook
STORE A CALL LOG NUMBER INTO THE PHONEBOOK Follow Steps 1 and 2 in the section of View the Call Log. to select ADD TO PB. Press Press and the selected call log number is displayed. 4. Edit the number if necessary. 5. -
Page 47: Phonebook
You can also select different melodies for your phonebook entries. The entries are store alphabetically. The entries are shared across all handsets when more than one handset is registered to your CL6527A base. STORE A NUMBER ENTRY IN THE PHONEBOOK When idle, press to access the phonebook. -
Page 48: Entering Names
ENTERING NAMES Use the keypad letters to enter names, e.g. to store Tom: Press 8 once to enter T. Press 6 three times to enter o . Press 6 once to enter m . WRITING TIPS Press to delete the last character or digit. Press and hold to delete all characters or digits. -
Page 49: Search A Phonebook Entry Alphabetically
SEARCH A PHONEBOOK ENTRY ALPHABETICALLY When idle, press to access the phonebook. Enter the first character of the name by multi-tap. EDIT A PHONEBOOK ENTRY When idle, press to access the phonebook. Press to select the entry you want to edit. to select EDIT. -
Page 50: Check Phonebook Capacity
CHECK PHONEBOOK CAPACITY You can check how many entries have been occupied in your VIP list and how many are available for further entry storage. When idle, press then to select PHONEBOOK. Press then to select ALL. Press then to select STATUS. 4. -
Page 51: Speed Dial
SPEED DIAL You can store six directory entries to the speed dial locations (1-9). The speed dial numbers can be shared by all handsets. Numbers assigned to the speed dial location must be selected from the directory. ASSIGN A SPEED DIAL NUMBER FROM THE DIRECTORY to select PHONEBOOK. -
Page 52: Vip List
VIP LIST You can add 50 numbers to the VIP list, so that you can choose to allow incoming calls of the numbers in the VIP list to be exempted from being blocked in the call block settings. Add a Number in the VIP List When idle, press to access the phonebook. -
Page 53: Call Guard
CALL GUARD If you have subscribed to a Calling Number Display service, you can use the call guard feature to reject certain calls automatically. This is achieved by adding up to 50 numbers into the block list, and/or programming the phone to reject all calls without number. -
Page 54: Set Block Mode
SET BLOCK MODE You can set the block mode to determine whether all types of calls are to be blocked. Press when the telephone is not in use. Press to scroll to CALL BLOCK. to scroll to SETTINGS. Press 4. Press to scroll to BLOCK MODE. -
Page 55: Add A Block List Entry
ADD A BLOCK LIST ENTRY Press when the telephone is not in use. Press to select CALL BLOCK. Press to choose BLACK LIST. 4. Press to choose ADD. 5. Press , and the use the dialing keys to enter a telephone number. -
Page 56: Delete A Block List Entry
4. Press to scroll to the desired entry. 5. Press to scroll to EDIT. 6. Press , and the use the dialing keys to enter a telephone number. Press , and the use the dialing keys to enter a name. 8. -
Page 57: Answering System
ANSWERING SYSTEM The total storage time for outgoing message, messages and memos is about 20 minutes. Use the answering system menu of a cordless handset to turn on or off the answering system or call screening, set up the announcement message, or change the number of rings, message recording time, remote access code, or system PIN. -
Page 58: Message Playback
MESSAGE PLAYBACK If you have new messages, the telephone plays the new messages automatically. If there are no new messages, the telephone plays back all messages (oldest first). To play messages at the telephone base: Press when the telephone is not in use. Options during playback: •... -
Page 59: Delete All Messages
DELETE ALL MESSAGES You can only delete old (reviewed) messages. You cannot delete new messages until you review them. You cannot retrieve deleted messages. To delete all messages with a handset: Press when the phone is not in use. Then, press to scroll to ANS. -
Page 60: Announcement
ANNOUNCEMENT The announcement is the message a caller first hear when the answering machine answers their call. There is a pre- recorded announcement message or you can record your own. To record your own announcement: Press when the phone is not in use. Then, to scroll to ANS. -
Page 61: Number Of Rings
NUMBER OF RINGS You can set the answering system to answer an incoming call after four, six, eight, or ten rings; or toll save. With toll save selected, the answering system answers after two rings when you have new messages, or after four rings when you have no new messages. -
Page 62: Remote Access Setting
REMOTE ACCESS SETTING You can turn on or off the remote access feature. Press when the phone is not in use. Then, to scroll to ANS. SYSTEM. press Press to scroll to SET TAM. to scroll to REMOTE ACC. Press 4. -
Page 63: Call Screening
CALL SCREENING To screen a call at a handset: If the answering system is on and your answering system is recording a message, the handset displays SCREENING ?. Press to screen the call on your handset. Options while a message is being recorded: •... -
Page 64: Remote Access
REMOTE ACCESS A two-digit security code is required to access the answering system remotely from any touch-tone telephone. The default code is 00. NOTE • Remote access can only be used if this function is activated. Dial your telephone number from any touch-tone telephone. -
Page 65: Direct Memory Keys
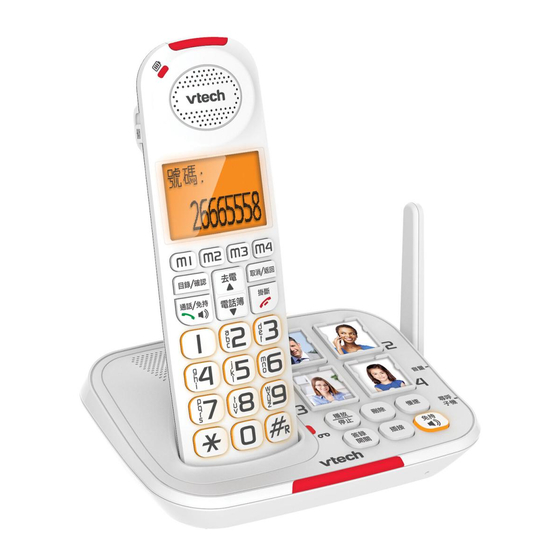
DIRECT MEMORY KEYS There are four direct memory keys on both the handset and the base - M1, M2, M3, and M4 on the handset and their corresponding photo speed dial keys 1, 2, 3, and 4 on the base. You can store a number into each of these keys and dial them directly from idle mode. -
Page 66: Base Photo Speed Dial Keys
BASE PHOTO SPEED DIAL KEYS There are four photo speed dial memory keys 1, 2, 3, and 4 on the right side of the telephone base, which synchronize with the numbers set in M1, M2, M3, and M4 slots on the handset. -
Page 67: Sos Emergency Calls
SOS EMERGENCY CALLS Do not solely rely on the SOS feature for emergency purpose. The SOS mode functionality is dependent on the phone settings and network availability. You need to program the SOS numbers before you can make SOS Emergency Calls. Make sure you program all the five SOS numbers to maximize the possibility of receiving response from others when you make an emergency call. - Page 68 Record, Play, or Delete SOS Messages The SOS message is your own recorded message to be played directly when you make an emergency call. The default SOS message is “This is an emergency call. Please press any number key to start the conversation.” You can record your own message using the handset.
- Page 69 To make the SOS Emergency Calls: • Press and hold SOS button on handset (or press SOS button on SOS pendant if one paired). SOS call can be cancelled internally by pressing: Handset – or SOS key; Base – key; Pendant (if one paired) –...
-
Page 70: Reminder Alarm
REMINDER ALARM You can set reminder alarms that could remind you at the time intervals you have set. Set the reminder alarm: Press when the phone is not in use, and then press to scroll to REMINDER. Press to scroll to your desired alarm. Press to choose ON / OFF. -
Page 71: Talking Digits
TALKING DIGITS You can choose whether the digits are to be announced whenever you press the number keys. To turn the Talking Digits on or off: Press when the phone is not in use, and then press to scroll to TALKING DIGIT. Press to scroll to ON or OFF. -
Page 72: Device Setup
You can add new Contact Sensor (VC7002A), Motion Sensor (VC7003A), Water Leakage Sensor (VC7006A), Extension Ringer (VC7014A), Audio Doorbell (VC7021A), and SOS pendant (VC7022A) to your CL6527A telephone system (all purchased separately). The VC7002A Contact Sensor lets you know if anything you care about is open or closed with these magnetic sensors, like a window, door or medicine cabinet. - Page 73 The CL6527A is capable of registering the following number of devices: • Up to 5 handsets, and no VC7002A, VC7003A, VC7006A, VC7014A, VC7021A or VC7022A; or • Up to 4 handsets, 1 VC7021A, and no VC7002A, VC7003A, VC7006A, VC7014A, or VC7022A; or •...
-
Page 74: Add A New Device
After you have purchased new Contact Sensor (VC7002A), Motion Sensor (VC7003A), Water Leakage Sensor (VC7006A), Extension Ringer (VC7014A), Audio Doorbell (VC7021A), and SOS pendant (VC7022A) to your CL6527A telephone system, you need to registered each of them to your telephone system before use. -
Page 75: Test Device Signal Strength
TEST DEVICE SIGNAL STRENGTH Before you mount any of your devices, follow the instructions below to check the signal strength between the device and the telephone base. Make sure you mount the device in a location where the signal strength is good. Press when the phone is not in use, and then press... -
Page 76: Sensor Operations
SENSOR OPERATIONS SENSOR MODE You can choose LOCAL mode to receive alerts at the telephone system, or REMOTE - CALL mode to receive calls at other numbers you have specified. This allows you to get notified even when you are away from home. The preset sensor mode is LOCAL. -
Page 77: Arm/Disarm The Sensor Alert System
ARM/DISARM THE SENSOR ALERT SYSTEM You can arm (turn on) or disarm (turn off) the sensor alerts system. Press when the phone is not in use, and then press to scroll to SENSOR MODE. Press and then press to scroll to ARM/DISARM. -
Page 78: Sensor Arm/Disarm Pin Protection
SENSOR ARM/DISARM PIN PROTECTION You can set whether you can to enter the PIN each time before you change the Arm/Disarm setting. The default PIN is 0000. To enable or disable Arm/Disarm PIN protection: Press when the phone is not in use, and then press to scroll to SENSOR MODE. -
Page 79: Specific Device Operations
SPECIFIC DEVICE OPERATIONS DOORBELL After you have registered an Audio Doorbell (VC7021A) to your CL6527A telephone base, you can follow the instructions below to configure your doorbell. The doorbell helps you get notified at your telephone system upon visitors’ arrival. When the doorbell is chimed, it sends an alert to your telephone. - Page 80 Chime Tone You can choose from different chime tones for the telephone base or handset. Press when the phone is not in use, and then press to scroll to SET DEVICE. Press to select DOORBELL. Press to choose CHIME. 4. Press and then press to scroll to CHIME TONE.
- Page 81 To turn on or off the auto call divert: Press when the phone is not in use, and then to scroll to SET DEVICE. press Press to select DOORBELL. to scroll to DBELL Press and then press DVRT. to scroll to AUTO 4.
-
Page 82: Extension Ringer
EXTENSION RINGER After you have registered an Extension Ringer (VC7014A) to your CL6527A telephone base, it allows to have an extra ringer and/or flashing lights in addition to your handset and base. You can follow the instructions below to turn on or off your of extension ringer at any time. -
Page 83: Device Monitoring
You can add new Contact Sensor (VC7002A), Motion Sensor (VC7003A), Water Leakage Sensor (VC7006A), Extension Ringer (VC7014A), Audio Doorbell (VC7021A), and SOS pendant (VC7022A) to your CL6527A telephone system (all purchased separately). Once there is at least one of these devices registered to the CL6527A telephone base, the DEVICE menu option will appear in the handset menu. -
Page 84: General Product Care
GENERAL PRODUCT CARE Taking care of your telephone Your cordless telephone contains sophisticated electronic parts, so it must be treated with care. Avoid rough treatment Place the handset down gently. Save the original packing materials to protect your telephone if you ever need to ship it. Avoid water Your telephone can be damaged if it gets wet. -
Page 85: Frequently Asked Questions
FREQUENTLY ASKED QUESTIONS Below are the questions most frequently asked about the cordless telephone. Problem Solutions My telephone • Make sure the batteries are installed and charged does not work correctly. For optimum daily performance, return the at all. handset to the telephone base after use. •... -
Page 86: Technical Specifications
TECHNICAL SPECIFICATIONS Frequency control Crystal controlled PLL synthesizer Transmit 1.88GHz to 1.9GHz frequency Channels Power Handset: 1.2V, 500mAh, 3 x AAA Ni-MH battery requirement Telephone base: 6V DC @ 800mA Memory Phonebook: 100 memory locations; up to 20 digits and 10 characters Caller ID log: 50 memory locations;... - Page 87 VTECH TELECOMMUNICATIONS LTD. A member of THE VTECH GROUP OF COMPANIES. © 2019 VTech Telecommunications Ltd. All Rights Reserved. V4.0. 05/19...
Need help?
Do you have a question about the CL6527A and is the answer not in the manual?
Questions and answers