Table of Contents
Advertisement
Advertisement
Table of Contents

Related Manuals for Digi AnywhereUSB Plus Series


Summary of Contents for Digi AnywhereUSB Plus Series
- Page 1 AnywhereUSB® Plus User Guide...
- Page 2 Information in this document is subject to change without notice and does not represent a commitment on the part of Digi International. Digi provides this document “as is,” without warranty of any kind, expressed or implied, including, but not limited to, the implied warranties of fitness or merchantability for a particular purpose.
-
Page 3: Table Of Contents
Contents AnywhereUSB® Plus User Guide User roles Terminology Get started Verify product components AnywhereUSB 2 Plus components AnywhereUSB 8 Plus components AnywhereUSB 24 Plus components Install the AnywhereUSB Manager Connect the hardware Verify initial connection Create groups and assign to client IDs Create groups and assign ports to the group Assign a group to a client ID Connect to a group or USB device in the AnywhereUSB Manager... - Page 4 Add a Hub to the known Hub list Remove a Hub from the known Hub list Minimize the AnywhereUSB Manager when launched Autofind Hubs when the AnywhereUSB Manager launches Specify search, response, and keepalive intervals for a Hub View latency graph View the AnywhereUSB Manager system messages View AnywhereUSB®...
- Page 5 Restore the configuration for a Hub Update the firmware Download the firmware to your computer Update the firmware on the Hub View system logs View system statistics Configure the time on the Hub Configure time server synchronization Set the server time manually Restore factory default settings from the web UI Reboot the Hub View Hub information in Remote Manager...
- Page 6 set usbgroup show Deployment Security Client ID Troubleshooting AnywhereUSB Manager client ID is not unique No remote Hubs found Hide a group in the AnywhereUSB Manager Invalid Hub certificate Services turned off and locked out of the Hub Microsoft Windows restrictions Hubs and virtual machines Hardware Use the Reset button to restore factory defaults Regulatory and safety information...
-
Page 7: Anywhereusb® Plus User Guide
AnywhereUSB® Plus User Guide AnywhereUSB® Plus is a Remote USB 3.1 Hub that implements USB over IP® technology over Gigabit Ethernet networks. The Hub enables communication with USB-enabled devices from virtualized systems and from remote host computers. You can securely deploy AnywhereUSB® Plus Remote USB 3.1 Hubs in non-secure environments, making it ideal for point-of-sale, kiosks, surveillance, industrial automation, or any mission-critical enterprise application. -
Page 8: Terminology
AnywhereUSB® Plus User Guide Terminology Terminology Role Description Computer The physical or virtual equipment (such as a PC, laptop, or virtual machine), which is used to remotely access the AnywhereUSB Plus Hub. Client ID The client ID is a unique identifier assigned to a user account the first time a user logs in to a computer and opens the AnywhereUSB Manager. -
Page 9: Get Started
Get started This section explains what comes with each AnywhereUSB® Plus model, how to install the necessary software, and how to connect the hardware. After you have verified the AnywhereUSB® Plus Hub components, the software installation, hardware connection, and initial connection process must be done individually for each computer. -
Page 10: Anywhereusb 2 Plus Components
Equipment Description AnywhereUSB 2-port device. Included equipment Required additional equipment STP Cat 7 Ethernet cable Power supply kit: Digi part number 76000965 Item Name Description Ethernet connector Connect the STP Cat 7 Ethernet cable. The USB port supports 1.1, 2.0, and 3.1 USB devices. -
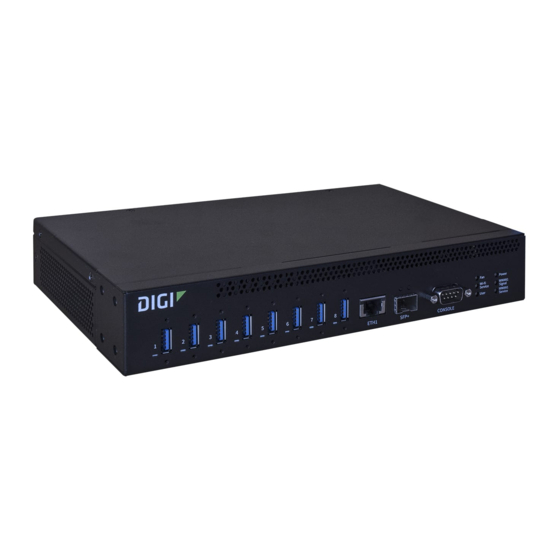
Page 11: Anywhereusb 8 Plus Components
Get started Verify product components AnywhereUSB 8 Plus components Verify that you have the following included, required, and optional equipment. Equipment Description Included equipment AnywhereUSB 8-port device Power supply Rack mounting brackets and screws Required additional equipment STP Cat 7 Ethernet cable IEC 60320 power cord Optional equipment SFP+ module... - Page 12 Connect a Cat 7 STP Ethernet cable. ETH1 Note Digi recommends that you use either the Ethernet cable or the SFP+ module. If both the Ethernet cable and the SFP+ module are connected, the SFP+ module will have priority. AnywhereUSB® Plus User Guide...
- Page 13 Get started Verify product components Item Name Description SFP+ Connect an SFP transceiver module for fiber connection, such as Finisar Network FTLX8574D3BCL SFP+. Used to access a console using the RS232 DTE interface. console The LED shows the status of the fan: Solid green when the fan is running within normal range of use.
-
Page 14: Anywhereusb 24 Plus Components
Get started Verify product components AnywhereUSB 24 Plus components Verify that you have the following included, required, and optional equipment. Equipment Description AnywhereUSB 24-port device Included equipment Required additional equipment STP Cat 7 Ethernet cable IEC 60320 power cord Optional equipment An additional STP Cat 7 Ethernet cable An additional IEC 60320 power cord SFP+ modules... - Page 15 ETH 1/2 optional and used for redundancy. Note Digi recommends that you use either the Ethernet cable or the SFP+ module. If both the Ethernet cable and the SFP+ module are connected, the SFP+ module will have priority. Connect an SFP transceiver module for fiber connection, such as SFP+ 1/2 Finisar Network FTLX8574D3BCL SFP+.
-
Page 16: Install The Anywhereusb Manager
Install the AnywhereUSB Manager The Anywhere USB Manager software must be downloaded from the Digi support site and installed on your computer. After the manager software installs, the AnywhereUSB Manager launches. The AnywhereUSB Manager automatically discovers AnywhereUSB® Plus Hubs on the local subnet. - Page 17 Get started Install the AnywhereUSB Manager 7. Click Next. The Ready to Install screen appears. 8. Click Install. A status bar shows the progress of the installation process. When complete, the Completed screen appears. 9. Select from the options on the screen: Launch AnywhereUSB Manager: Select this option to open the AnywhereUSB Manager when the installation completes.
-
Page 18: Connect The Hardware
Verify product components. WARNING! Digi recommends that you use a private network to connect the computer to the Hub, as described in this section. If you do not use a private network, and the same client ID is assigned to both a known and an unknown computer, there is a risk of misidentification. -
Page 19: Verify Initial Connection
Get started Verify initial connection It is recommended that you download a PDF copy of this manual to your computer. 1. Connect one end of a Shielded CAT 7 (STP) Ethernet cable to the Hub. 2. Connect the other end of the Ethernet cable to your computer. 3. - Page 20 Get started Verify initial connection 7. You will notice that the Manager is showing the Hub in an error state, with a red X appearing next to the Hub name. Click on the Hub to update information in the Hub Status pane. The Hub State appears as "Unregistered Client ID."...
- Page 21 Get started Verify initial connection 9. Open the AnywhereUSB Manager. The Manager connects to the Hub. 10. Expand the Hub to display the groups. 11. Expand Group 1 to display the USB flash drive connected to Group 1. 12. Right-click on Group 1 and select Connect to Group. The USB flash drive is available in Windows.
-
Page 22: Create Groups And Assign To Client Ids
Create groups and assign to client IDs For each Hub, the Hub administrator can assign a number of USB ports to a group. The Hub administrator can also assign groups to client IDs. Groups are created and assigned to client IDs in the AnywhereUSB page in the web UI. -
Page 23: Assign A Group To A Client Id
Create groups and assign to client IDs Assign a group to a client ID Assign a group to a client ID You can assign the groups to a client ID. When the client ID connects to the Hub, the computer can access all of the ports in the specified groups. - Page 24 Create groups and assign to client IDs Assign a group to a client ID AnywhereUSB® Plus User Guide...
-
Page 25: Connect To A Group Or Usb Device In The Anywhereusb Manager
Connect to a group or USB device in the AnywhereUSB Manager When you connect to a group, you are given exclusive access to all of the ports in the group to which you are allowed access. All other users are blocked from access to the ports in that group until you disconnect from the group. -
Page 26: Connect To A Usb Device
Connect to a group or USB device in the AnywhereUSB Manager Connect to a USB device 3. Expand a Hub to display the groups in the Hub. 4. Right-click on the group to which you want to connect. 5. Select Connect to Group. A note appears next to the group name, next to the devices in the group, and in the Group Status pane to show that the device is being used by you. - Page 27 Connect to a group or USB device in the AnywhereUSB Manager Connect to a USB device AnywhereUSB® Plus User Guide...
-
Page 28: Manage The Hubs Using The Anywhereusb Manager
Manage the Hubs using the AnywhereUSB Manager You can use the AnywhereUSB Manager to view the AnywhereUSB Plus Hubs that are allowed to connect to your computer. You can also connect to groups of USB ports on the Hubs. By default, the AnywhereUSB Manager is configured to automatically discover Hubs that are connected to the same network as your computer. -
Page 29: Start The Anywhereusb Manager
Start the AnywhereUSB Manager You can search for and launch the Anywhere USB Manager using the Windows application search feature or from the Digi International Start menu. If you selected the Run AnywhereUSB Manager at Startup option during the installation process, the tool launches automatically each time you log into your computer. -
Page 30: Assign A Local Name To A Group
Manage the Hubs using the AnywhereUSB Manager Disconnect from a group or USB device 4. Select the Assign Local Name menu option. A dialog appears. 5. In the field, enter a local name for the Hub. 6. Click OK. Assign a local name to a group You can give a group a descriptive local name. -
Page 31: Disconnect From A Group
Manage the Hubs using the AnywhereUSB Manager Configure auto connect Disconnect from a group You can disconnect from a group that has ports you no longer need access to. You are disconnected from all USB devices and ports in that group. Any other user can then connect to that group. Note If you have auto connect enabled for the group, you are not allowed to disconnect from the group. -
Page 32: Enable Auto Connect For A Group
Manage the Hubs using the AnywhereUSB Manager Manage the list of known Hubs For this to work as expected, you should also choose to automatically start the AnywhereUSB Manager each time you start your computer. For example, you can enable auto connect for a group that has a camera connected to a port in the group. -
Page 33: Add A Hub To The Known Hub List
Manage the Hubs using the AnywhereUSB Manager Minimize the AnywhereUSB Manager when launched Add a Hub to the known Hub list The Hubs you add to the known Hub list can be on the same network as your computer, or on a different network. -
Page 34: Autofind Hubs When The Anywhereusb Manager Launches
Manage the Hubs using the AnywhereUSB Manager Autofind Hubs when the AnywhereUSB Manager launches 4. Determine whether you want to automatically minimize the AnywhereUSB Manager when it launches. Select Start Manager minimized to automatically minimize the AnywhereUSB Manager when it launches. De-select Start Manager minimized to open the AnywhereUSB Manager when it launches. -
Page 35: View Latency Graph
Manage the Hubs using the AnywhereUSB Manager View latency graph View latency graph You can review the relative latency of all of the Hubs connected to the network. Open the AnywhereUSB Manager. 2. Select Help > Latency graph to display the latency graph. View the AnywhereUSB Manager system messages You can view the system message log of the AnywhereUSB Manager events. -
Page 36: Restore Anywhereusb Manager Default Configuration
Manage the Hubs using the AnywhereUSB Manager Restore AnywhereUSB Manager default configuration Restore AnywhereUSB Manager default configuration You can restore the AnywhereUSB Manager to the default settings. During this process, you have the option to keep your currently configured client ID and identity certificate during this process. See Client ID for more information about how the client ID is used by your computer and the Hub to create a connection. -
Page 37: Anywhereusb Manager Icons And Toolbar
Manage the Hubs using the AnywhereUSB Manager AnywhereUSB Manager window Information about the icons in the screen and the menu options can be found here: AnywhereUSB Manager icons and toolbar AnywhereUSB Manager menu options You can use the menus associated with the Hubs, groups, and USB devices to configure local names, preferences, and connections. -
Page 38: Anywhereusb Manager Menu Options
Manage the Hubs using the AnywhereUSB Manager AnywhereUSB Manager window Icon Location Description Yellow dot: The PC and Hub are attempting to connect. Red X: Connection between the Hub and the PC failed. The toolbar icons manage the AnywhereUSB Manager dialog. Icon Description Minimizes the AnywhereUSB Manager into the task bar and the notification area of... -
Page 39: Anywhereusb Manager Usb Device Menu Options
Manage the Hubs using the AnywhereUSB Manager AnywhereUSB Manager window Disable Auto Connect Assign Local Name AnywhereUSB Manager USB device menu options Right-click on a USB device name in the AnywhereUSB Manager to configure and connect to the USB device. Connect to Device Connect to Group Disconnect from Device Assign Local Name... -
Page 40: Anywhereusb Manager Group Status Pane
Manage the Hubs using the AnywhereUSB Manager AnywhereUSB Manager window Label Description Local Name A descriptive local name for the Hub. The local name also displays in the tree view in the left-hand pane in the AnywhereUSB Manager. The local name is local to the computer on which the AnywhereUSB Manager is running. -
Page 41: Anywhereusb Manager Device Status Pane
Manage the Hubs using the AnywhereUSB Manager AnywhereUSB Manager window Label Description Group No The group number from the Hub. Group Name The name of the group supplied by the Hub. By default, a group is named "Group" appended by a consecutive number, such as Group 1, Group 2, and so on. -
Page 42: Set Hub Preferences
Manage the Hubs using the AnywhereUSB Manager AnywhereUSB Manager window Label Description Local Name A descriptive local name for the USB device. The local name also displays in the tree view in the left-hand pane in the AnywhereUSB Manager. The local name is local to the computer on which the AnywhereUSB Manager is running. -
Page 43: Exit The Anywhereusb Manager
Manage the Hubs using the AnywhereUSB Manager Exit the AnywhereUSB Manager Advanced tab Specify search, response, and keepalive intervals for a Hub Exit the AnywhereUSB Manager You can log out of the AnywhereUSB Manager close the dialog. AnywhereUSB® Plus User Guide... - Page 44 Manage the Hubs using the AnywhereUSB Manager Exit the AnywhereUSB Manager Open the AnywhereUSB Manager. 2. Click File > Exit to disconnect all USB devices connected to your computer, close all connections, and close the AnywhereUSB Manager. 3. If you are connected to any USB devices, a confirmation dialog appears. 4.
- Page 45 Administrators: Configure the AnywhereUSB® Plus in the web user interface You can configure the AnywhereUSB® Plus Hub in the Configuration and Management web user interface. The web UI is available from a Hub listed in the AnywhereUSB Manager. You must install the AnywhereUSB Manager before you can use the web UI.
-
Page 46: Administrators: Configure The Anywhereusb® Plus In The Web User Interface
Administrators: Configure the AnywhereUSB® Plus in the web Open the Configuration and Management web user interface user interface Open the Configuration and Management web user interface You can open the Configuration and Management web user interface for a selected AnywhereUSB® Plus Hub. -
Page 47: Configure And Manage Client Ids
Administrators: Configure the AnywhereUSB® Plus in the web user interface Configure and manage client IDs Remote Manager Admin Password Management section Connections Administration section Backup/Restore Firmware Update Factory Default Settings System Log Find Me LED System Statistics Reboot Help Online Manual Configure and manage client IDs The client list for a Hub displays in the Client Settings section. -
Page 48: Configure A Client Id
Administrators: Configure the AnywhereUSB® Plus in the web user interface Configure and manage client IDs Configure a client ID You can assign a descriptive name to a client ID in the client list, and update the groups the computer is allowed to access. The computer can access all of the ports in the specified groups, as defined in the Group Settings section. -
Page 49: Manually Add A Client Id
ID will be rejected. For information about computers with the same client ID, see AnywhereUSB Manager client ID is not unique. WARNING! After you have manually added a client ID to the list, Digi recommends that you use a private network to connect the computer to the Hub and then to... - Page 50 Administrators: Configure the AnywhereUSB® Plus in the web user interface Configure and manage client IDs 4. Enter information about the client ID in the Settings for Client "New Client" section. a. In the Client ID field, enter the client ID for the computer. b.
-
Page 51: Remove A Client Id
Clients option is disabled by default, meaning that computers that have not previously connected to the Hub are rejected. Note Digi recommends keeping the Automatically Register Unknown Clients option disabled and to manually add client IDs on a secure network. -
Page 52: Automatically Register Unknown Clients
Administrators: Configure the AnywhereUSB® Plus in the web user Rename a Hub and the groups in a interface Note Digi recommends keeping the Automatically Register Unknown Clients option disabled and to manually add client IDs on a secure network. Open the web 2. -
Page 53: Rename The Hub
Administrators: Configure the AnywhereUSB® Plus in the web user interface View Hub system information Note Only administrators can rename the Hubs and the groups. Rename the Hub Rename a group Rename the Hub You can rename the AnywhereUSB® Plus Hub in the Ethernet Network Configuration page. By default, the Hub name is the serial number assigned to the Hub. -
Page 54: Configure The Ip Address On The Hub
Administrators: Configure the AnywhereUSB® Plus in the web user interface Configure the IP address on the Hub Configure the IP address on the Hub You can configure the IP address for the Hub in the Ethernet Network Configuration page. You can choose to enable the Hub to automatically obtain an IP address, or you can manually assign an IP address. -
Page 55: Ethernet Network Bonding
Administrators: Configure the AnywhereUSB® Plus in the web user interface Ethernet network bonding Ethernet network bonding For the AnywhereUSB 24 Plus Hub, you can specify the bonding mode for the Ethernet network. The Hub has two physical Ethernet network ports that use the same MAC address and share one IP address. -
Page 56: View Current Connections To The Hub
Administrators: Configure the AnywhereUSB® Plus in the web user interface View current connections to the Hub View current connections to the Hub You can view information about current connections to the Hub in the Connections Management page. Open the web 2. -
Page 57: Configure The Findme Feature
Enable AnywhereUSB: Allows remote access to USB devices connected to this server. The default TCP Port value is 18574. Enable Secure Shell Server (SSH): Allows users secure access to log in to the Digi device and access the command line interface. The default TCP Port value is 22. -
Page 58: Configure Device Identity Settings
Allow the Hub to connect to Remote Manager You can use Digi® Remote Manager to view your Hubs and manage the information sent from the Hub to Remote Manager. By default, the Hub is configured to connect to Remote Manager, and Remote Manager is configured to allow a connection with the Hubs. -
Page 59: Backup And Restore Settings
Administrators: Configure the AnywhereUSB® Plus in the web user interface Backup and restore settings Note You must have a Remote Manager account and add the Hub to Remote Manager to be able to view the Hub data in Remote Manager. For more information, see View Hub information in Remote Manager. -
Page 60: Back Up A Hub's Configuration
You must first get the current firmware file, and then you can upload it to the Hub. Download the firmware to your computer 1. Go to www.digi.com/support. 2. Scroll down to the Support Downloads section. 3. Click Firmware Updates. -
Page 61: Update The Firmware On The Hub
Administrators: Configure the AnywhereUSB® Plus in the web user interface View system logs Update the firmware on the Hub Open the web 2. Click Firmware Update from the Administration section. The Update Firmware page appears. 3. Click Choose File and browse for the firmware file. 4. -
Page 62: Configure The Time On The Hub
If you use this method, and the Hub has lost power (both external and internal), or if you reboot the Hub, you will need to manually reset the time. Note Digi recommends using NTP. See Configure time server synchronization. To manually set the time: Open the web 2. -
Page 63: Restore Factory Default Settings From The Web Ui
Administrators: Configure the AnywhereUSB® Plus in the web user Restore factory default settings from the interface web UI 6. Click Apply to apply and save the change. Restore factory default settings from the web UI You can use the Factory Default Settings operation from the web UI to reset the configuration of a Hub to the factory default settings. -
Page 64: Reboot The Hub
Administrators: Configure the AnywhereUSB® Plus in the web user interface Reboot the Hub 4. Determine whether you want to retain the current DHCP and manual configuration settings. IP configuration option: automatic (automatically obtain an IP address each time you power on the Hub) or static (manually assign an IP address). -
Page 65: View Hub Information In Remote Manager
Get started with Remote Manager. For more information about Remote Manager in general, see the Digi Remote Manager User Guide. Get started with Remote Manager Before you can access an AnywhereUSB® Plus Hub in Remote Manager, you must be able to access your account in Remote Manager, and then add the Hub to the list of devices that are monitored by Remote Manager. -
Page 66: View Identifying Information About The Hub On The Home Page
Schedule an action in the Digi Remote Manager User Guide for detailed information about the schedule options. View identifying information about the Hub on the Home page You can display information about the Hub in the Home page, such as the IP address, global address,... - Page 67 View Hub information in Remote Manager View Hub connection history 4. Click Properties in the toolbar. The Home page for the Hub appears. 5. Click Connection History in the left pane. The connection history for the Hub displays. AnywhereUSB® Plus User Guide...
-
Page 68: Configure From The Command Line
Configure from the command line This chapter explains how to configure the AnywhereUSB from the command line interface (CLI). Configuring an AnywhereUSB through the CLI consists of entering a series of commands to set values in the device. Access the command line interface backup display cloud display device... -
Page 69: Access The Command Line Interface
Configure from the command line Access the command line interface Access the command line interface To configure devices using the command line interface: 1. Do one of the following to connect the AnywhereUSB to a computer. Using a serial port on the AnywhereUSB 8 Plus or Anywhere USB 24 Plus only: Connect an RS-232 null modem cable between the Console port of the Hub and a PC or laptop serial port, allowing CLI access directly through a Terminal emulation program. -
Page 70: Syntax Conventions
Configure from the command line Access the command line interface Syntax Conventions Presentation of command syntax in this manual follows these conventions: Brackets [ ] surround optional material. Braces { } surround entries that require you to chose one of several options, which are separated by the vertical bar, |. - Page 71 Configure from the command line Purpose Displays options for the current line or command. Syntax #> ? Options None. Examples Display root commands #> ? backup display factory-default findme fwupdate exit help info newpass quit reboot revert show Display options for the set command #>...
-
Page 72: Backup
Configure from the command line backup backup Purpose Save any configuration changes you have made to a file, and then restore a configuration by applying the saved changes to any Hub. This can also be done from the web UI. See Backup and restore settings for more detailed information. -
Page 73: Display Cloud
Displays the status of the connection to Remote Manager. Syntax display cloud Examples #> display cloud Device Type : AnywhereUSB 2 Plus Device ID : 00000000-00000000-00409DFF-FF3C5C05 Status : Connected to 52.73.177.207:3199 from 10.10.12.14:48288 Server : remotemanager.digi.com Connection Type : Device-initiated Connection Method : TCP/SSL AnywhereUSB® Plus User Guide... -
Page 74: Display Device
Configure from the command line display device display device Purpose Displays general product information. This information can also be displayed in the web UI. For more information, see Configuration and Management web user interface. Syntax display device AnywhereUSB® Plus User Guide... -
Page 75: Display Route
Configure from the command line display route display route Purpose Displays Route Table entries. Syntax display route Examples #> display route Kernel IP routing table Destination Gateway Genmask Flags Metric Ref Use Iface 0.0.0.0 10.10.12.1 0.0.0.0 0 eth0 10.10.12.0 0.0.0.0 255.255.255.0 0 eth0 AnywhereUSB®... -
Page 76: Display Tcp
Configure from the command line display tcp display tcp Purpose Displays active TCP sessions and active TCP listeners. display tcp provides current TCP information. Syntax display tcp Examples #> display tcp Active Internet connections (only servers) Proto Recv-Q Send-Q Local Address Foreign Address State 0 0.0.0.0:18574 0.0.0.0:*... -
Page 77: Display Udp
Configure from the command line display udp display udp Purpose Displays current UDP listeners. display udp provides current UDP information. Syntax display udp Examples #> disp udp Active Internet connections (only servers) Proto Recv-Q Send-Q Local Address Foreign Address State 0 0.0.0.0:5353 0.0.0.0:* 0 127.0.0.1:323 0.0.0.0:*... -
Page 78: Display Versions
Configure from the command line display versions display versions Purpose Displays EOS firmware version information. Syntax display versions AnywhereUSB® Plus User Guide... -
Page 79: Exit
Configure from the command line exit exit Purpose Logs you out of the Hub. Syntax exit AnywhereUSB® Plus User Guide... -
Page 80: Factory-Default
Configure from the command line factory-default factory-default Purpose Restore the AnywhereUSB® Plus Hub to the factory default configuration. The restore process clears all current settings (including all previously stored client IDs and certificates), deletes all Hub and AnywhereUSB Manager keys, resets the password for the administrative user, and restores the settings to the factory defaults. -
Page 81: Findme
Configure from the command line findme findme Purpose Turns on/off an LED to aid in finding a specific Hub among a group of Hubs. AnywhereUSB 2 Plus: When enabled, the power LED blinks green, then orange. AnywereUSB 8 Plus and AnywhereUSB 24 Plus: When enabled, the user LED blinks green, then orange. -
Page 82: Fwupdate
Configure from the command line fwupdate fwupdate Purpose Updates the firmware on the Hub. The Hub reboots when the firmware update is complete. Syntax fwupdate [ host ]:[ filename ] A local file for [filename] may be selected by specifying "local" as the [host] value. The [host] is the literal "local"... -
Page 83: Help
Configure from the command line help help Purpose Displays the commands that are available and the options available for a specific command. Syntax help help [ command ] Example #> help backup display factory-default findme fwupdate exit help info newpass quit reboot revert... -
Page 84: Info Ethernet
Configure from the command line info ethernet info ethernet Purpose Displays Ethernet communications-related statistics. Statistics that display are gathered since the statistic tables were last cleared by rebooting the Hub, and include data, event, and error counts. These statistics are useful in understanding how the Hub is operating and can be helpful in finding problems. -
Page 85: Info Icmp
Configure from the command line info icmp info icmp Purpose Displays statistics related to Internet Control Message Protocol (ICMP) activity. Statistics that display are gathered since the statistic tables were last cleared by rebooting the Hub, and include data, event, and error counts. These statistics are useful in understanding how the Hub is operating and can be helpful in finding problems. -
Page 86: Info Ip
Configure from the command line info ip info ip Purpose Displays statistics relating to Internet Protocol (IP) activity. To reset the statistics, reboot the device. Syntax info ip Example #> info ip IP Statistics: Datagrams Received : 201797 Datagrams Sent : 54487 Header Errors Received Datagrams Forwarded Address Errors Received... -
Page 87: Info Tcp
Configure from the command line info tcp info tcp Purpose Displays statistics relating to Transmission Control Protocol (TCP) activity. Statistics displayed are those gathered since the statistic tables were last cleared by rebooting the Hub, and include data, event, and error counts. These statistics are useful in understanding how the Hub is operating and can be helpful in finding problems. -
Page 88: Info Udp
Configure from the command line info udp info udp Purpose Displays statistics for User Datagram Protocol (UDP) communications activity. To reset the statistics, reboot the device. Syntax info udp Example #> info udp UDP Statistics: Datagrams Received : 13877 Datagrams Sent : 2665 Receive Errors No Ports AnywhereUSB®... -
Page 89: Newpass
Configure from the command line newpass newpass Purpose Creates or changes administrator password for the Hub. You can also change the password in the web UI. See Change the Hub password. Syntax newpass You are asked for the current password, the new password, and then to repeat new password. Examples #>... -
Page 90: Quit
Configure from the command line quit quit Purpose Logs you out of the Hub. Syntax quit Example #> quit AnywhereUSB® Plus User Guide... -
Page 91: Reboot
Configure from the command line reboot reboot Purpose Reboots the Hub. Note You can also reboot the Hub from the web UI. See Reboot the Hub. Syntax reboot Wait approximately 15 seconds for the reboot to complete. When the reboot is complete, all the LEDs turn on and then turn off, leaving the power LEDs on. -
Page 92: Revert
Configure from the command line revert revert Purpose Sets a particular group of a Hubs settings to its default values. Only one settings-group keyword can be specified per revert command. That is, entering several keywords on a single command to revert multiple settings is not allowed. - Page 93 Configure from the command line revert usbgroup Reverts to the groups to the default group list. AnywhereUSB® Plus User Guide...
-
Page 94: Set Cloud
Configure from the command line set cloud set cloud Purpose Enables you to enable and configure the Hub's access to Remote Manager. Note This command performs the same functions as the options in the Remote Manager Configuration page in the web Syntax set cloud [ options ] Options server=[server address text]... -
Page 95: Set Host
Configure from the command line set host set host Purpose Configures a name for the Hub, also known as a host name, or displays the current host name for the Hub. Note The name can consist of the following characters: 0-9, A-Z, a-z, dash (-), or period (.). You cannot use spaces, underscores (_), comma (,), forward slash (/), back slash (\), or ampersand (&). -
Page 96: Set Network
Options interface specific options Set configuration options for network interfaces for the Digi device. globalsettings Global network settings include setting a gateway priority; that is, the default gateway is used to route IP packets to an outside network, unless controlled by another route, and the device’s use of Domain Name Server (DNS). - Page 97 Configure from the command line set network Examples Manually set the device IP address #> set network ip=10.0.0.1 gateway=255.255.255.0 submask=255.255.255.0 dhcp=off Enable DHCP #> set network dhcp=on AnywhereUSB® Plus User Guide...
-
Page 98: Set Service
Used to specify the index of the network service to which the rest of the command’s options apply. This range varies among Digi devices. Enter set service to display the index numbers for the network services on your Digi device. - Page 99 Secure Shell service. Allows users secure access to log in to the Digi device and access the command-line interface. AnywhereUSB MDNS The MDNS port is not configurable.
-
Page 100: Set System
Configure from the command line set system set system Purpose Configures and displays system-identifying information, such as a description of the device, its location, and a contact person. Syntax Change system-identifying information set system [description= string ] [location= string ] [contact= string ] Display system-identifying information set system... -
Page 101: Set Time
Sets the Coordinated Universal Time (UTC) and/or system time and date on a Digi device. All Digi devices maintain time and date as the UNIX epoch (00:00:00, January 1, 1970) plus device up- time. On devices with no real-time clock (RTC), date and time revert to the UNIX epoch on each reboot or power-cycle. - Page 102 Configure from the command line set time Set the date and time to 2:15 PM, April 3, 2008 #> set time time=14:15 date=04.03.08 AnywhereUSB® Plus User Guide...
-
Page 103: Set Usbclient
Configure from the command line set usbclient set usbclient Purpose Add a client ID to the client list. When a computer searches for Hubs, any computer with a client ID on the client list can connect to the Hub. You can also add client IDs in the web UI. See Manually add a client Automatically register or reject computers that have not previously connected to the Hub. - Page 104 Configure from the command line set usbclient Automatically register unknown clients set usbclient index=3 autoreg=on AnywhereUSB® Plus User Guide...
-
Page 105: Set Usbgroup
Configure from the command line set usbgroup set usbgroup Purpose Assign a name to each group and specify the ports in each group. When a client connects to a group the AnywhereUSB Manager, the user has access to all of the ports in the group. You can change the name for a group in the Group Description field. -
Page 106: Show
Configure from the command line show show Purpose Displays the current settings in a Hub. Syntax show [ options ] [ options Options [options] [options] Specifies which settings in the device to show, for example, show time. The following table shows the options can be specified. -
Page 107: Who
Configure from the command line Purpose Displays active connections to and from the Hub. Syntax Examples Display a list of all current connections #> who Local address Remote address Service --------------------- --------------------- -------------------- 10.10.12.14:18574 10.10.12.19:57536 AnywhereUSB 10.10.12.14:18574 10.10.12.16:37298 AnywhereUSB 10.10.12.14:18574 10.10.12.11:50217 AnywhereUSB 10.10.12.14:18574... -
Page 108: Deployment
Deployment This process describes how to re-deploy a Hub. Note If you want to deploy a new Hub, see started. 1. If you are re-deploying a Hub, remove the Hub from the network. 2. Make a connection between the Hub and each computer that should be allowed to connect to the Hub. -
Page 109: Client Id
Security Security-related features in AnywhereUSB® Plus include: Unique password for each Hub. See Change the Hub password. Configurable network service port numbers. Secure access and authentication to the web UI and CLI. One password, one permission level. Selectively enable and disable network services such as mDNS, HTTP/HTTPS, and SSH. Encrypted AnywhereUSB®... - Page 110 Security Client ID After the initial launch of the AnywhereUSB Manager, the next time the user logs in, the computer is able to connect to the Hubs that recognize that client ID. Multiple user accounts with the same client ID In some cases, multiple computers may inadvertently use the same client ID. When this occurs and computers with the same client ID attempt to connect with the same Hub, the first computer to associate itself with the Hub will be able to connect to the Hub.
-
Page 111: Troubleshooting
Troubleshooting The following information provides troubleshooting steps for the most common issues. To find information on other issues, visit our Knowledge Base at knowledge.digi.com. AnywhereUSB Manager client ID is not unique No remote Hubs found Hide a group in the AnywhereUSB Manager... -
Page 112: Anywhereusb Manager Client Id Is Not Unique
Troubleshooting AnywhereUSB Manager client ID is not unique AnywhereUSB Manager client ID is not unique When you install the AnywhereUSB Manager, you must assign a client ID to your computer, which must be unique. Note Client ID for more information about how the client ID is used by your computer and the Hub to create a connection. -
Page 113: Invalid Hub Certificate
Troubleshooting Invalid Hub certificate 4. Reassign each port in the group to a different group, or to the Unassigned row. 5. When done, click Apply to save the changes. 6. Return to the AnywhereUSB Manager. The group no longer appears. Invalid Hub certificate In some situations, the Hub certificate may become invalid. -
Page 114: Microsoft Windows Restrictions
Troubleshooting Microsoft Windows restrictions Microsoft Windows restrictions Microsoft Remote Desktop Some devices (such as a web camera), and some input devices (such as a USB keyboard or a mouse), are blocked and may not display when Microsoft Remote Desktop is connected to a laptop or a virtual machine. -
Page 115: Hardware
Hardware The physical dimensions, environmental, and power requirements of the AnywhereUSB® Plus Hub can be found in the appropriate datasheets. Use the Reset button to restore factory defaults Note Using the reset button is the most extreme factory reset option. If the AnywhereUSB®... -
Page 116: Regulatory And Safety Information
Regulatory and safety information Safety warnings Review the following safety warnings for AnywhereUSB® Plus Hub. WARNING! Notice the following safety warnings: Risk of explosion if battery is replaced by incorrect battery type. Dispose of used batteries according to the instructions. This equipment is not suitable for use in locations where children are likely to be present. - Page 117 Regulatory and safety information Safety warnings AVERTISSEMENT! Notice the following safety warnings: Risque d'explosion si la batterie est remplacée par un type de pile incorrect. Jeter les piles usées selon les instructions. Cet équipement ne convient pas pour une utilisation dans des endroits où des enfants sont susceptibles d'être présents.
Need help?
Do you have a question about the AnywhereUSB Plus Series and is the answer not in the manual?
Questions and answers