Table of Contents
Advertisement
Available languages
Available languages
Quick Links
Advertisement
Table of Contents

Related Manuals for KTM Power Parts 76012935044


Summary of Contents for KTM Power Parts 76012935044
- Page 1 Information Power Parts 76012935044 11. 2011 3.211.770 *3211770* www.ktm.com...
- Page 2 Todos nuestros productos han sido desarrollados y producidos según los estándares más altos utilizando los mejores materiales disponibles. Las KTM Power Parts están probadas en competencia y garantizan un óptimo rendimiento. NO SE PUEDE HACER RESPONSABLE A LA KTM POR UN MONTAJE O UN USO INCORRECTO DE ESTE PRODUCTO.
-
Page 3: Montage
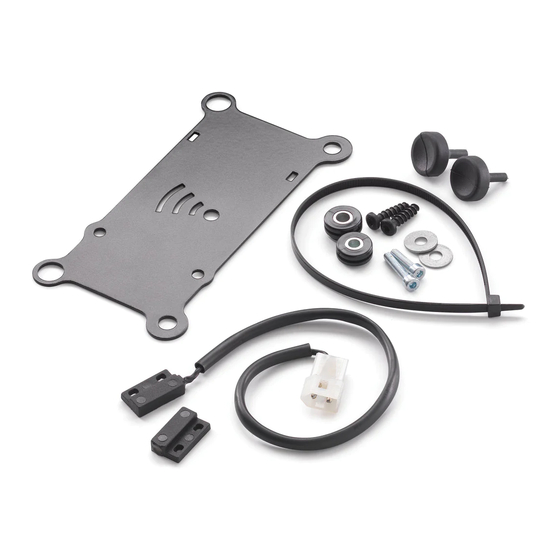
Lieferumfang 2x Distanzgummi 18x8 (1) 69007040030 1x Halteblech Alarmanlage (2) 76012935020 1x Kabeltülle (3) 60012035160 2x Büchse (4) 62512035070 2x U-Scheibe DIN 9021 A 5,3 (5) 0021050003 2x LI.Blechschraube K 50x18 (6) 0081050181 1x Kabelbinder (7) 44011076305 2x Zylinderschraube M4x20 (8) 0912040203 1x Reedschalter (9) 60012035185... - Page 4 Befestigung Reedschalter 20mm - Vor dem Aufkleben des Reedschalters darauf achten, dass die Klebestelle sauber und entfettet ist. - Reedschalter (9a) am Rahmenheck wie gezeigt anlegen und aufkleben Abstand: 20mm (Bild A). - Reedschalter am Kabelstrang (11) anschließen. - Kabel des Reedschalters unter dem Sitzbankschloss in der Kabelführung verlegen (Bild A).
- Page 5 Scope of delivery 2x rubber spacers 18x8 (1) 69007040030 1x retaining bracket for alarm system (2) 76012935020 1x cable sleeve (3) 60012035160 2x bushes (4) 62512035070 2x washers DIN 9021 A 5.3(5) 0021050003 2x oval head tapping screws K 50x18 (6) 0081050181 1x cable tie (7) 44011076305...
-
Page 6: Final Steps
Attaching the reed switch 20mm - Before bonding the reed switch, ensure that the adhesive surface is clean and degreased. - Position and bond the reed switch (9a) on the rear frame as shown. Distance: 20 mm (Figure A). - Connect the reed switch to the wiring harness (11). - Route the reed switch cable in the cable guide under the seat lock (Figure Properly route all cables and secure them with cable ties. - Page 7 Volume della fornitura N. 2 gommini distanziali 18x8 (1) 69007040030 N. 1 piastrina impianto d'allarme (2) 76012935020 N. 1 passacavo (3) 60012035160 N. 2 bussole (4) 62512035070 N. 2 rondelle a U DIN 9021 A 5,3 (5) 0021050003 N. 2 viti autofilettanti con testa cilindrica K 50x18 (6) 0081050181 N.
- Page 8 Fissaggio del contatto Reed - Prima di incollare il contatto Reed, assicurarsi che la parte da incollare 20mm sia pulita e sgrassata. - Applicare il contatto Reed (9a) sul telaietto posteriore (come mostrato) e incollarlo. Distanza: 20 mm (figura A). - Collegare il contatto Reed al cablaggio (11).
- Page 9 Etendue de la livraison : 2x Caoutchouc d'écartement 18x8 (1) 69007040030 1x Tôle de fixation de l'alarme (2) 76012935020 1x Cache-câble (3) 60012035160 2x Bague (4) 62512035070 2x Rondelle en U DIN 9021 A 5,3 (5) 0021050003 2x Vis à tôle LI K 50x18 (6) 0081050181 1x Serre-câble (7) 44011076305...
-
Page 10: Montage Final
Fixation du contacteur Reed - Avant de coller le contacteur Reed, veiller à ce que la surface à encoller 20mm soit bien propre et dégraissée. - Placer et coller le contacteur Reed (9a) à l'arrière du cadre comme illus- tré. Distance : 20mm (figure A). -
Page 11: Montaje
Extensión de suministro 2x gomas separadoras 18x8 (1) 69007040030 1x chapa de sujeción del equipo de alarma (2) 76012935020 1x manguito para cables (3) 60012035160 2x casquillos (4) 62512035070 2x arandelas en U DIN 9021 A 5,3 (5) 0021050003 2x tornillos roscachapa K 50x18 (6) 0081050181 1x cinta sujetacables (7) 44011076305... -
Page 12: Montaje Final
Fijación del interruptor de lengüeta - Antes de pegar el interruptor de lengüeta, comprobar que el lugar donde 20mm se va a pegar esté limpio y desengrasado. - Colocar el interruptor de lengüeta (9a) en el subchasis tal como se mues- tra en la ilustración y pegarlo Distancia: 20 mm (figura A).
Need help?
Do you have a question about the 76012935044 and is the answer not in the manual?
Questions and answers